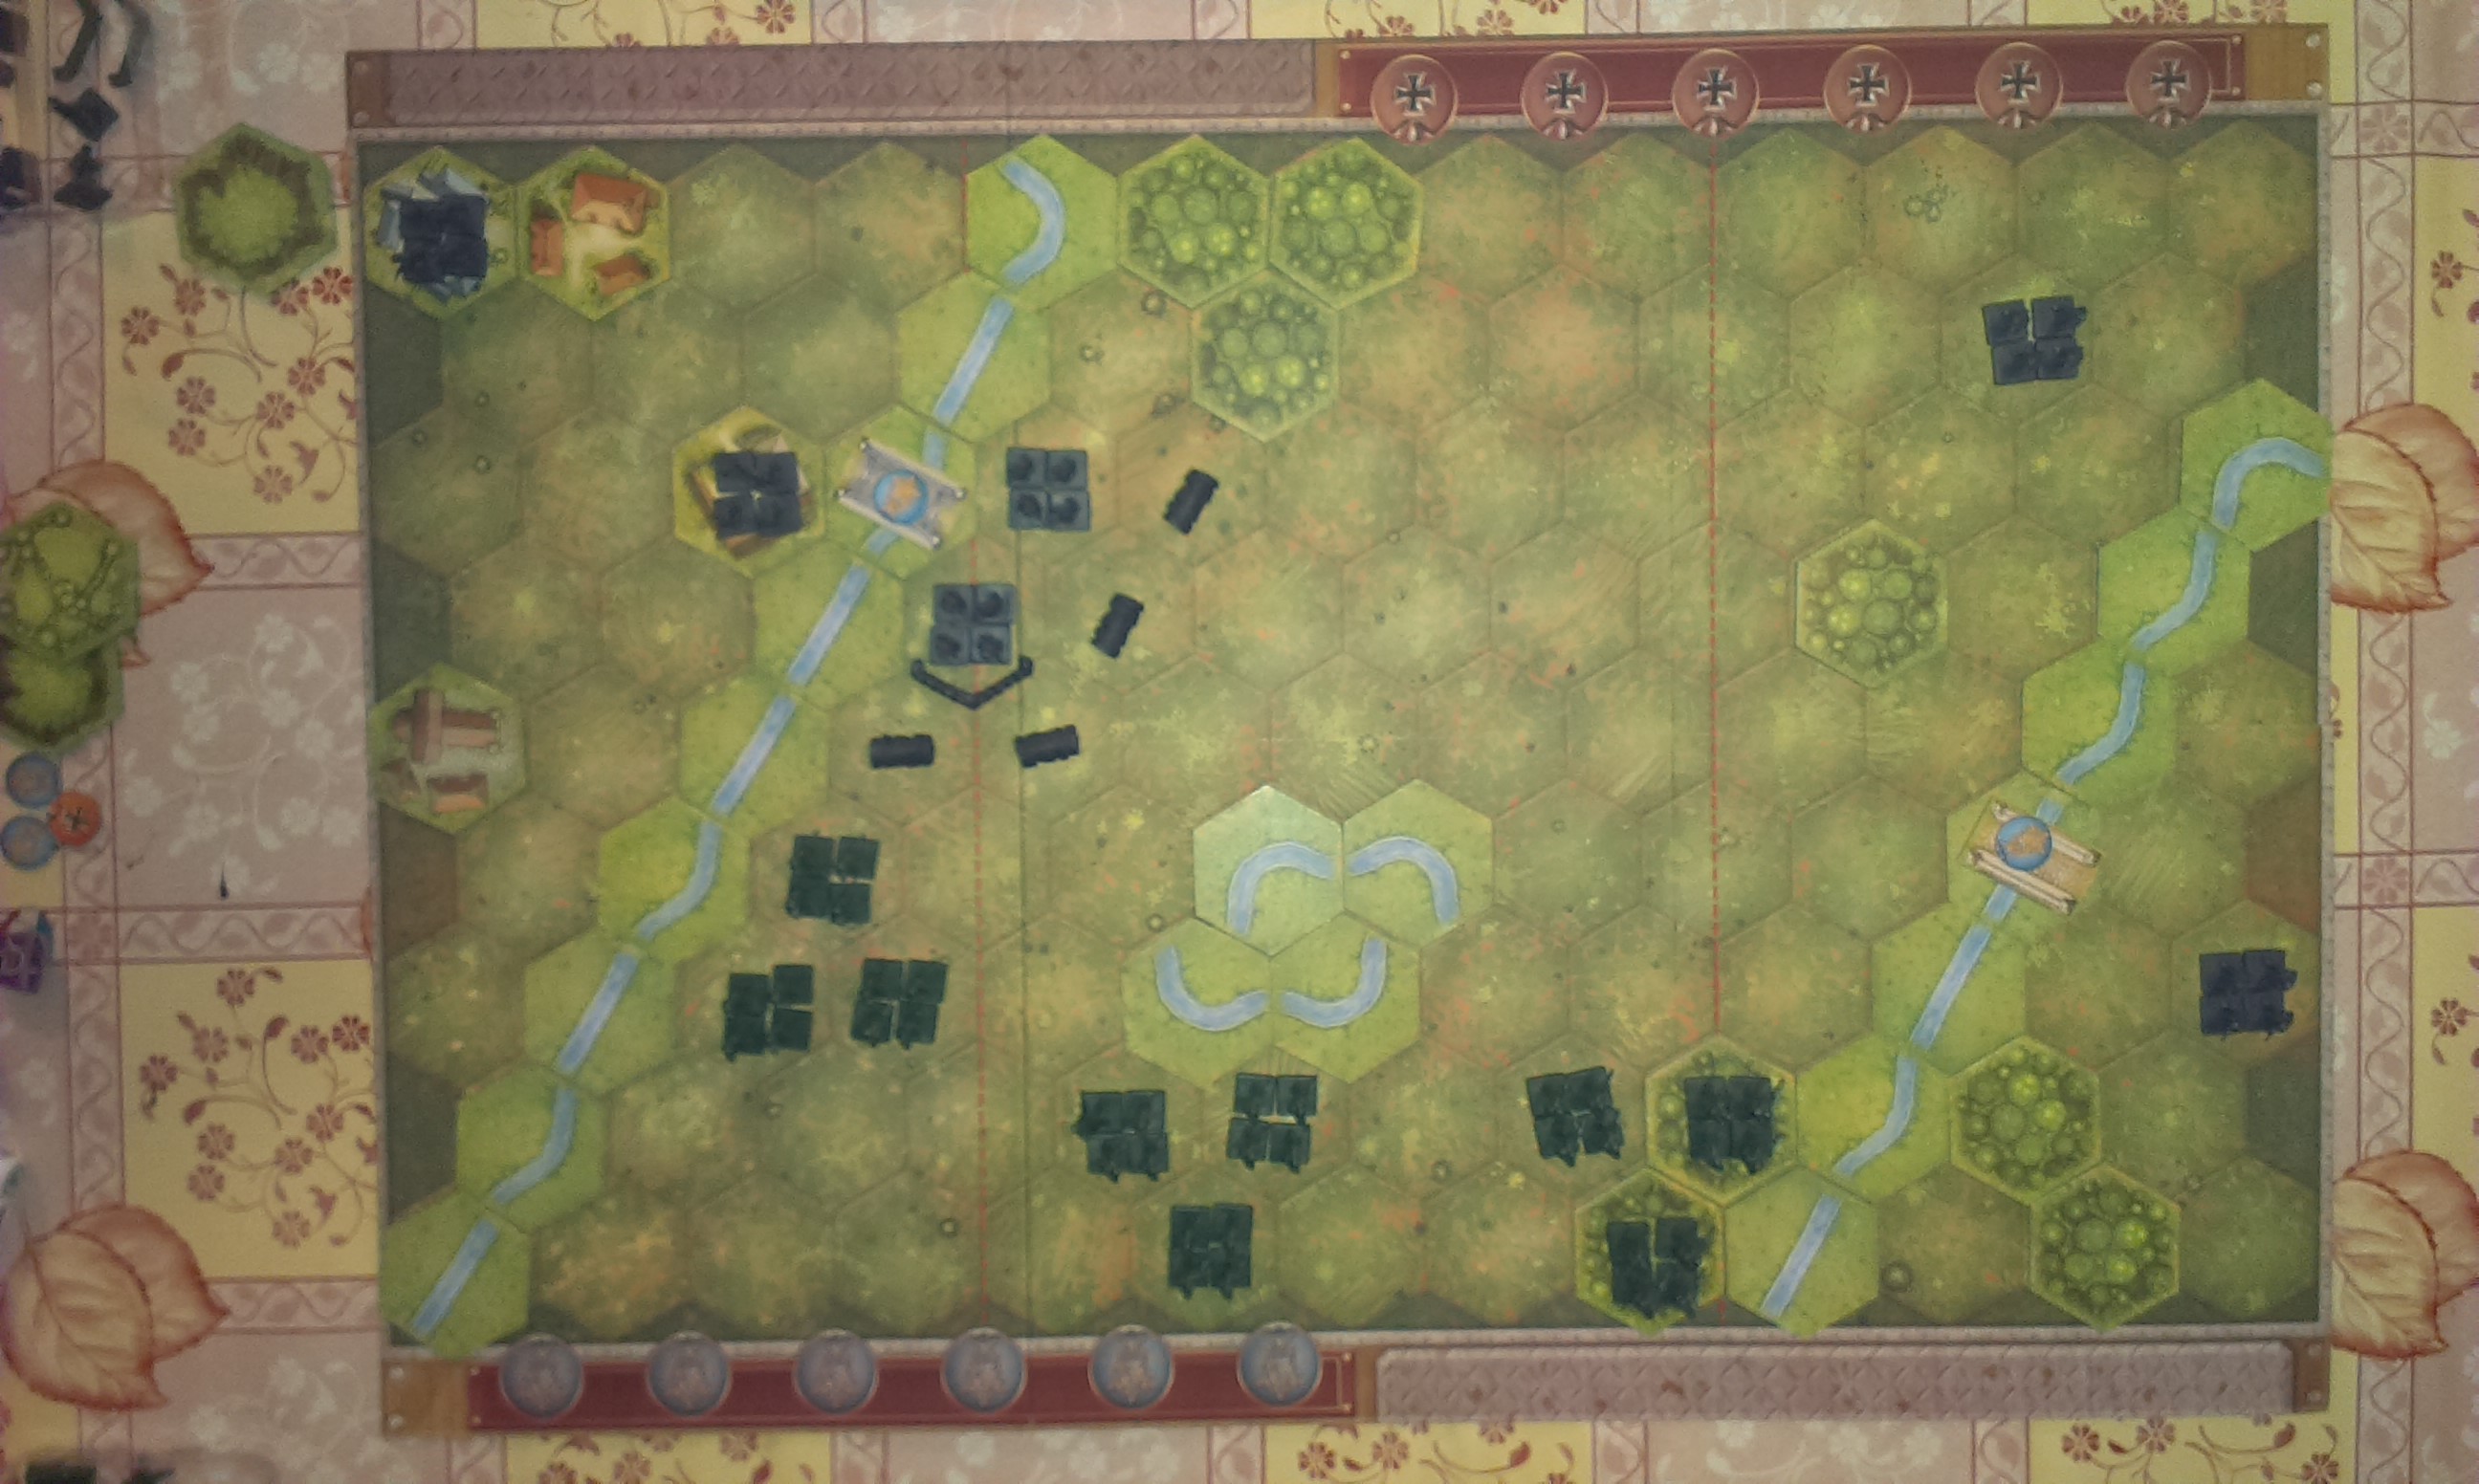
The rules of the game tell us a brief history of this battle; June 6th, 1944.
It was felt by the Allies that the position the Germans held on top of the cliffs at Pointe-Du-Hoc was too strong. They had guns with them that could, from the top of the 100 foot cliff, accurately hit anything attempting to land on the beach.
The Second Rangers (an American unit formed specifically for this mission), under the command of Colonel James E. Rudder were assigned to stop them. After a difficult landing, under heavy fire from the Germans they managed to reach the top of cliffs. Here they found that the guns had been withdrawn from their stations several days beforehand and only dummies left in their casements. One Ranger patrol went south searching for the missing guns.
Two concentrations of Germans had remained; one in the south-west antiaircraft bunker, the other in the observation bunker. Despite repeated attacks these resisted and were the most dangerous of the German forces in the area.
The single Ranger unit finally found the guns sitting quietly, unguarded, in an apple orchard inland. They placed incendiary devices inside them and completed their mission.
Pointe-Du-Hoc
The Steup.
Strategy:
Allies:
Landing on the beach puts you at a fairly strong disadvantage to the Axis player; you’re in the sea, which gives you movement restrictions, and retreat penalties, but you get six command cards and you move first, so it’s not all bad.
You have to factor in that you cannot scale the cliffs in one move, the special rules for this scenario state that you must use two moves, to scale a cliff from the beach side.
However, your units are Rangers, so they can all move two hexes and still battle, which is a big advantage, and makes life much harder for the Germans.
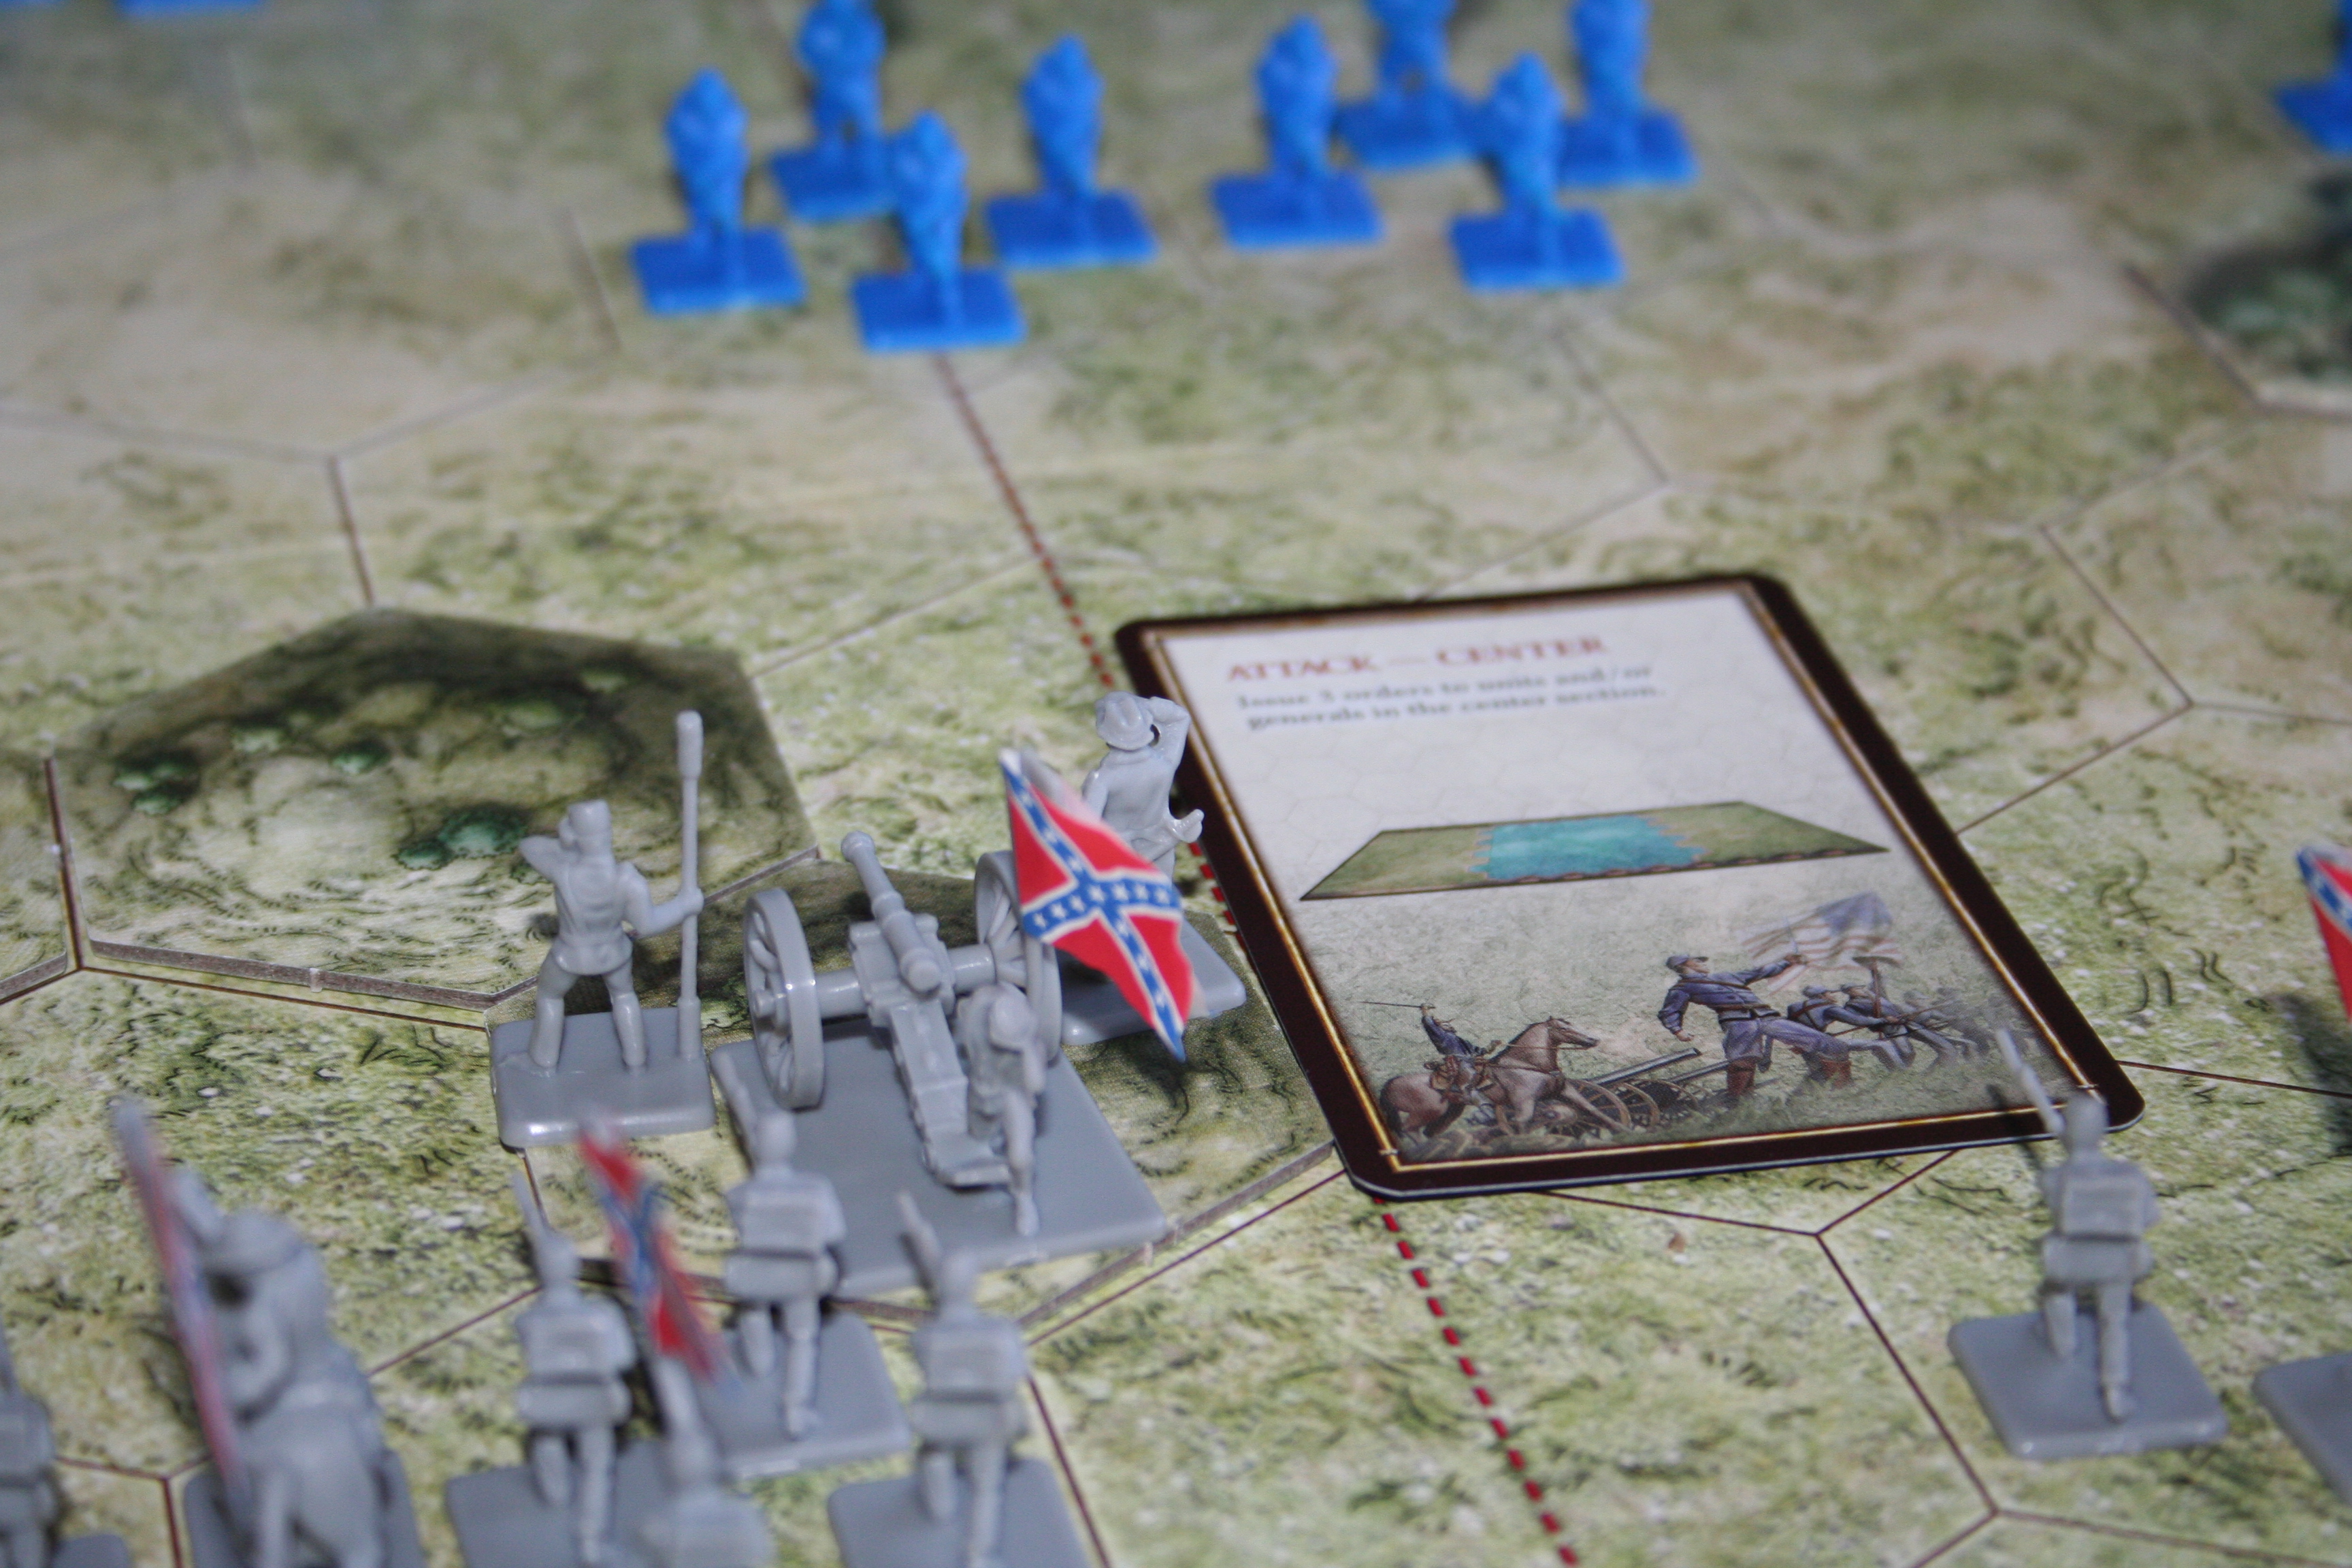
The victory condition is four medals; we found that the most promising way to achieve this was to storm straight up the middle and try and take out the units in the sandbags, plus the left-hand one in the bunker. Then capture medals at the back to win. You should also try and do this as quickly as possible.
In this scenario I would say that keeping your units pretty close together was probably a better bet than spreading them thin, simply because the victory condition in not so high as in other scenarios, and it’s easier to outgun a unit if you’ve several of your units attacking them.
Axis:
You get the fun of defending in this one. Dave and I did have a bit of a debate about whether or not it was more advantageous to stay in the bunkers and let the Allied player come to you, or to go out and meet them. We played it both ways.
You’ve got a bit of an interesting set up, on the top of the cliff. You’re position is very good defensively, but a little annoying until the Allied player has moved a fair few of their units.
You’ll probably find that although you can attack maybe on or two of their units, you can probably only do so with one battle die, which is an incredibly tedious (although completely acceptable, and sometimes necessary) way of destroying a unit
My main comment for this one is to not (if possible) let your enemy destroy your artillery. Because of its range this unit is incredibly useful, but annoyingly, also fairly easy to obliterate if an enemy unit gets close enough. PROTECT IT. That’s what your unit in the bunker on the point is for – to stop anything getting to your artillery.
General strategy point: be aware of the spread of your units in relation to your command cards. It’s very unwise to bunch all your units in one section of the board, as there may come a time when you have no command cards relevant to that section, which renders your turn useless and gives your opponent the upper hand.
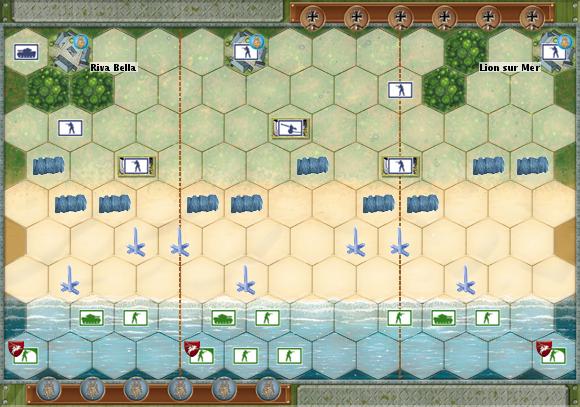
Morning. June 6th. 1944. The 8th Brigade Group of the 3rd British Division, supported by Commandos of the 1st Special Service Brigade and the Sherman tanks of the 13th and 18th Hussars make up the first wave of Allied forces to land on “Sword” beach, near the mouth of the Orne River.
The objective of the day was for the Allied forces to retake the city of Caen, and although the French troops captured the Casino at River Bella, the Allies failed in this objective. The sea was difficult that day, the tanks were supposed to land first and engage the enemy before the infantry landed, however, tanks and infantry ended up landing together. This coupled with the German resistance meant that the inland advance was seriously delayed. The failure to retake Caen was one of the biggest set-backs of D-Day and the consequences were still felt well into July of that year.
Strategy and Tactics:
Axis:
You have a defensive advantage in this scenario. Not only are the Allied forces advancing from the sea, which initially gives them a terrain disadvantage, but some of your forces are also already holed up in bunkers. Bunkers are useful as they give a -2 to tanks and a -1 to infantry when being attacked. You also possess the only artillery unit in this scenario. This is, if you manage to prevent its destruction, probably your most useful unit, as it has the longest attack range.
Despite these advantages you also have fewer troops than your opponent, and your only tank unit starts in a useless position, from which you have to order it twice to get it within attacking range of the Allied forces. You also have one less command card, and move second.
Okay, so that aside, tactically we found that arranging your troops towards the back of the board and then waiting for the Allied forces to come to you was a fairly sound way of playing the scenario. Though it’s definitely worth dragging your tank unit out of the corner early on. I would also generally say that it’s worth keeping the units that are already in the bunkers in them, unless for some dire reason you have to retreat or lose that unit.
Because wood hexes provide a -1 for attacking a unit in the woods it’s also worth trying to position your in Lion Sur Mer in the most forward of the two woods hexes next to it, this moves you closer to the fighting action whilst giving the unit a decent terrain advantage and enabling it to be close enough to try and prevent Allied forces taking the town and claiming the medal there, that contributes to their victory points.
Other than that, I would say, try not to let yourself get surrounded by the Allies, because they’ve got a lot more firepower than you, and also, if possible, knock out their tank units first, as these move further and have a fighting advantage over infantry units as well as needing less hits to destroy a unit.
Allied:
Although you start in the sea, you have an advantage in number units and number of command cards, as well as being the side that starts the scenario. Not only do you have three tank units to the one that your opponent possesses you also have three special forces units available to you, these are able to move up to two hexes and still battle, where regular infantry can either move one and battle, or two and do nothing.
Your first task is to get your units out of the sea, this is slow going because of the terrain restrictions that the sea imposes, but we found that it was tempting just to move either one block of your units out, maybe just from, say, the left flank, or to maybe move one unit from each section of the board, depending on your command cards. This is however, not a good idea. If you move one unit from each section too far from its comrades you make it an easy target, remember that you’re at a disadvantage with the bunkers, not to mention the hedgehogs and barbed wire that’s between you and the Axis forces. And if you only move one block and ignore the others you also make those units targets because if they’re in the sea and they get attacked a retreat roll on the battle dice counts as a hit because you cannot retreat and so must sacrifice one member of your unit for every retreat rolled.
If you start out with any command cards that enable you to annihilate your opponents artillery unit this is a big score early in the game, it levels the playing field a lot. Not only does it have only two pieces to a unit, making it the easiest to destroy in terms of dice rolls needed, but it also makes it much harder for the Axis player to just sit and wait for you, as they can no longer pick off your units from such a distance.
Surrounding bunkers is a good way of destroying a unit completely, if you attack a bunker with three units instead of just one, you’re less effected by the defensive advantage they give to the Axis player.
Lastly, don’t forget about the medals in the three towns at the back of the board. Each one of these counts for one of the five victory points you need to win the scenario if you capture, and hold, the town. They’re worth going after because they mean you need to physically destroy less enemy units.
To Conclude:
I really enjoyed this scenario from both sides. As you can see from the running score we’re keeping – I lost. But it was fairly close both ways round. It was more a lack of useful command cards than any tactical errors made. This scenario is also great because you get artillery and special forces units in play, as well as bunkers, hedgehogs and barbed wire, which adjust the way you have to think about moving around the board. This is great because by this point you’re familiar with the infantry and tank units, and then the game gives you something new to play with. It also starts to pick up the pace of play. Dave mentioned in his last post that he thought it felt a little slow, I agree with him, but I think that this scenario really cranks the game up a bit, making it much more interesting.
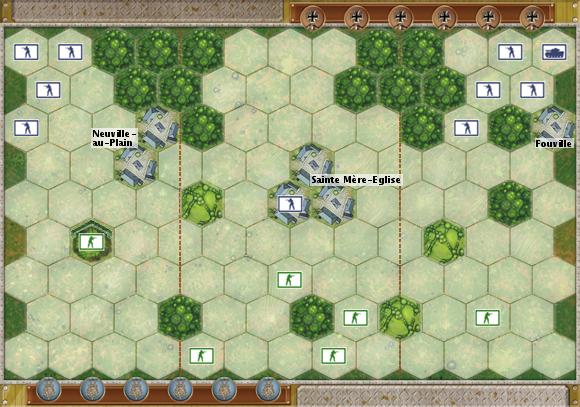
Set in 1944 on the 6th of June this scenario aims to replicate the D-day battle of Sainte-Mère-Eglise. Sainte-Mère-Eglise is a town in Normandy, north-west France. The town is used as the central setting for the board, as can be seen in the layout diagram below. The fight began with Allied paratroopers landing at 0140; this is simulated by the dropping of four units of Allied men onto the board from a height of around 12 inches. If they land on a empty hexagon they become a full unit, however, if they land on a German unit, or off the board, they are considered a failed drop. Many drops failed that night as buildings in the town were on fire. This lit up the sky making the paratroopers easy targets. There were also incidents like that of John Steele who’s parachute got caught on the church tower and he could only observe the battle and there were others who got caught in trees.
The set up.
At around 0500 the town was taken by the 505th parachute infantry regiment, it was then heavily counter attacked by the Germans, but the infantry held until they were reinforced from Utah Beach in the afternoon of June 7th.
Historically speaking this was an Allied victory, however, the success of your parachute drop at the start strongly influences your chances of success or failure.
Strategy and Tactics:
Allied:
The first thing to focus on when playing as the Allies is your parachute drop. You get four units that you have to drop from 12 inches above the board, if they land on an occupied space or off the board they are taken out of play, so you want as many of them to land safely as possible, so drop with care. Additionally, depending on where they land this effects what you do next.
As the Allied player it makes sense to take the Axis unit that holds the town in the center first; depending on your command cards and on your parachute drop this can be quite easy as this unit is cut off from the rest of the Axis forces. Then holding the town and waiting for the Axis player to come to you is a fairly sound strategy as you then have the added bonus of the protection of the town at -1 against infantry and -2 against tanks for dice roll because of obscured line of sight.
What I found while playing is that while the hill on the left side of the board looks like a good position, if you don’t reinforce it you may as well pull out because with the right command cards and a couple of moves that unit will be eliminated with ease.
I also found that the single unit on the right is easily forgotten about by both sides, if it’s left by itself, as, if you’ve enforced the town in the center, the Axis player will move their right had units in towards the center in an attempt to take the town. So to move this unit into the cover of a hedgerow makes sense and, if possible, to reinforce it, depending on where your parachute men dropped.
Axis:
The Axis players are not so lucky as to have anything as fun and useful as the parachute drop, they do have one unit of tanks, but they also get one less command card. Assessment of where the parachute men fell is essential for the Axis player; the thing to keep in mind is that the win criteria is four medals (four completely destroyed enemy units). So seeing where their weakest units are and destroying them speedily makes good sense.
I found that the unit on the left up the hill was most often left by itself so that was a good place to start, even with the -1 for shooting up a hill. Additionally withdrawing your unit from the town in the center to prevent its quick destruction was also a good idea.
If the Allied player were to fill the town in the center it is highly possible to lose more men than it’s worth trying to retake the town; however they cannot hide all of their men in the town and will undoubtedly have some out in the open, here getting your tanks into play and focused on units not in cover is a good move, but to fire tanks into a town is close to a waste of a move as they fire at -2.
Both Sides:
Remember to try to keep units in all sections of the board as it will always be the section of the board you have no units in that you have all the command cards for!
To Conclude:
This is a good scenario with a lot of replay value due to the parachute drop creating a slightly different set up every time. Also being only the second scenario in the rule book it gives a small, basic introduction to tanks with one tank unit in play. It also introduces you to hedgerows and hills and is a well-paced second scenario for people still learning the game.
However it lacks the fun of some of the later scenarios due to its relative simplicity and lack of lots of heavy weaponry!
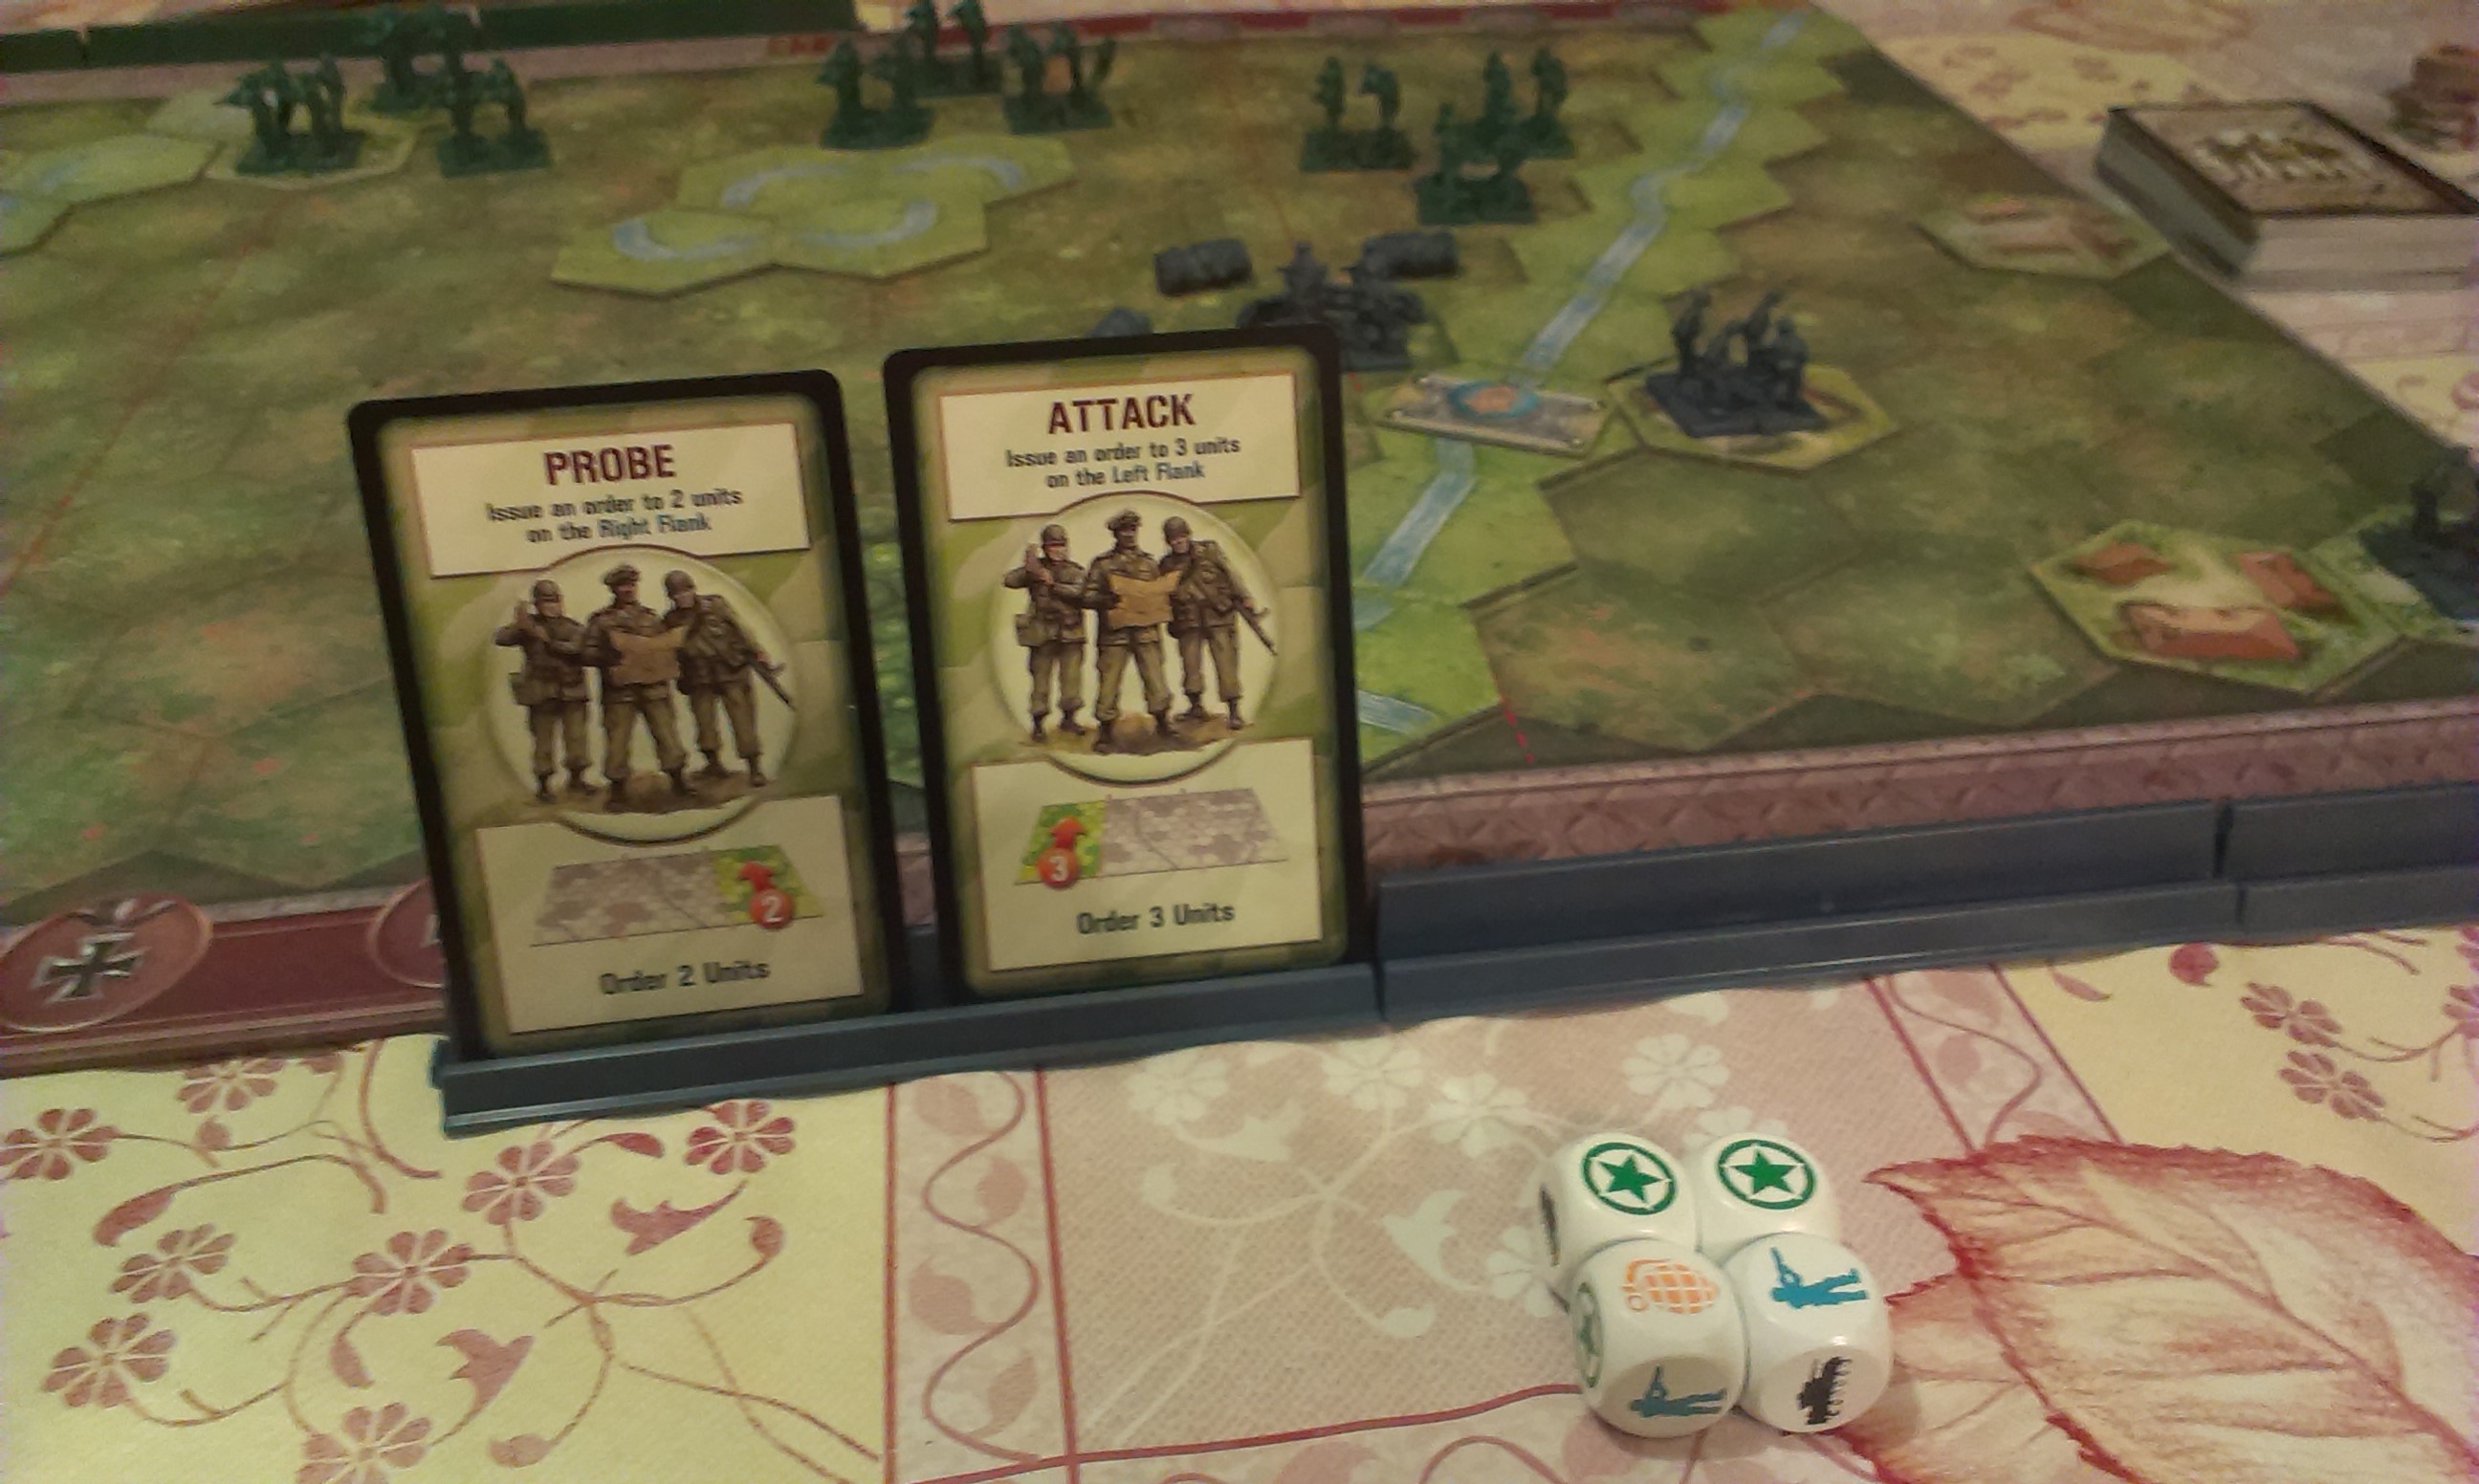
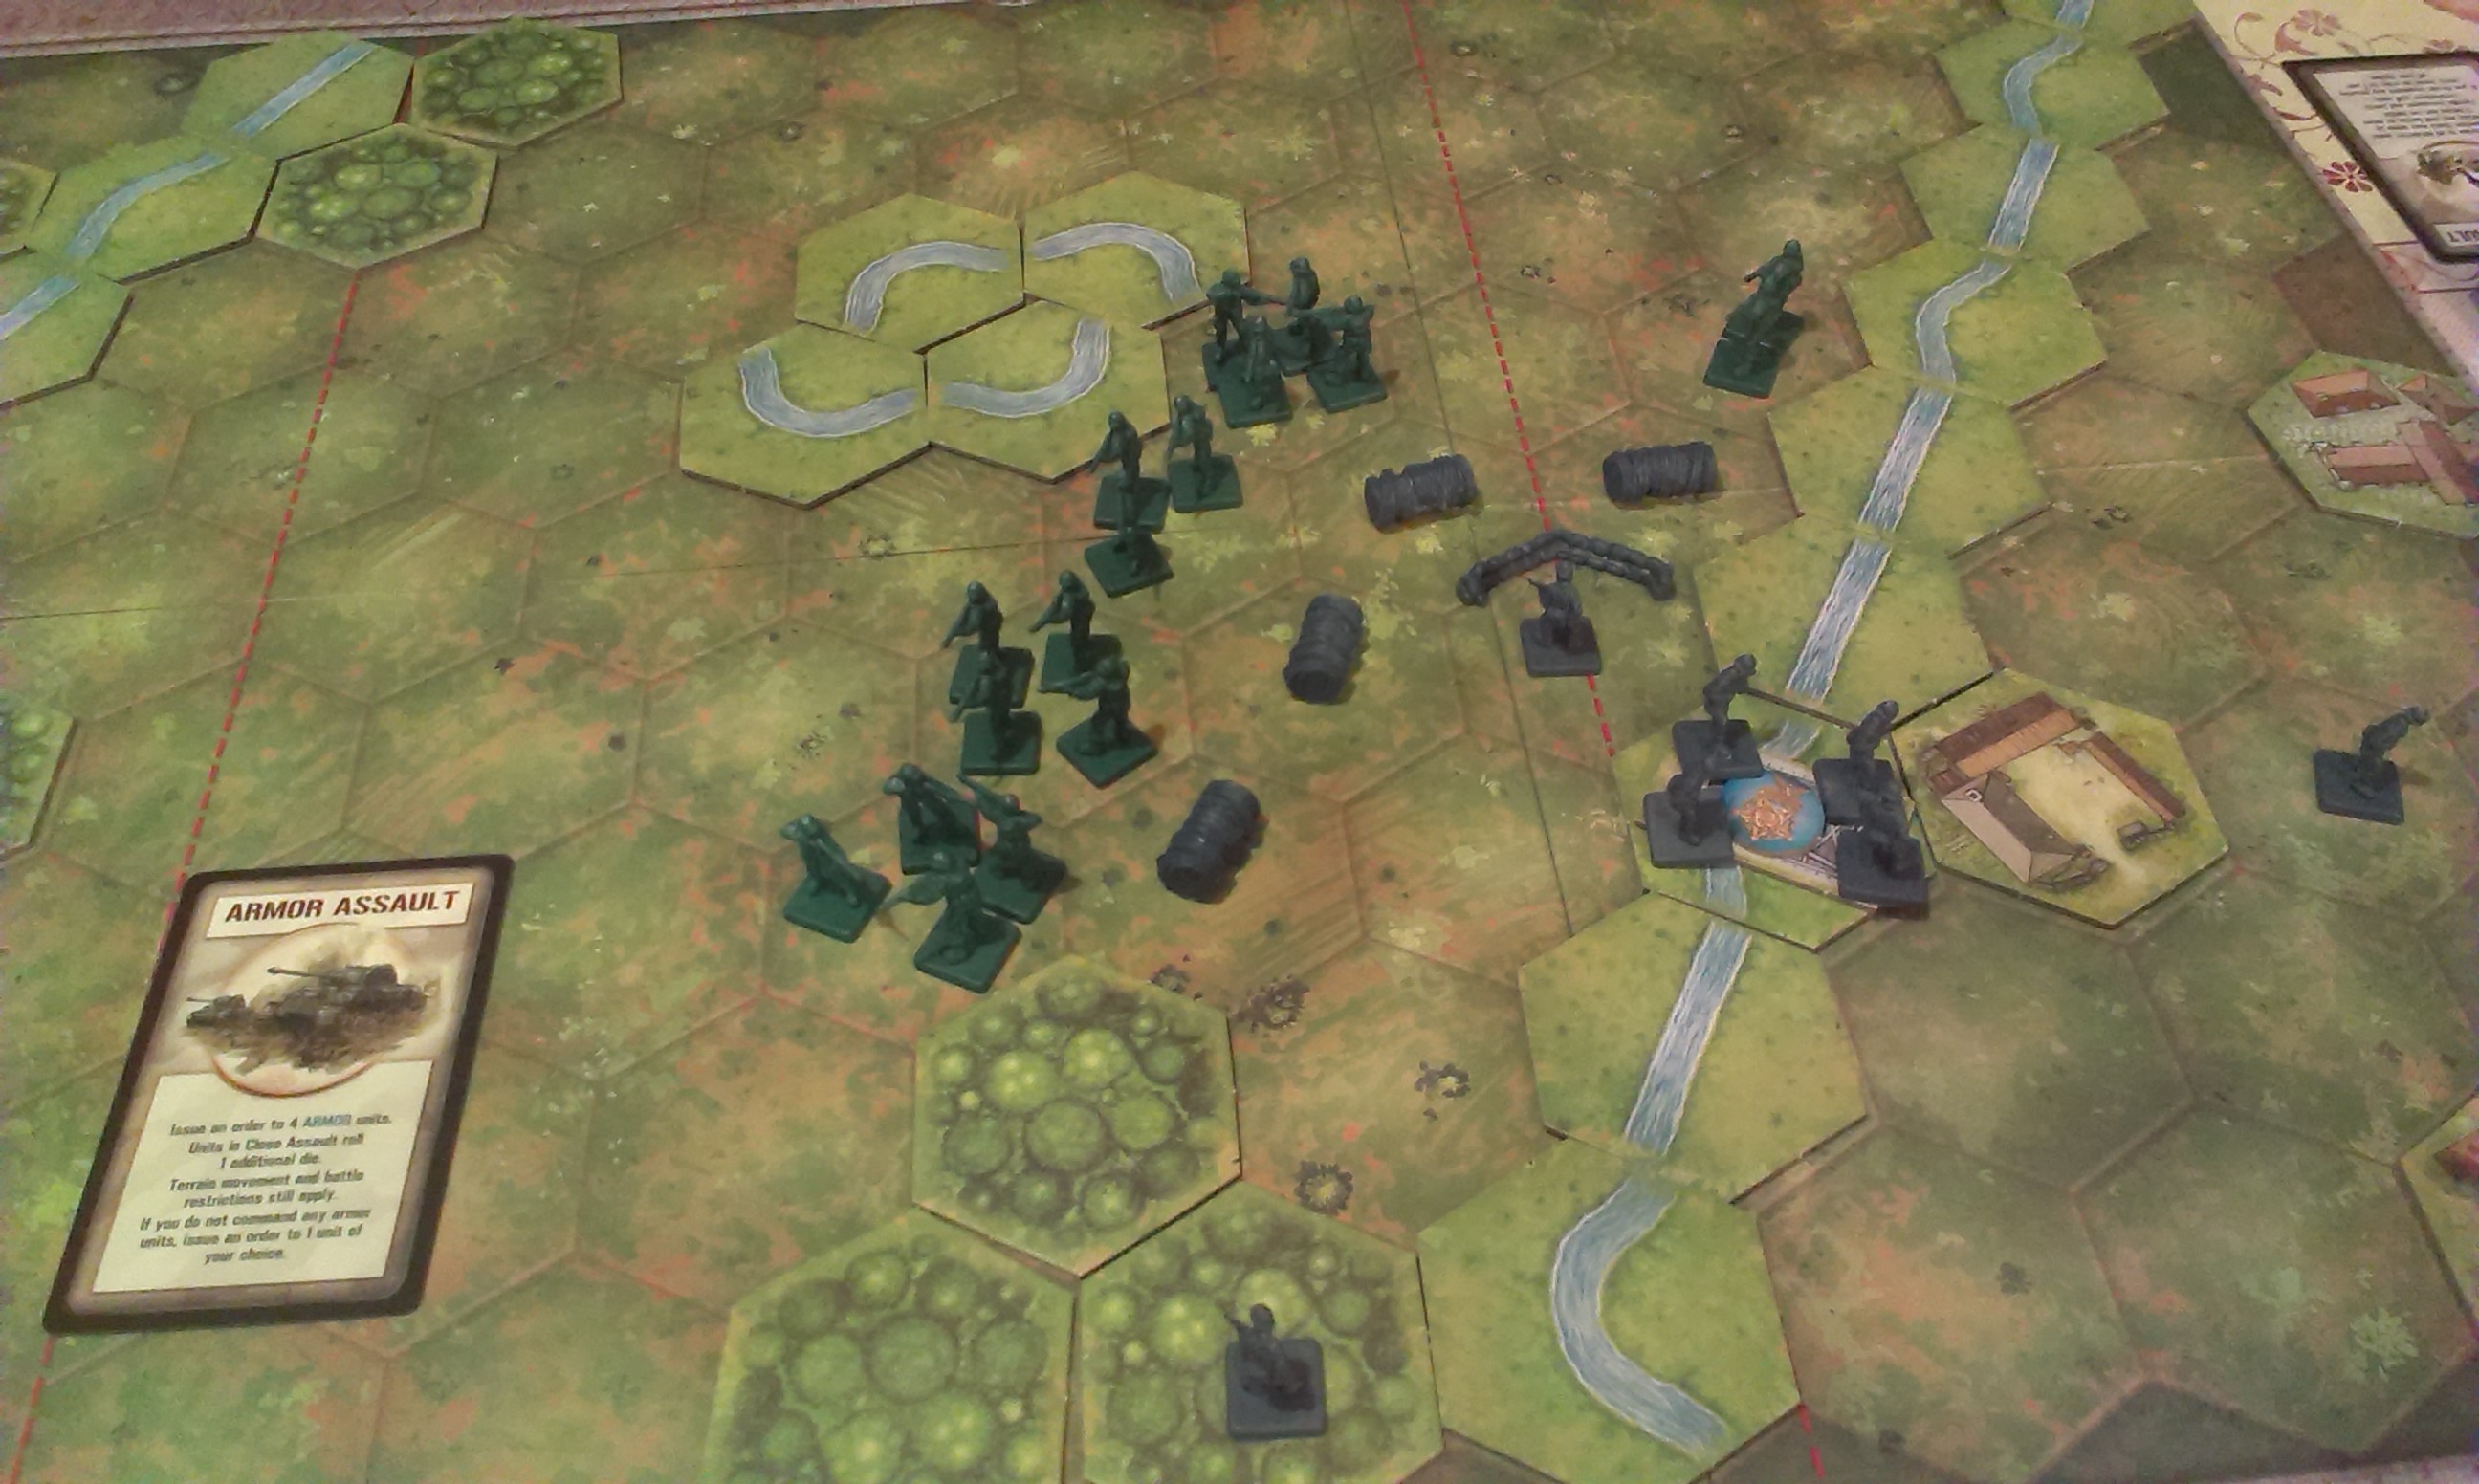
Set on the night of June 5th, 1944 this scenario recreates the brief battle for Pegasus Bridge. Or Bénouville Bridge, as it was known at the time, in Normandy, France. Major John Howard led the men of the Oxford and Buckinghamshire Light Infantry in the first airborne assault of D-Day, his objective being to capture both Pegasus Bridge and Orne Bridge. At a few minutes past midnight the Horsa Gliders land in a patch of field only yards away from their objective. The men stream out of the gliders totally surprising the German forces, there’s a brief and furious fight involving a machine gun in a sandbag nest right by the Pegasus Bridge. The British forces secure the Bridge, and the Orne equally as quickly, losing only two men in the process.
The bulk of British troops here start behind the impassable pond, meaning that they must be maneuvered around it to get involved in the battle. The Allied player has the natural advantage in this scenario; they have more men to begin with, receive more Command Cards, and play first.
Strategy and Tactics:
The Allied player here has the upper hand, but if they play badly that’s going to be completely irrelevant. In this game a certain amount of your success as a player is determined by which Command Cards you draw, as on some occasions you may need to give orders to a section of the board that you don’t have the Command Card for, and so can’t. How quickly and efficiently you kill enemy units is also determined by the roll of the battle dice. So some amount is down to luck and chance. But aside from that we’ve found so far that once you’ve found a decent defensive position (for example in a patch of trees) it’s ideal to stay there for as long as possible, all the while you can fire on your enemy from there you should stay as the woods reduce the chances that you’re going to lose men when the enemy fires on you.
In this scenario the German forces have barbed wire and sandbags. These are inconvenient, for an Infantry unit to be able to remove them they have to move into the space that the barbed wire is in, and then remove it instead of battling. So it can be completely suicidal to remove them as you end up adjacent to you enemies units and unable to attack them. Leaving you as a clear target. It’s also important to remember that the rive does not effect line of sight. You can fire on an enemy unit across a river provided that they are within range and no other terrain restrictions that would prevent you attacking them apply.
I found, when playing as the Allied forces, that trying to take the patch of wood on the right flank of the board, by the Orne Bridge, was a strong position to be in. That bridge is under defended and so the woods is a good position from which to either attack the lone German unit at the top of the board there, or to swoosh down and take the bridge from the other German unit. The blue medals on the two bridges count as victory points if the bridges are held by British forces. Meaning that that player has to destroy less of the Axis units to win the scenario.
For Axis forces it’s tactically ideal to get you lonely unit in the top of the right flank down into the patch of woodland before anyone else can, this is a good defensive position to be in, to prevent anyone trying to take the Orne Bridge. Your second unit there could then be on the bridge, between them they’ll put up a good fight against any optimistic British forces.
When we played this scenario we left the Axis units mostly where they were in the center and on the left flank, only really moving the one in the top left corner to bring it closer to the action. On reflection it would probably have been a good idea to shift the unit in the town right next to Pegasus Bridge further down the river to attack the British, because we didn’t actually use it that much.
To Conclude:
This is the starter scenario, so it’s been simplified from the original battle. The Germans has a machine gun in their sandbag nest by Pegasus Bridge that’s been replaced with regular Infantry in this one. But as starters go it’s very good, it’s an easy board to navigate, and the use of only one type of unit allows you to completely get to grips with how they move and battle. It would’ve rated higher, but that it’s been deliberately simplified for learning purposes, so the scenario doesn’t have as much going for it as some of the later, more complex ones do. It’s well designed as an introduction though, and sets you up in good stead for future scenarios.
We should really include that in all the titles/opening paragraphs for this blog, since I can’t immediately think of any game that we haven’t played wrong at least once. Memoir ’44, as has been stated at least once now, is a fantastic game. I don’t think we’re likely to ever get bored of it. Based on real scenarios from the Second World War it’s not only interesting for its historical accuracy, but also as a strategic game.
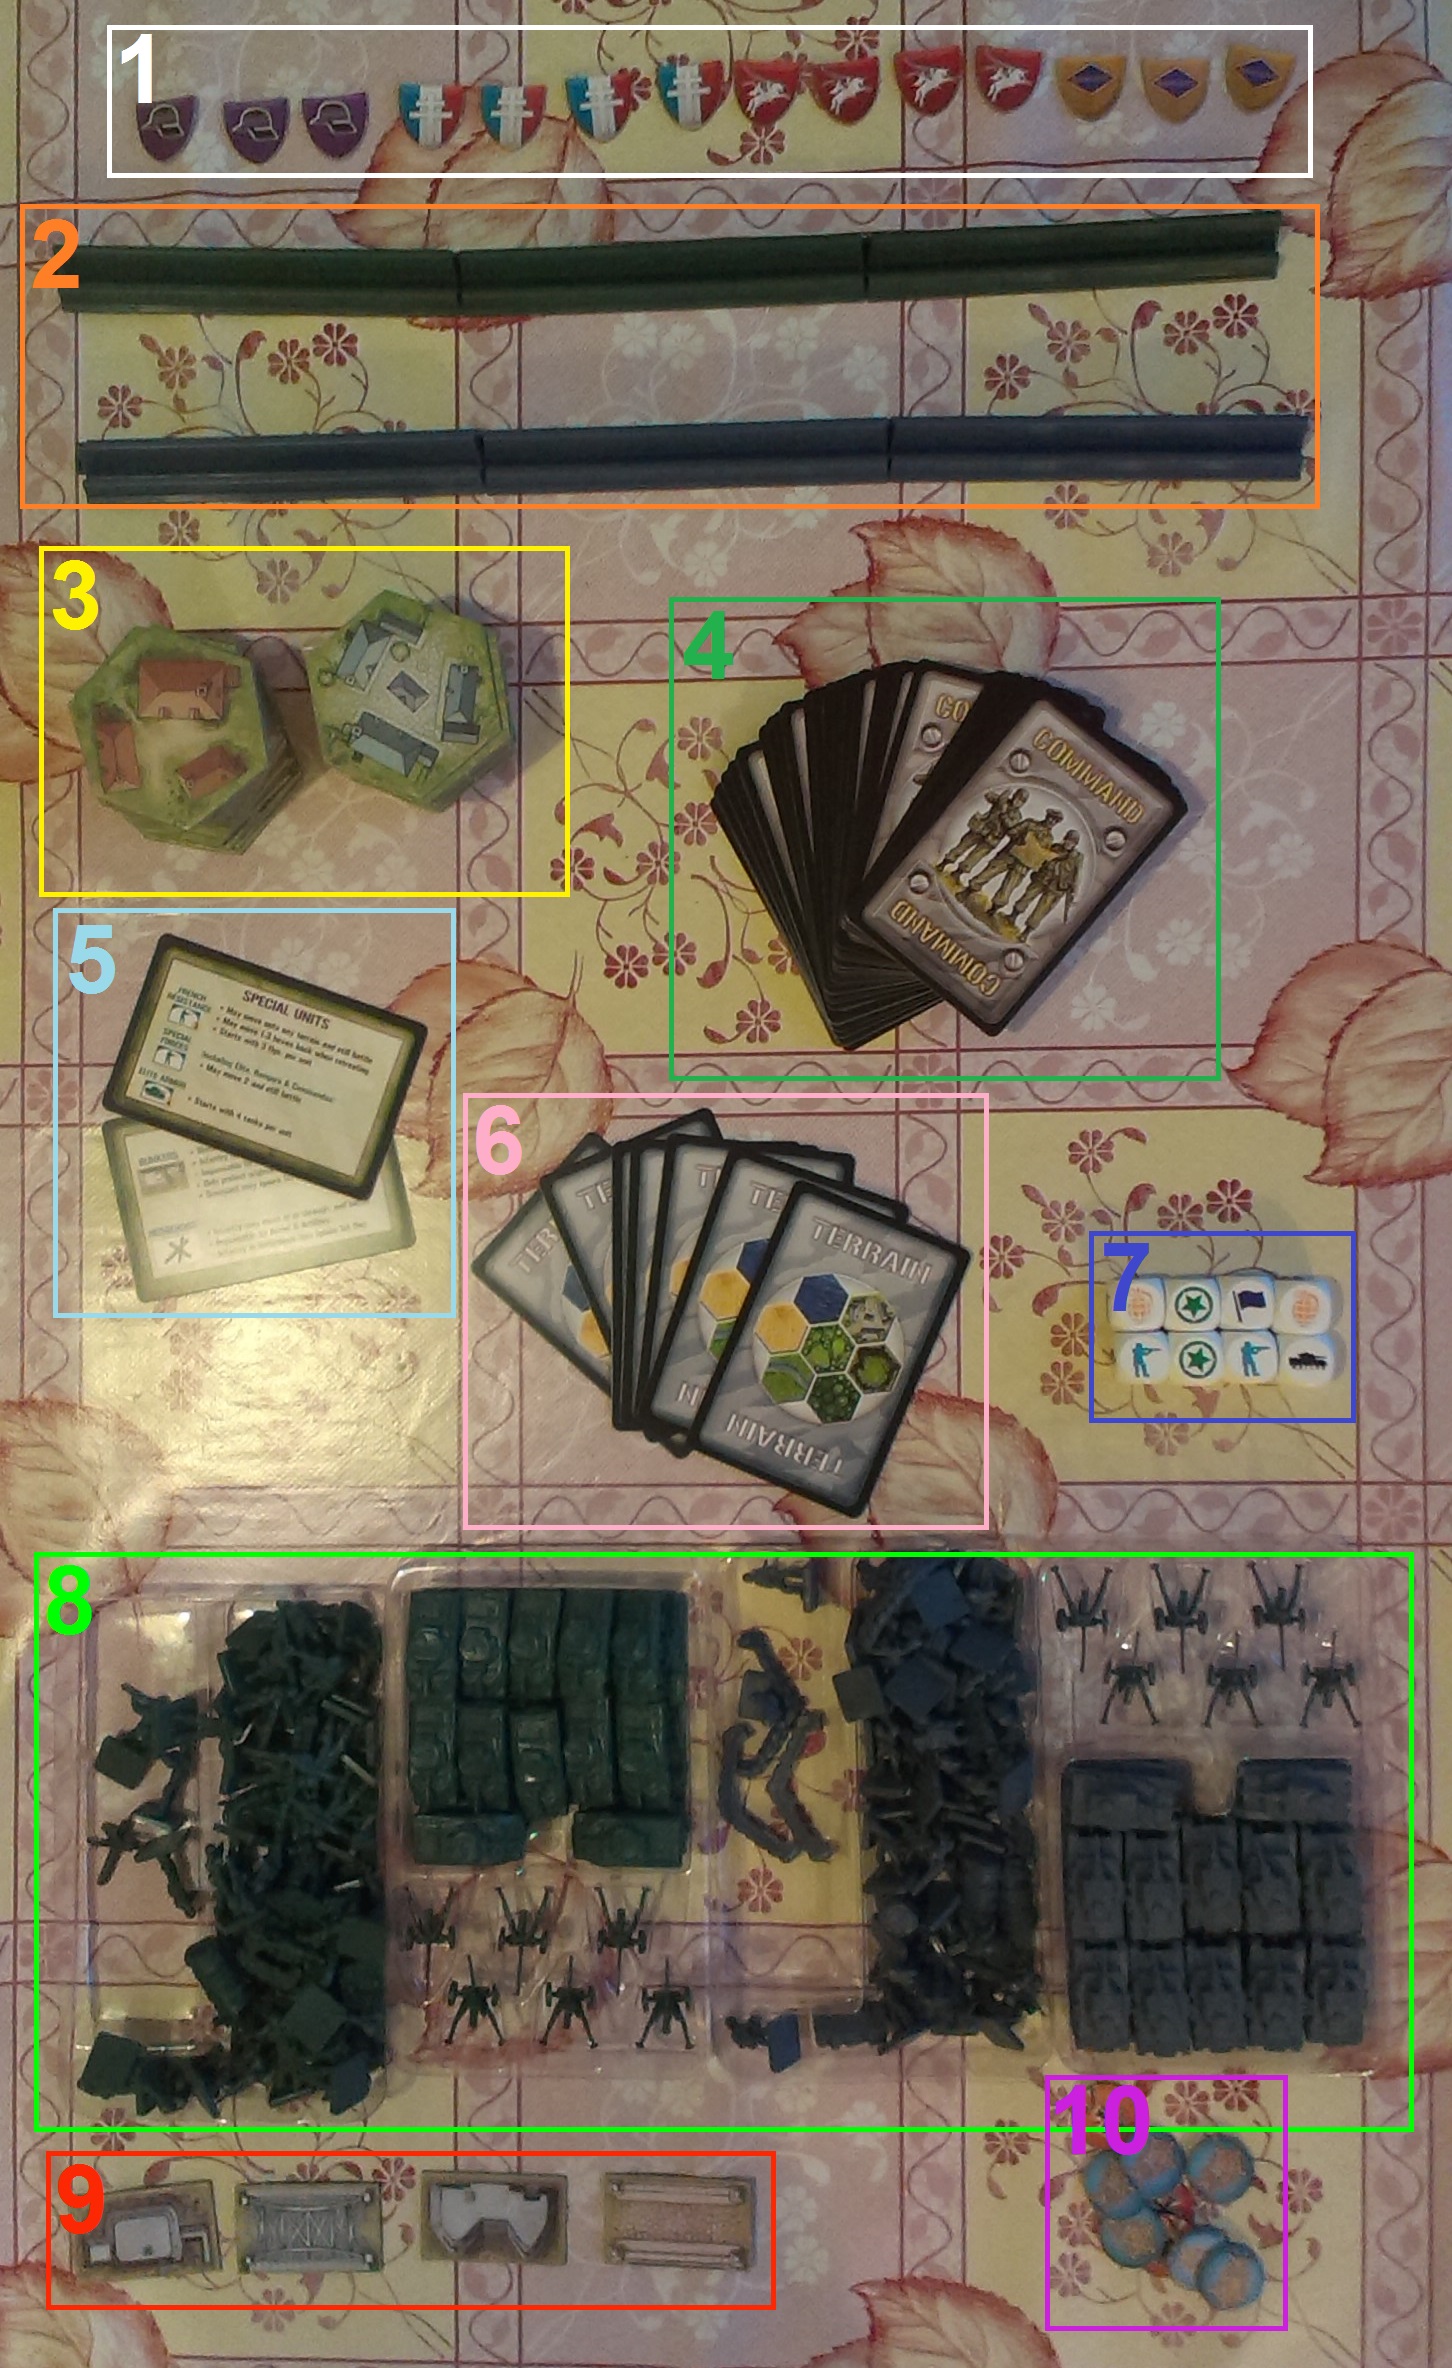
What’s In The Box:
The Stuff
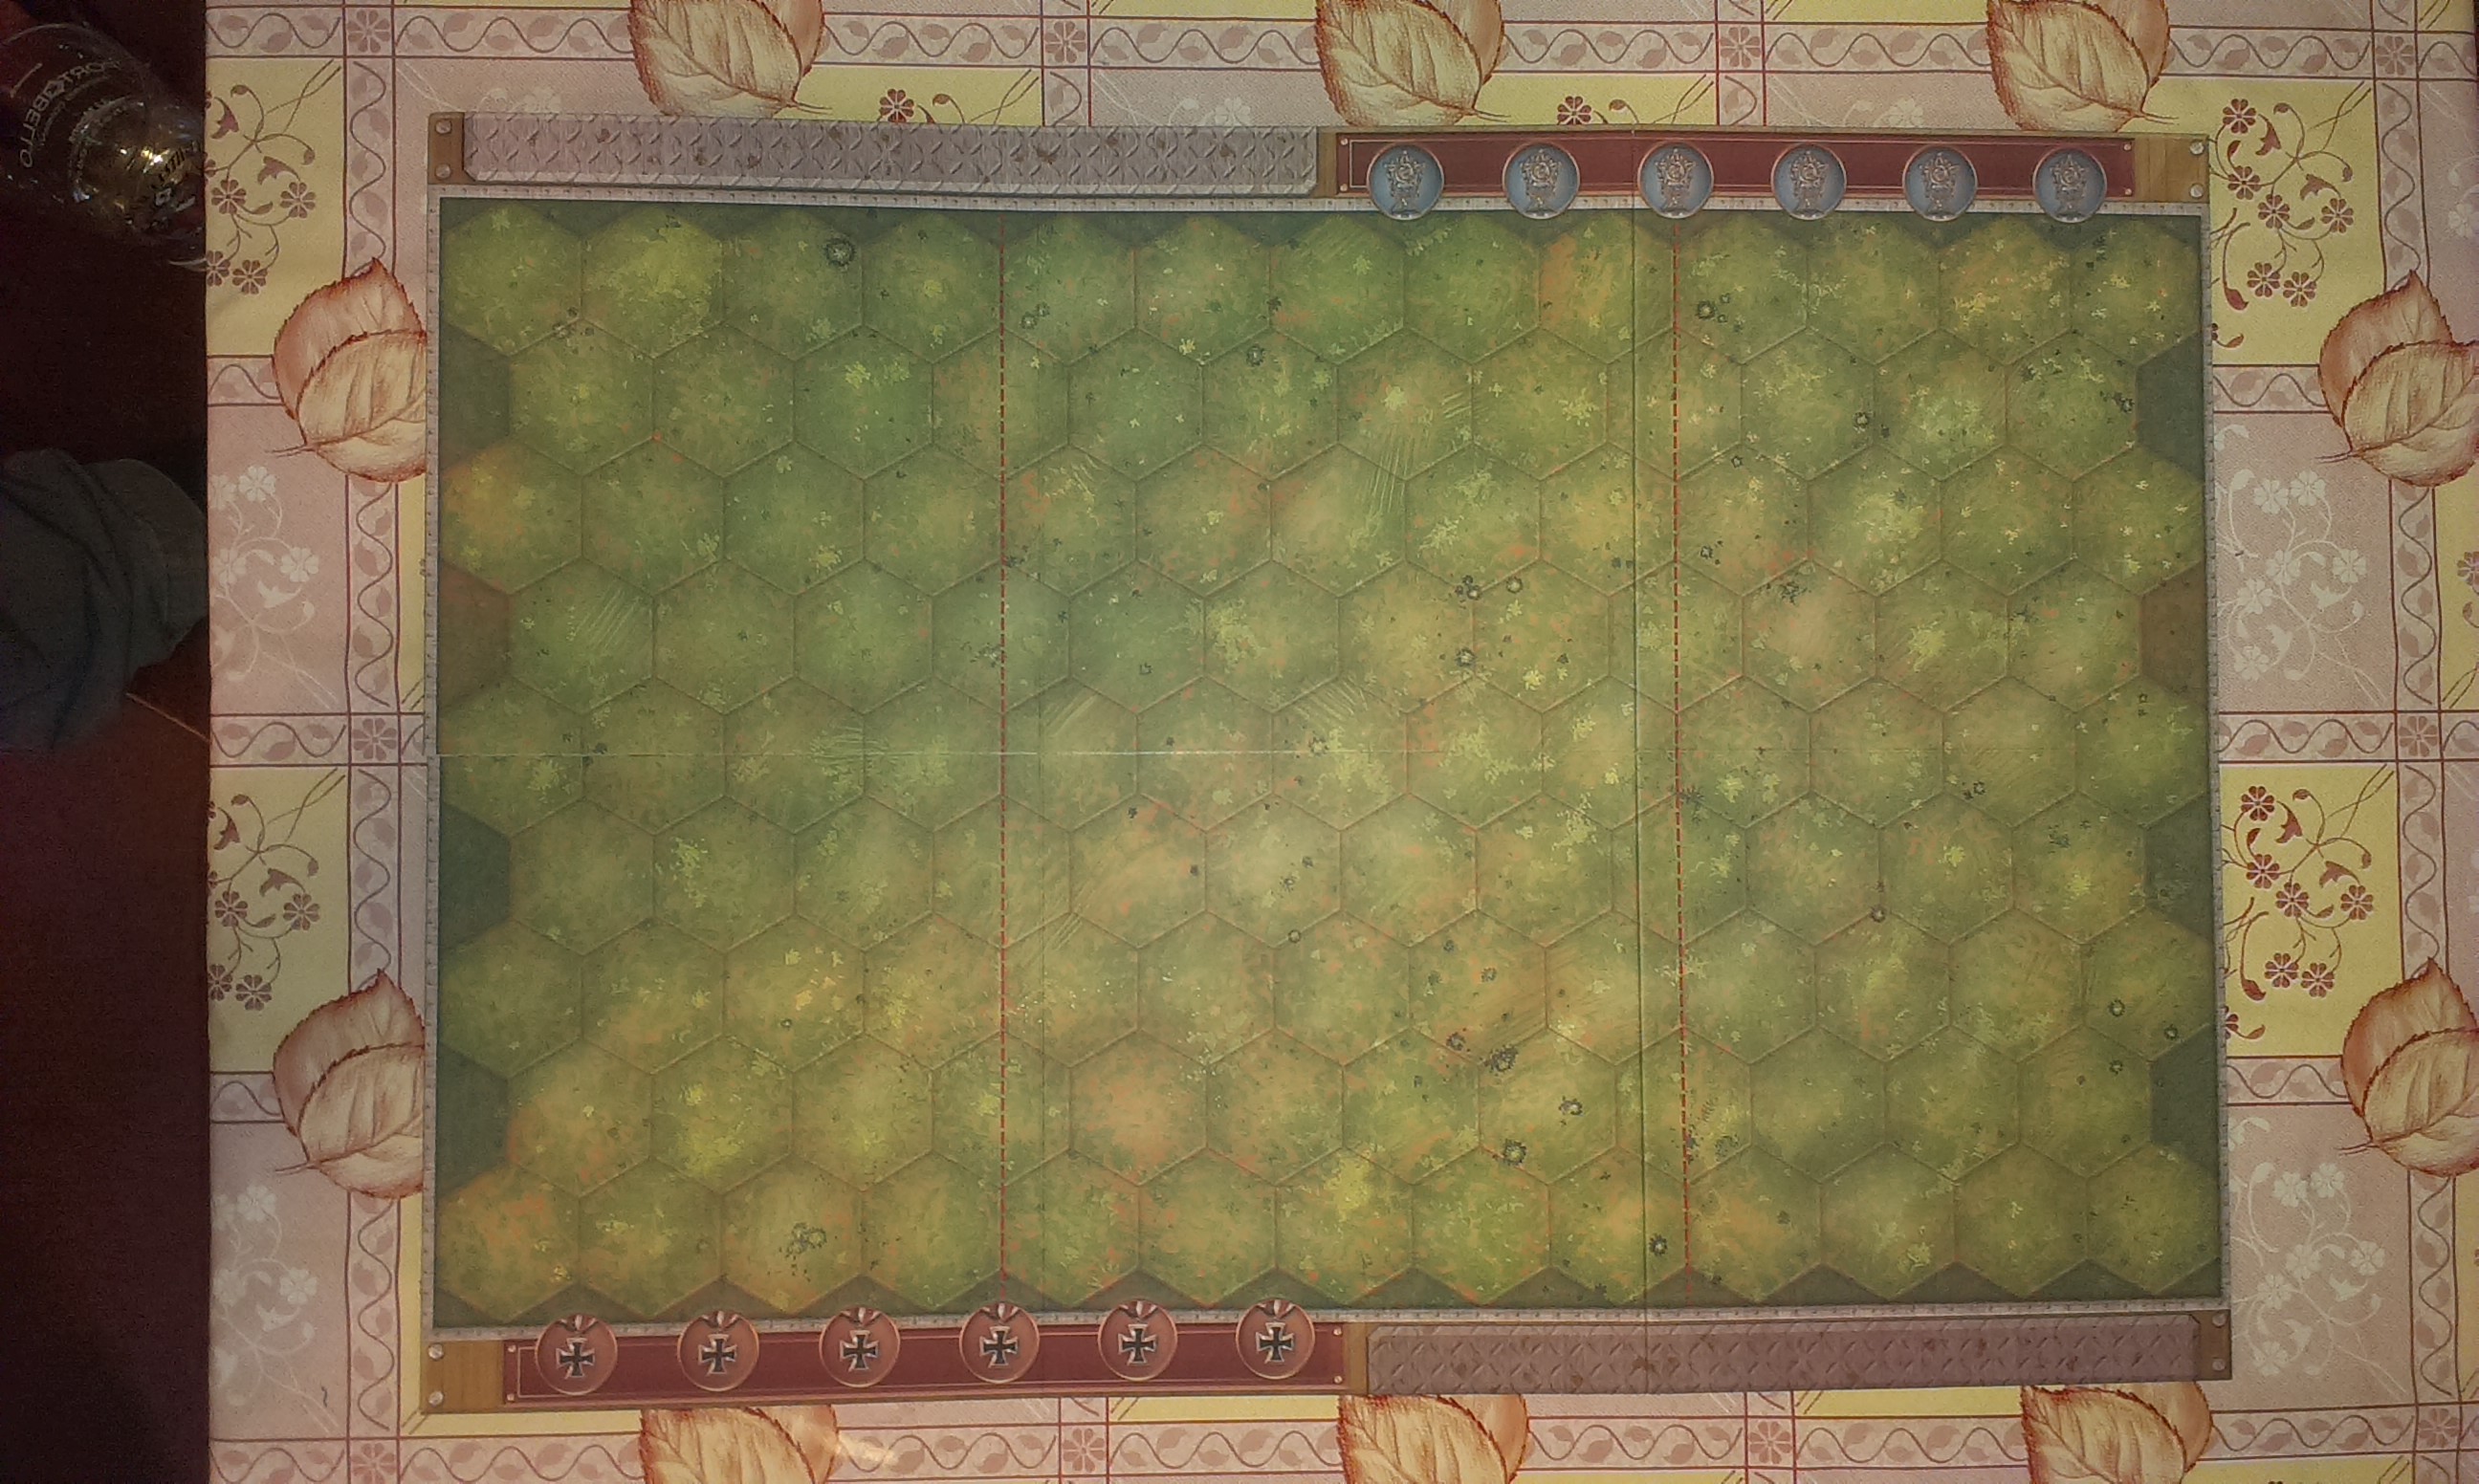
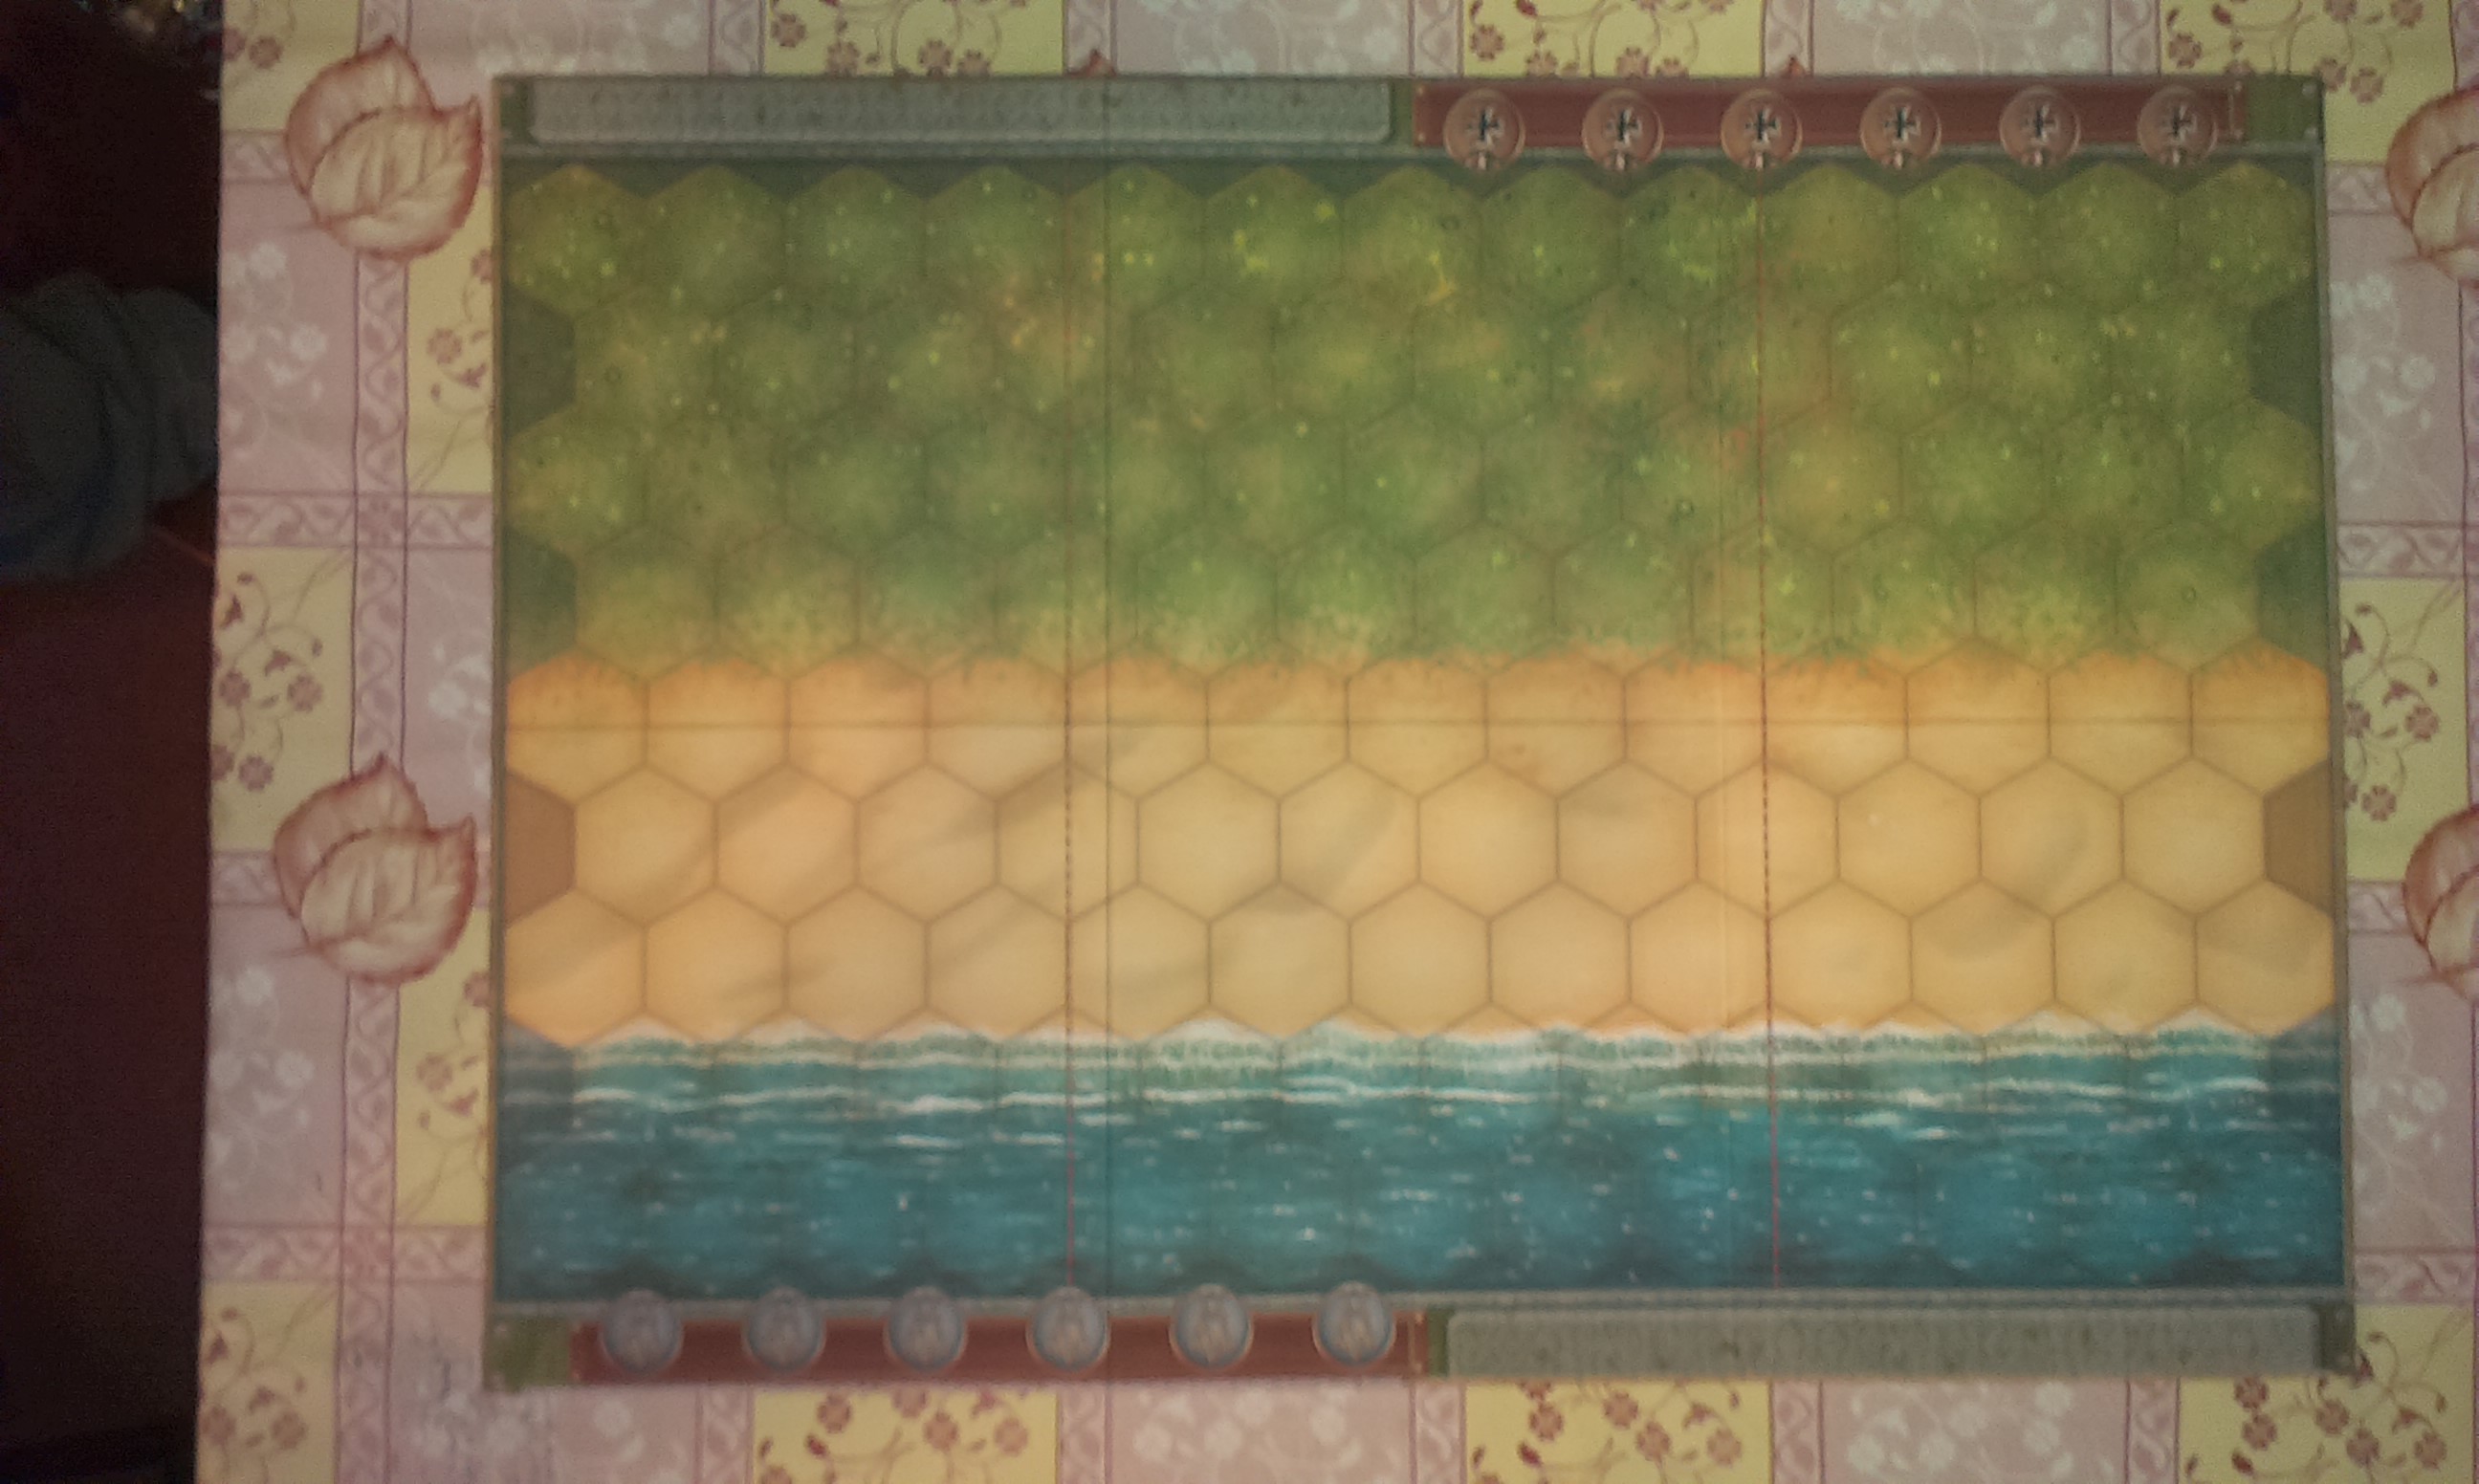
Countryside side of the boardBeach sideThe Rules
14 Special Forces Badges
3 Blue and 3 Green Command Card Holders
44 Double-Sided Terrain Hex Pieces
60 Command Cards
1 Double-Sided Obstacle Summary Card and 1 Double-Sided Unit Summary Card
7 Terrain Cards
8 Battle Dice
2 Sets of Army Miniatures; Green = Allied Forces, Blue-Grey = German/Axis Forces
4 Double-Sided Bunker and Bridge Tiles
10 Double-Sided Victory Medals
1 Double-Sided Battlefield Board Map
1 Rules and Scenario Booklet
Playing The Game:
Objective: To fulfill the scenario’s victory conditions before your opponent and score more points after you’ve switched sides.
When you read the rules for this game you’ll see that the first scenario it recommends you play uses only the Infantry Units available to each side. This is very good, as the game builds you up to a thorough understanding of each of the different types of unit available to you in different scenarios by introducing them one at a time into gameplay.
You start by setting up the board, as directed in the instructions for the scenario you’re playing. You change the look and layout of the board by using the terrain hexes to put in woods, hills, villages, rivers etc.
The starting set up of the first scenario in the rule book
Once you’ve set the board up for the scenario you then decide who’s playing as who. In the rule book the scenario instructions will tell you which side plays first, and how many Command Cards each player is dealt to begin with. Players then take turns. There will be a preset condition for victory in each scenario.
The Command Cards contain an array of things a player can do on their turn, standard orders or special commands. These mostly look like this:
an example of the Command Cards most commonly in play
The special command cards look like this, but are all different:
A special command card
Winning The Game:
There is no time limit to the scenarios, players continue taking turns until someone manages to destroy enough enemy units to fulfill the victory conditions for the scenario. Then the board is reset and players switch sides. A note is kept of the score from the first round, for example, if the victory condition was that someone needed to have completely destroyed 4 of their enemy units and the other player had destroyed 2 when this happened you would then make a note, and at the end of the following round the victorious players score would have to be the highest total number of units destroyed.
Strategy:
We realized fairly early into the playing stages of this that the scenarios are usually relatively heavily weighted towards one player, they may have an advantage in the number of Command Cards they have, or in having bunkers or sandbags. But despite this, if you play reasonably tactically, all the scenarios we’ve played so far could go either way.
We started out just playing the most obviously useful card we had in our hand at the start of each turn, and seeing where it got us. Because the destruction of a unit is determined by a combination of the card you played, the position of your units, the terrain around you and the rolling of battle dice it can be unreasonably hard, on occasion, to annihilate a unit that should have been wiped out the first time you attack it. This is both true to the slightly unpredictable nature of a battle, and completely inaccurate as an Armour unit fighting Infantry at what is more or less to be considered point-blank range should not somehow manage to miss all of them. But that aside, it is possible, tactically, surround and destroy units, using terrain disadvantages to your advantage.
There is a lot to be said about strategy on this game, but we’ve decided that in the interest of keeping you interested, we’ll go into much more detail on tactics and strategy, as well as historical overview and other exciting things like that as we write about each scenario individually.
History and Interesting Things:
The game was designed to commemorate the men and women of WW2 and the sacrifices they made.
It was published in collaboration with the Mission for the 60th Anniversary of the D-day Landings and Liberation of France.
In 2004 it was awarded the International Gamers Award for the General Strategy: 2-Player category.
There are eleven expansions for this game, all of them require the original to play.
The game can be played with up to six people, playing in teams of three, each commanding a different section of the board.
There is more to write, but we want to look at the history of each scenario in greater detail over the course of the month, as we’re doing with our Strategy section of each post.
To Conclude:
As is evident, we love this game. We hope that over the course of the month these posts will show us gaining a better understanding of the game, and knowledge of the historical associations of each scenario. As well as actually letting us play a game more than once, which will make a nice change to our usual style of review. If you can get a copy of this game and a friend or two who might be interested, do it. Otherwise, stay tuned for our upcoming post of the first scenario of the game Pegasus Bridge!
So we’re changing our format a touch! Or at least we’re going with what we feel like for now and we will review how well it works later and make changes accordingly. Instead of having a themed month and reviewing four to five games that fit into that theme we’re going to have just the one game for a month. We’re going to play the game multiple times and do one review in the same format as we used to that covers the game in a basic form, then we’re going to play it in different ways or play it in all its scenarios (depending on the format of the game) and review each scenario or form of play individually.
Hopefully this will result in a more in-depth look at the game, leave us with a greater understanding/appreciation for the game and allow us to actually comment on real strategy rather than having to say things like “we’re not sure as we’ve only played it twice but we think this might work <insert vague suggestion here>”.
So on that note, the game that shall start this change in form is the wonderful…
This game we first played at the UK Games Expo in May, you can see us playing a huge expo variation of the game in our Expo video here. We loved it immediately and bought it at the Expo. As some of you will be aware it has the same designer as the game Battle Cry: the almighty Richard Borg. We have already reviewed Battle Cry and that review can be seen here.
So strap in for a whole month of us going on about this game, analyzing every scenario, and even looking at the actual history of the given scenarios. We will also be keeping a running score at the bottom of each scenario post so you can tell which of us is getting better at the game, each of us will get 1 point for a loss, 2 for a draw and 3 for a win. By the end of the month it’ll be probably be clear which of us has the more strategic mind.
Other Things to Note:
We are actually back now and should be back for the foreseeable future.
Hopefully, with this whole month being about Memoir ’44, we should get our first video review up about it, so that should be exciting.
With there being more posts going up than there used to be (there should be at least 18 going up this month because there are 16 scenarios in Memoir ’44 plus this post and the over all review) it will be harder to commit to specific publications dates. We’ll say that Mondays will stay a sure thing, but depending on the game for the month (and how many posts it’ll take) we can’t be sure how regularly the in between posts will be going up.
And because of this you get cards with things like this written on them:
This did make us laugh… A lot.
Now unfortunately, being a big fan of the TV series this review is unlikely to be completely non- biased, I will however do my best to stay objective.
What’s In The Box:
The Stuff!
Game board
Rules Book
4 x House cards
62 x Market Cards
104 x Intrigue Cards
10 x Favor/Injured tokens
4 x Champion tokens
3 x House betting tokens (per house) and 1 x House marker (per house)
1 x Host marker
117 x Gold
4 x Gladiator figures
4 x Turn summary cards
A lot of Dice (9 x Red, 9 x Black and 8 x Blue)
Playing The Game:
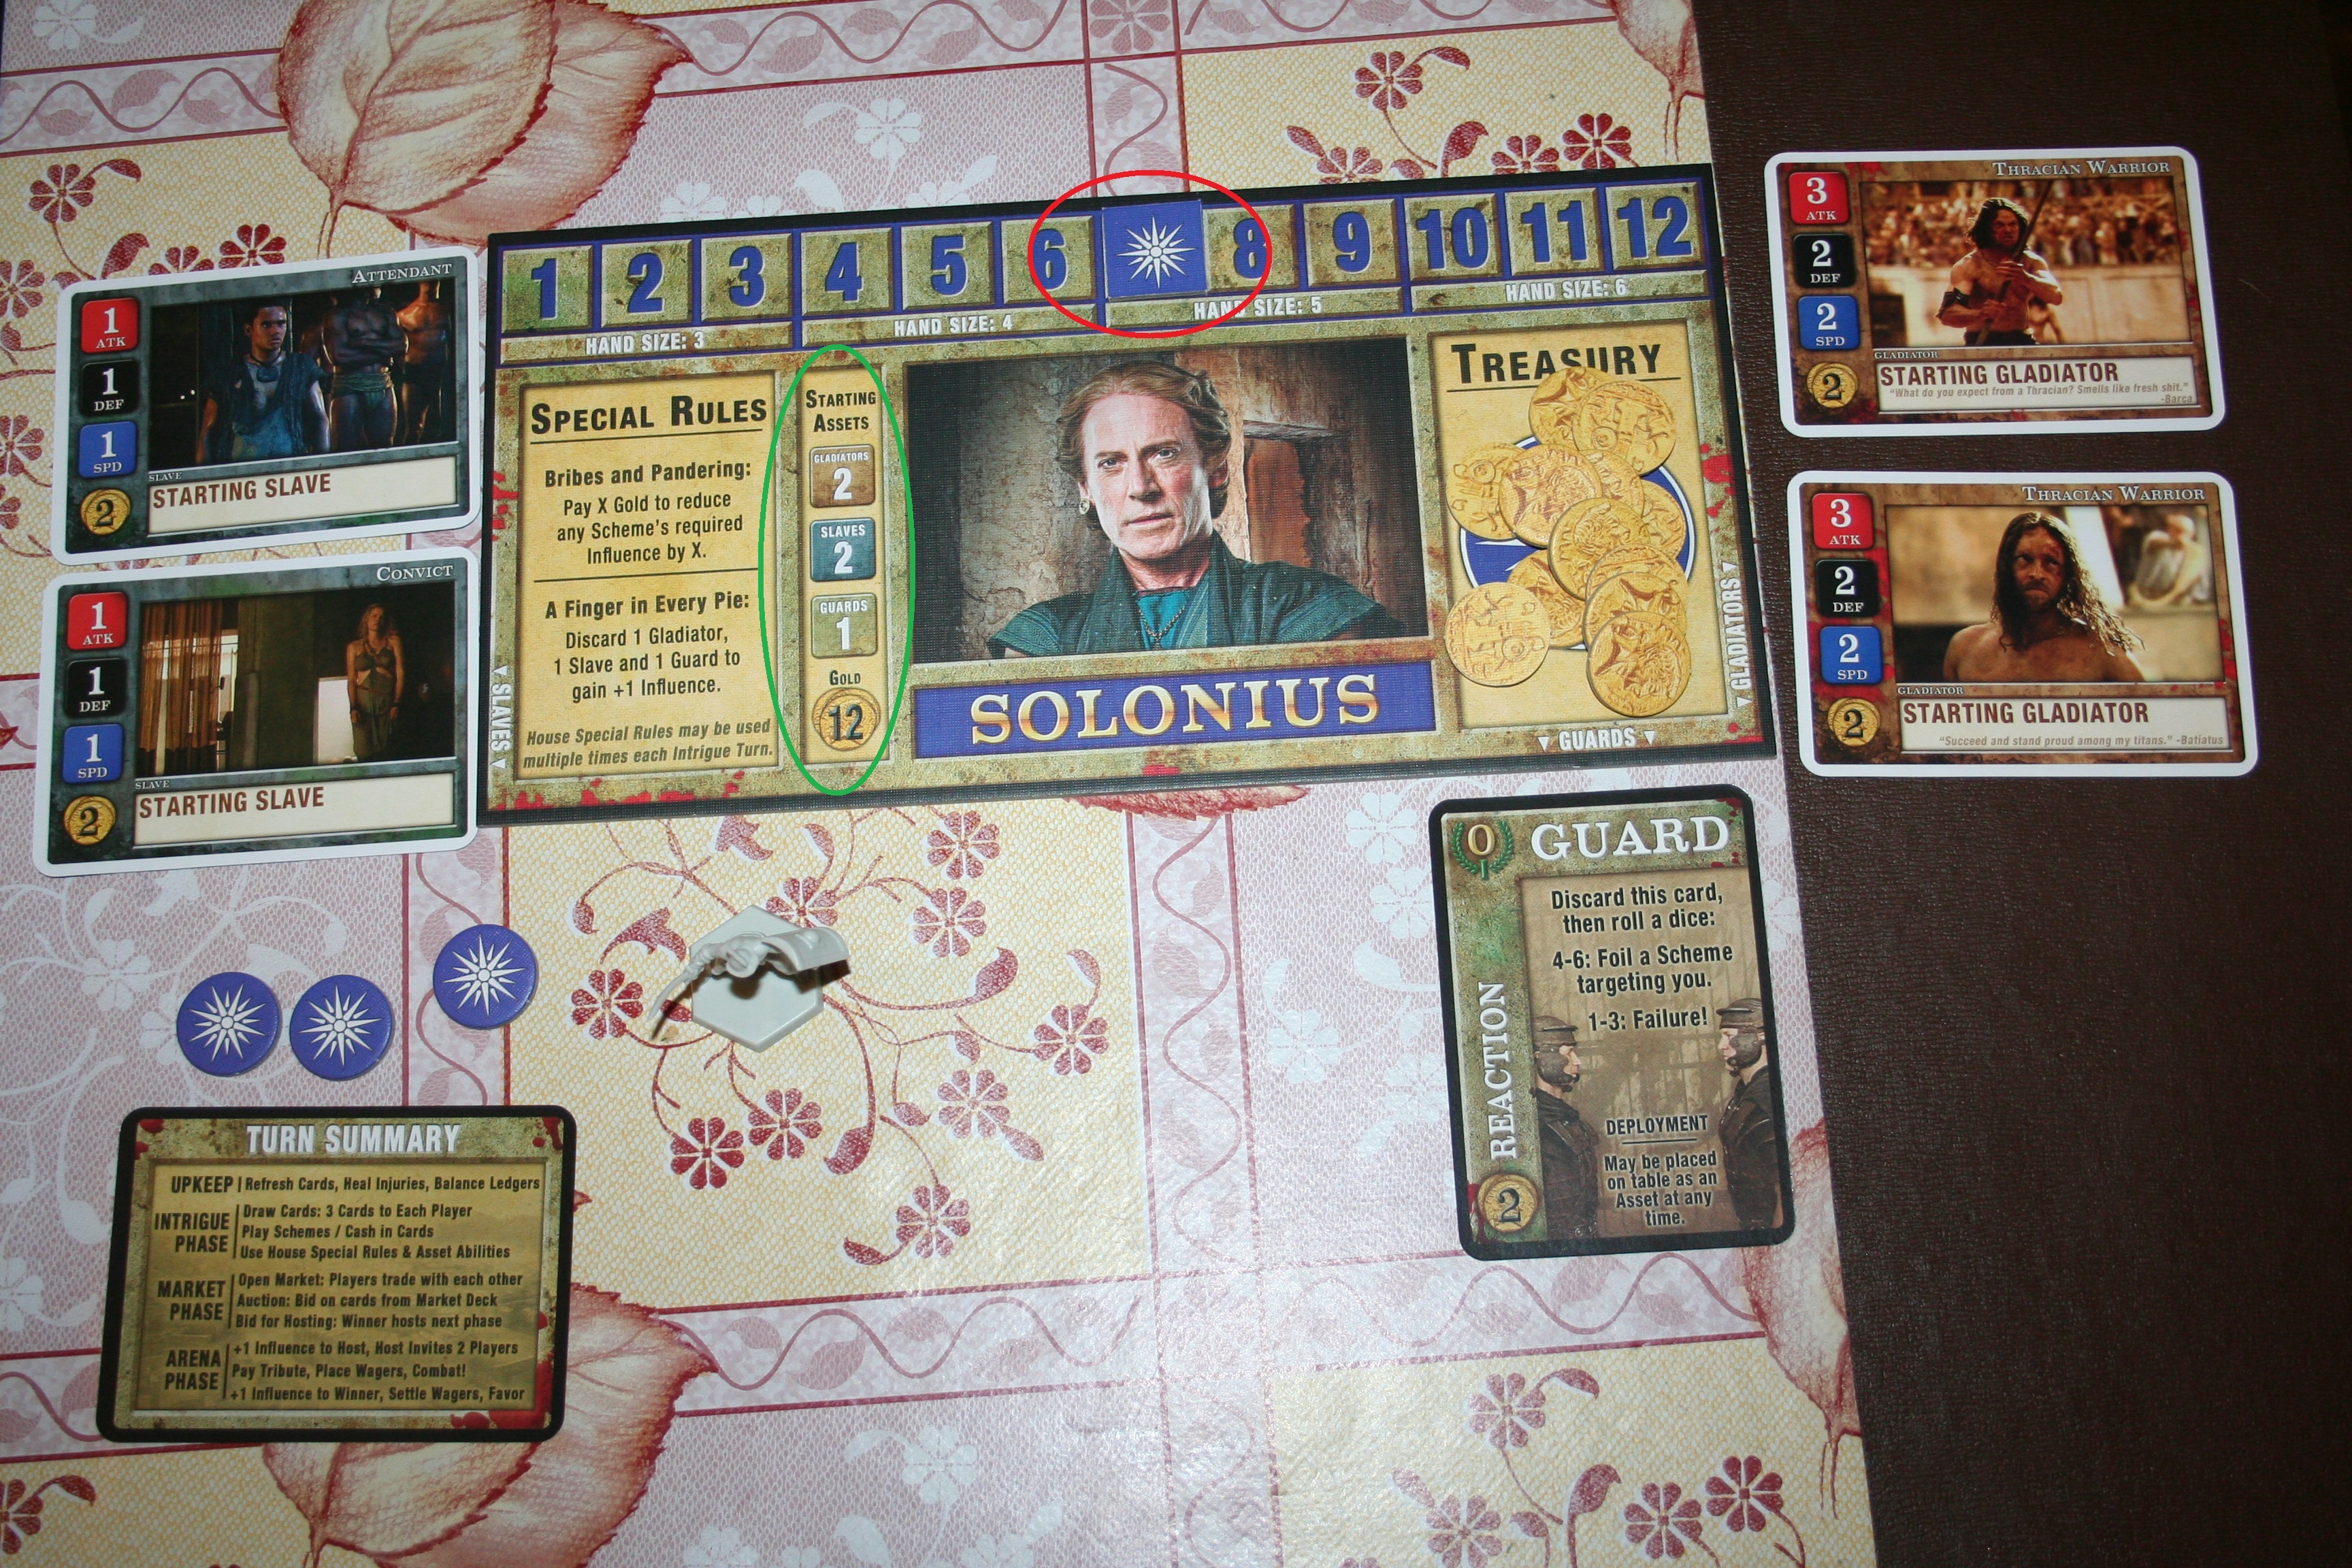
Objective: Be the first to raise your house influence to 12!
Depending on whether you want to play a Quick, Standard or Advanced game you set the starting amount of influence each house has to a different number:
Quick = 7
Standard = 4
Advanced = 1
Starting influence is set to 7 for a quick game and the starting amount of things dealt out.
You then get dealt the starting number of items as dictated by your house card (circled green). So for Solonius that’s 2 Gladiators, 2 Slaves, 1 Guard and 12 Gold. Additionally each player gets one gladiator figure, their 3 house betting tokens and a turn summary card.
Now, every turn of play is made up of four sections:
Up Keep
Intrigue Phase
Market Phase
Arena Phase
Up Keep:
Up keep consists of three parts:
Refreshing Cards – Any cards that have been exhausted in the previous round (so are face down) get turn back up so their abilities can be used again.
Healing Injuries – Attempt to heal any injured gladiators or slaves by performing a healing role – on a role of 4 – 6 they are healed anything less and they stay inured.
Balancing the Ledgers – You gain one gold for every ready slave you have and you must pay one gold to the bank for every ready gladiator you have – if you cannot pay (or don’t want to) you must discard the card that’s making you pay.
Intrigue Phase:
Intrigue consists of two parts:
Drawing Cards – At the start of each intrigue phase each player draws three intrigue cards (players all receive three cards simultaneously).
All Intrigue cards dealt.
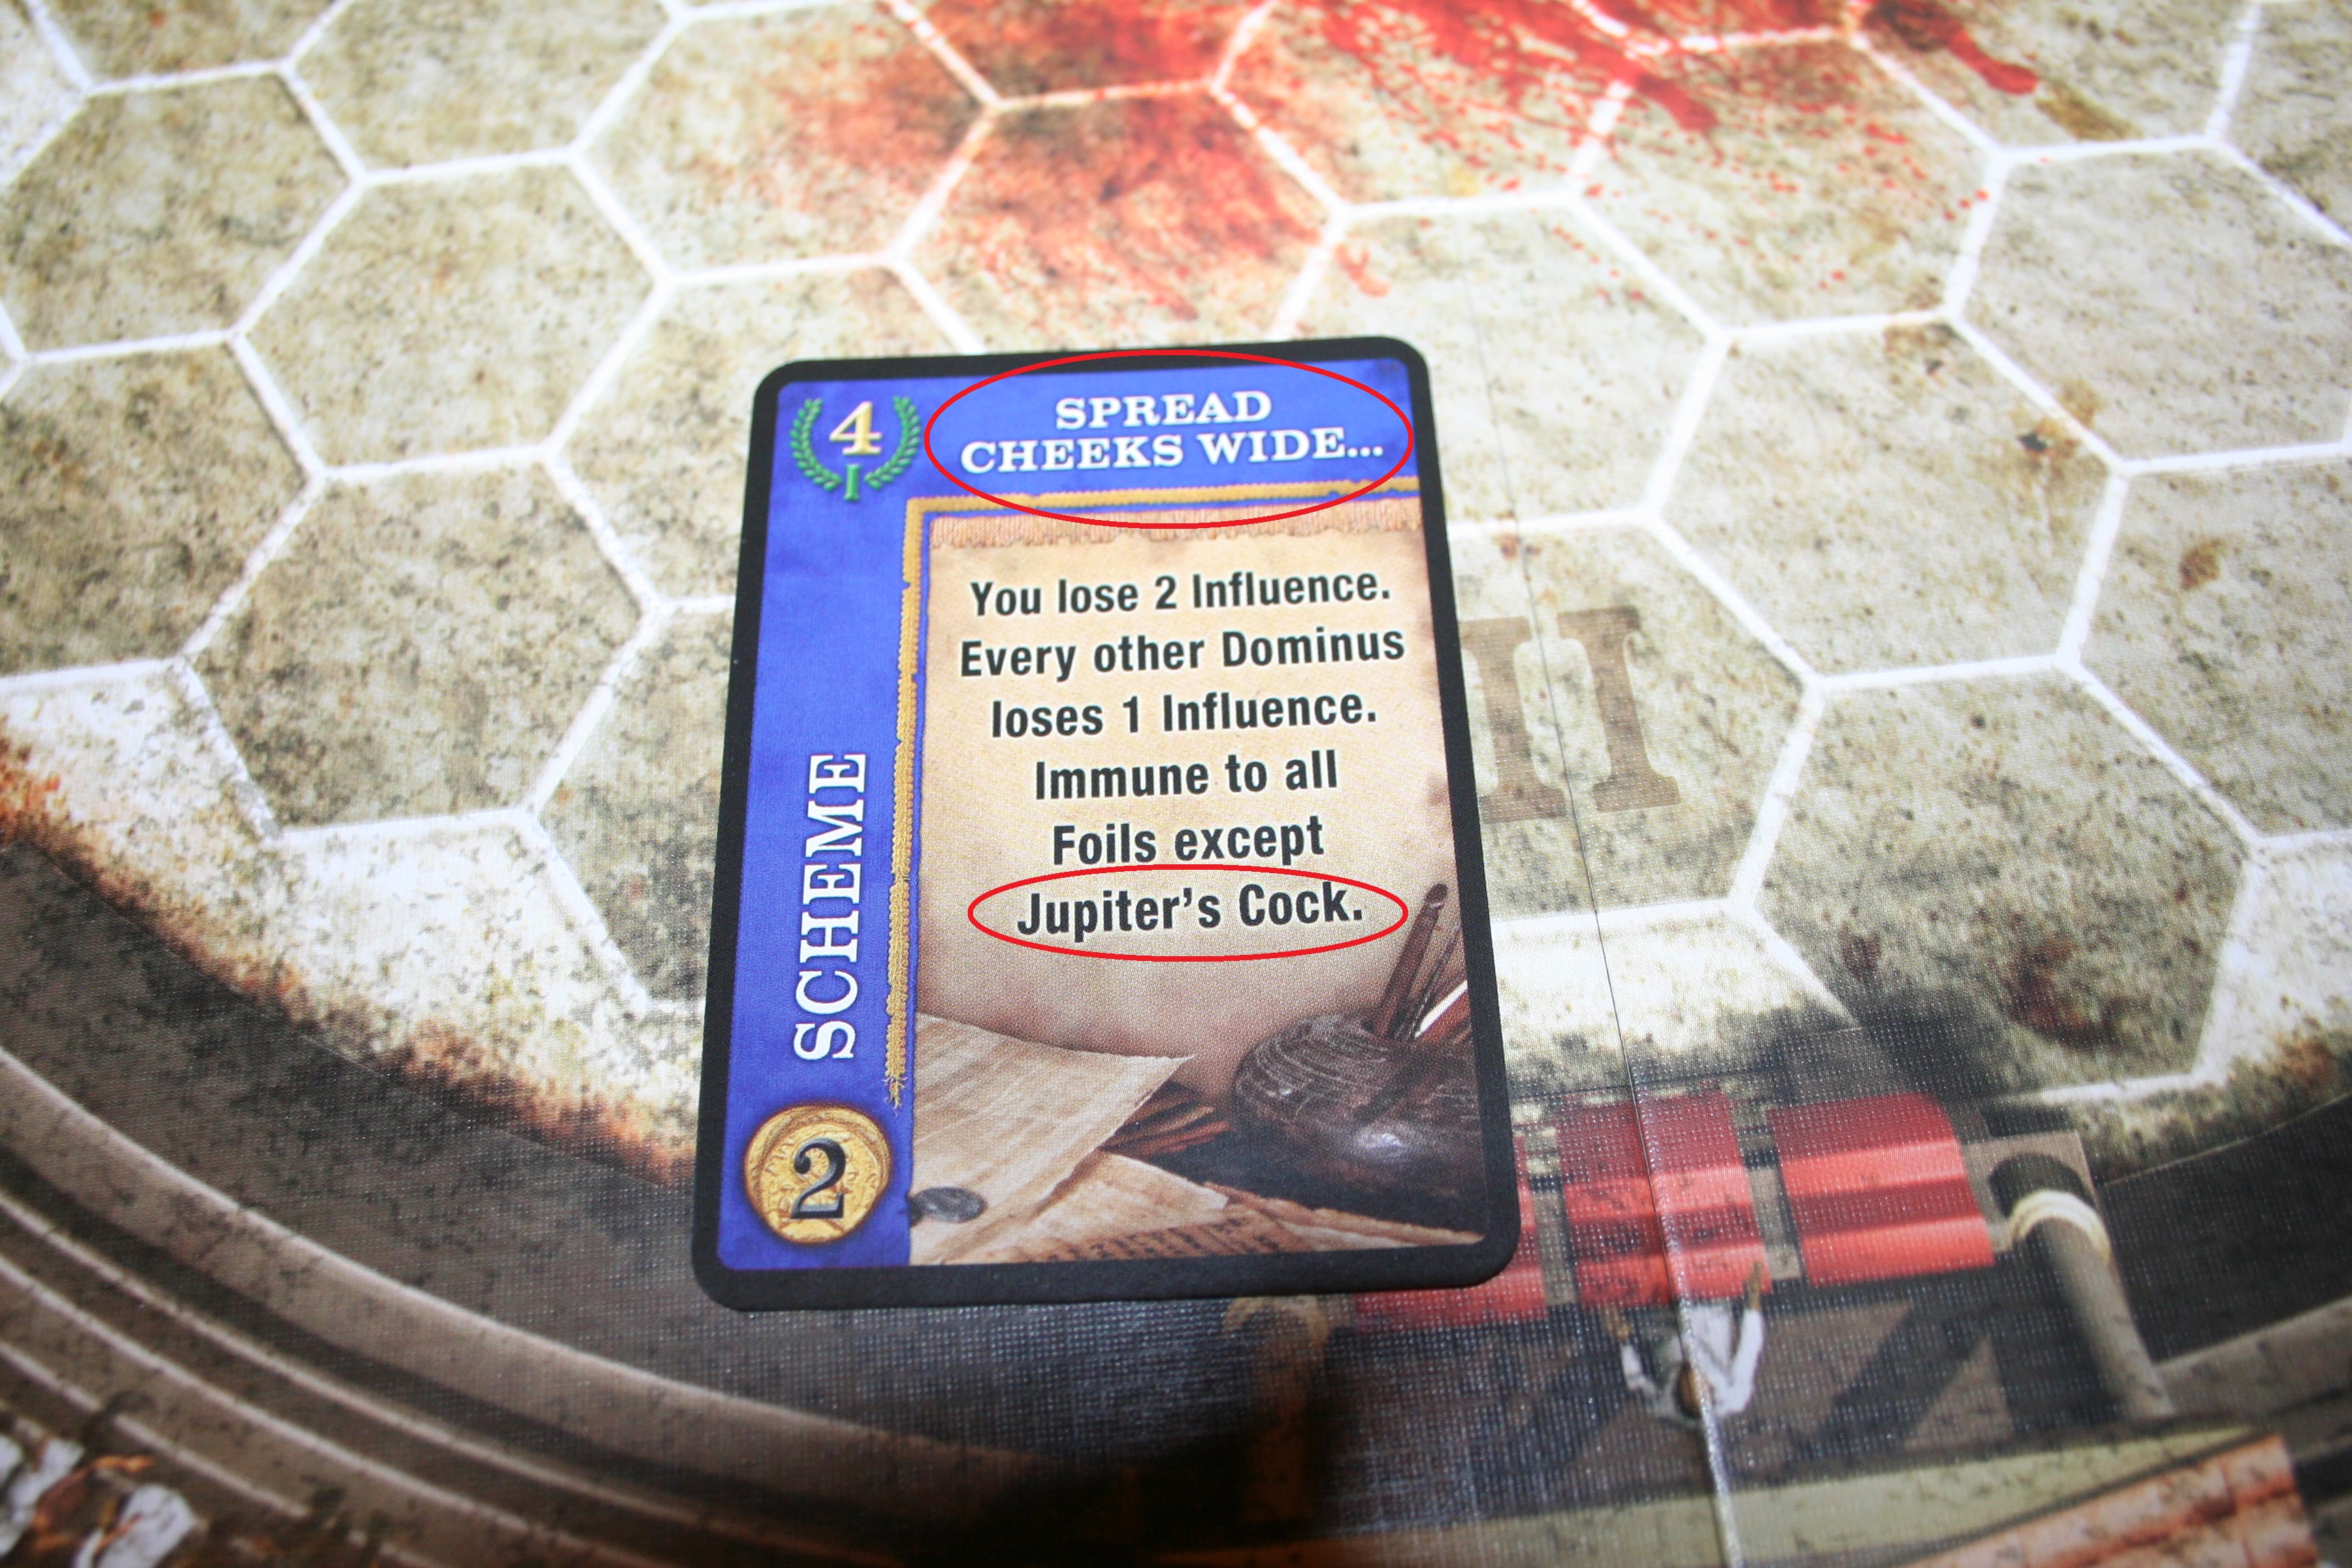
Playing Schemes/ Foiling Schemes/ Cashing in Cards – Some of the intrigue cards are schemes you can play against another Dominus (Latin word for master), cards that allow you to foil other schemes or get rid of an opponents guards. To play a Scheme you must have the right amount of influence to play it (as listed on the card), if you don’t you can pair with another Dominus to play it by adding your influence together but beware; deals that are made can be easily broken. If someone plays a scheme against you you can foil it by using your guards and performing a dice role or you can play a scheme foiling card that are reactions to schemes and also require that you have the right amount of influence to play it. Finally if you don’t want some of you cards or can’t keep them (as your had size is dictated by the amount of influence you have) you can cash in cards for the amount written on them from the bank.
Market Phase:
This phase is made up of three parts:
Open Market – At this point anything can be traded for anything for anything else. Except Intrigue cards, which cannot be sold.
Auction – After open market is over each player conceals their gold in their hand and cards equal to the amount of players playing are drawn face down on to the board. The first card is flipped up; each player decides how much they want to bid for that card and hide it in their hand and hold it out over the board, then together they revel how much they have bid, highest bidder wins. Someone who bids nothing is ignored, but if everyone bids nothing the card is discarded. If there is a tie the two players who are tied place the amount they have already bid on the board and repeat the procedure until one player is victorious. This is then repeated with each card until all cards are sold or discarded.
Bid for Hosting – This is done in the same way as the bidding for the cards. The person who wins the host bidding gets the Host token and it marks that they control the next phase of the game and choose who will fight who.
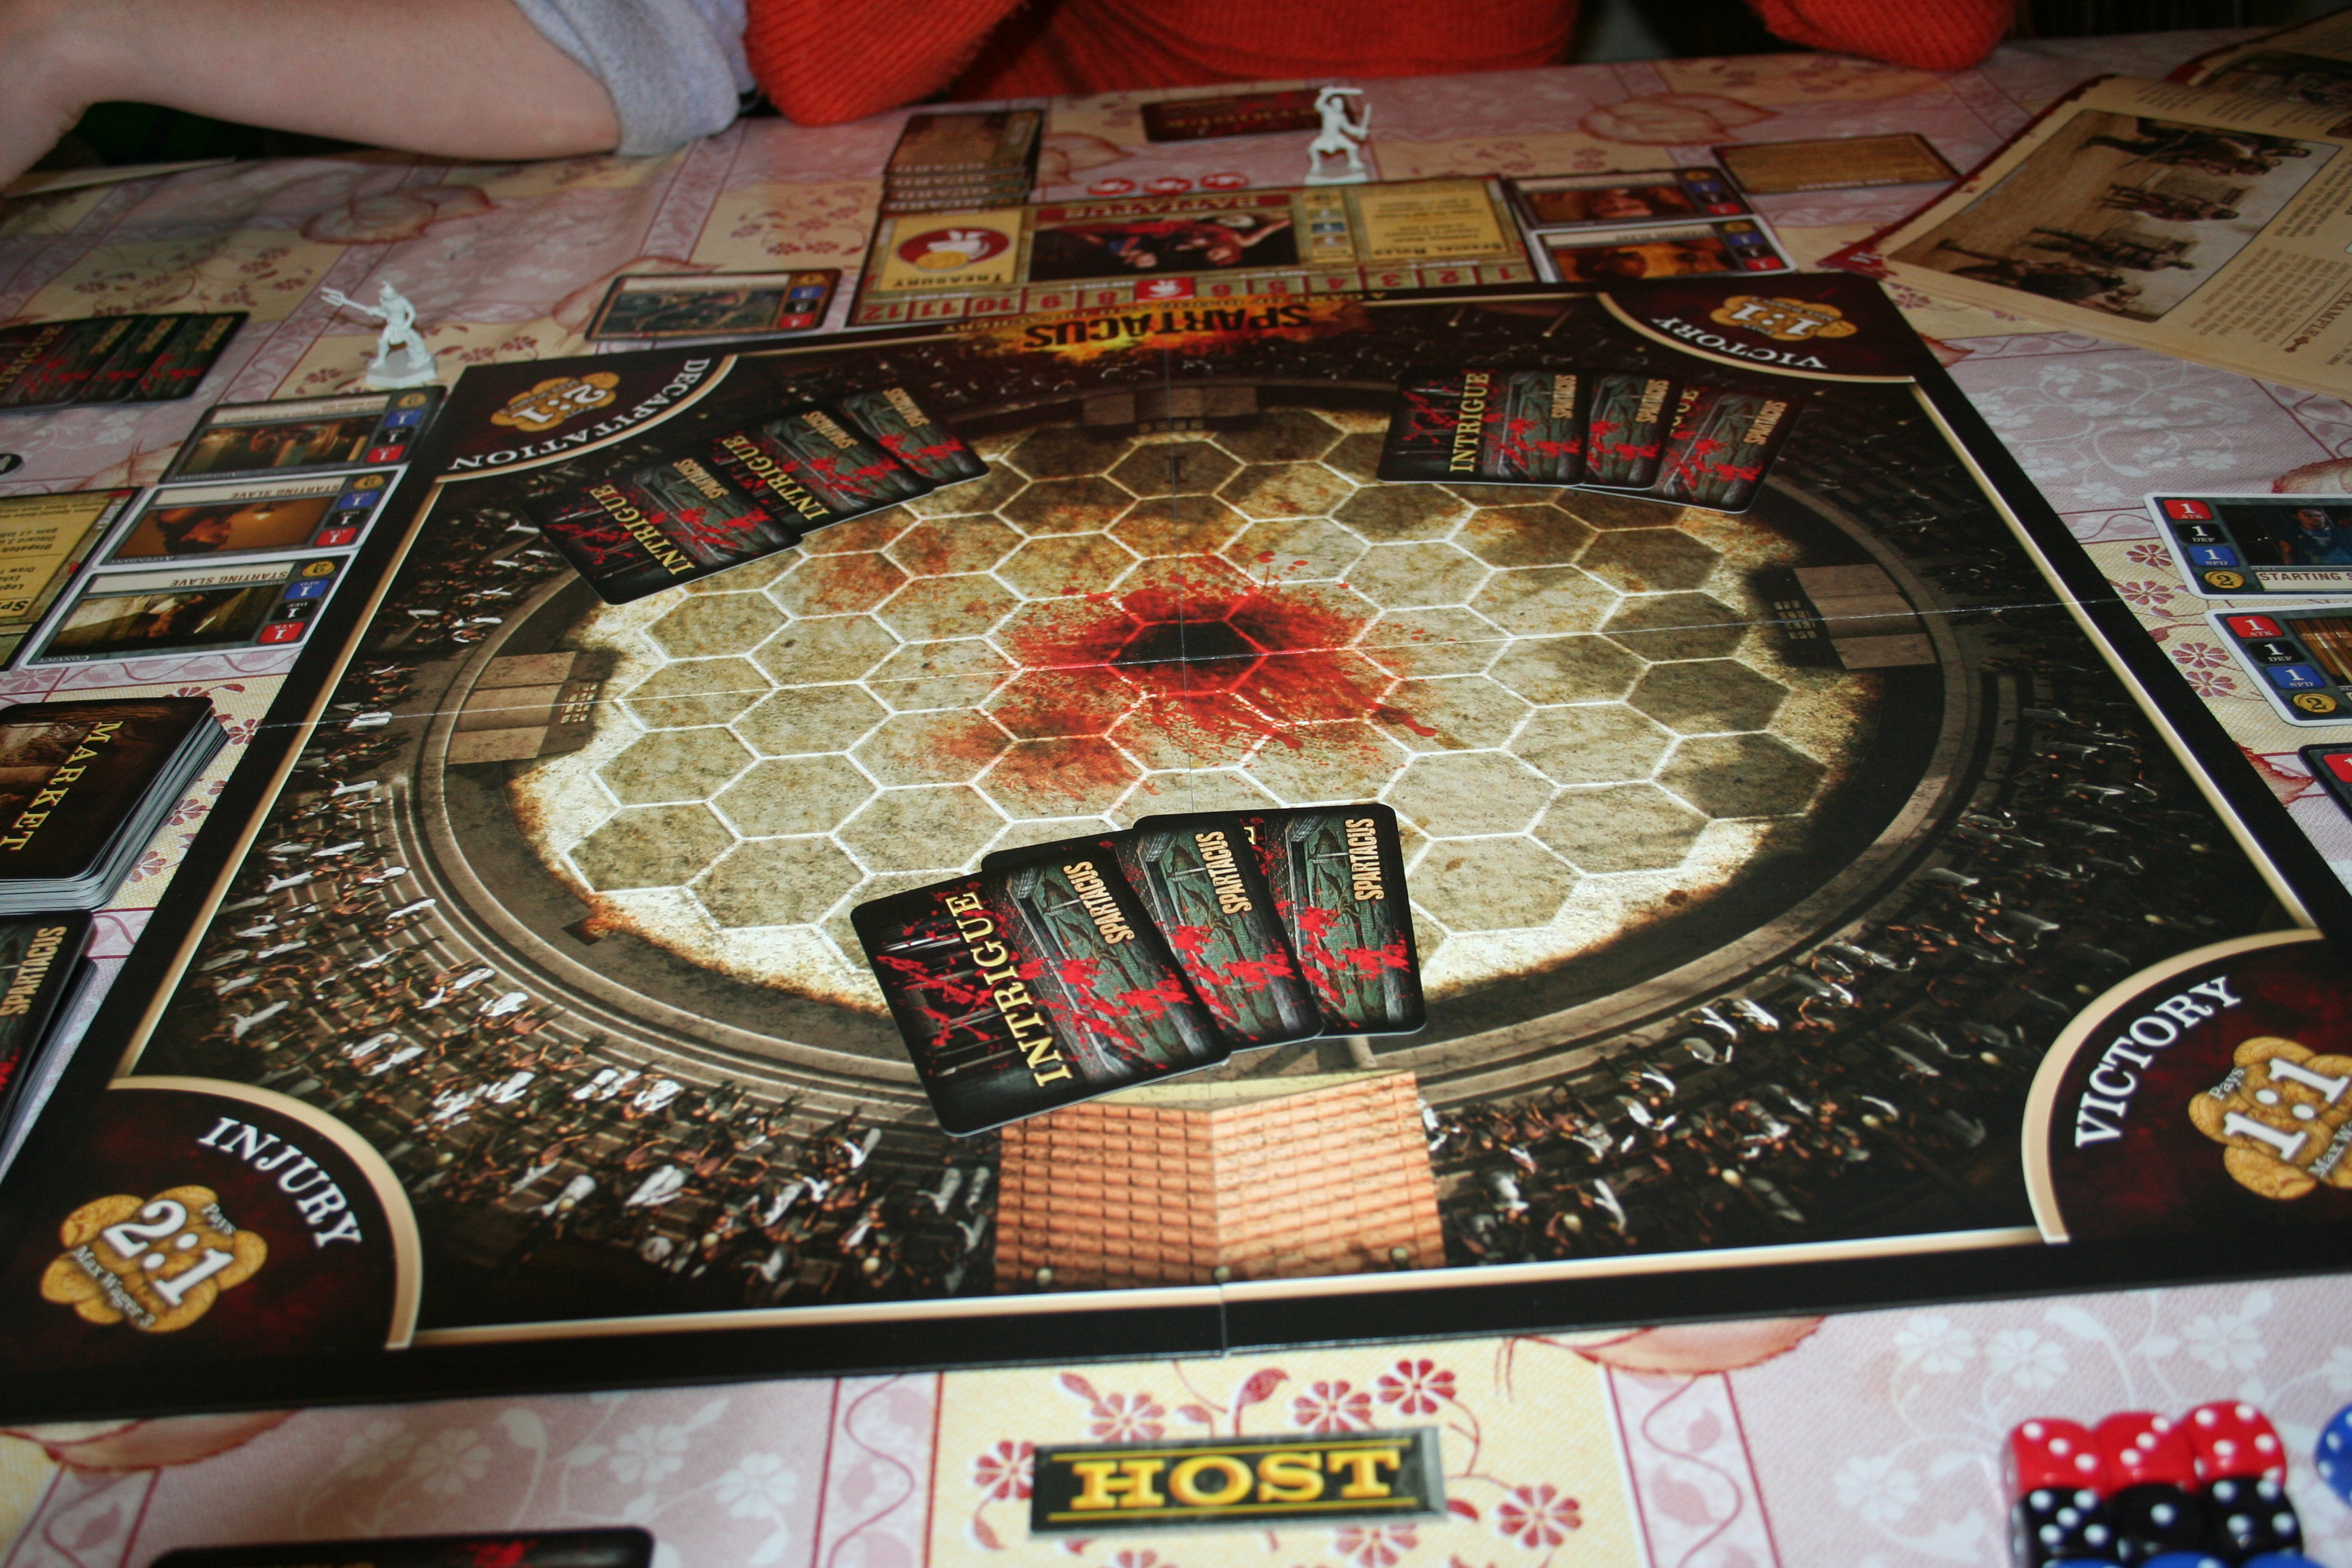
Arena Phase:
This phase is made up of six parts:
Honour to the Host – The player that won the hosting rights in the auction gets +1 influence.
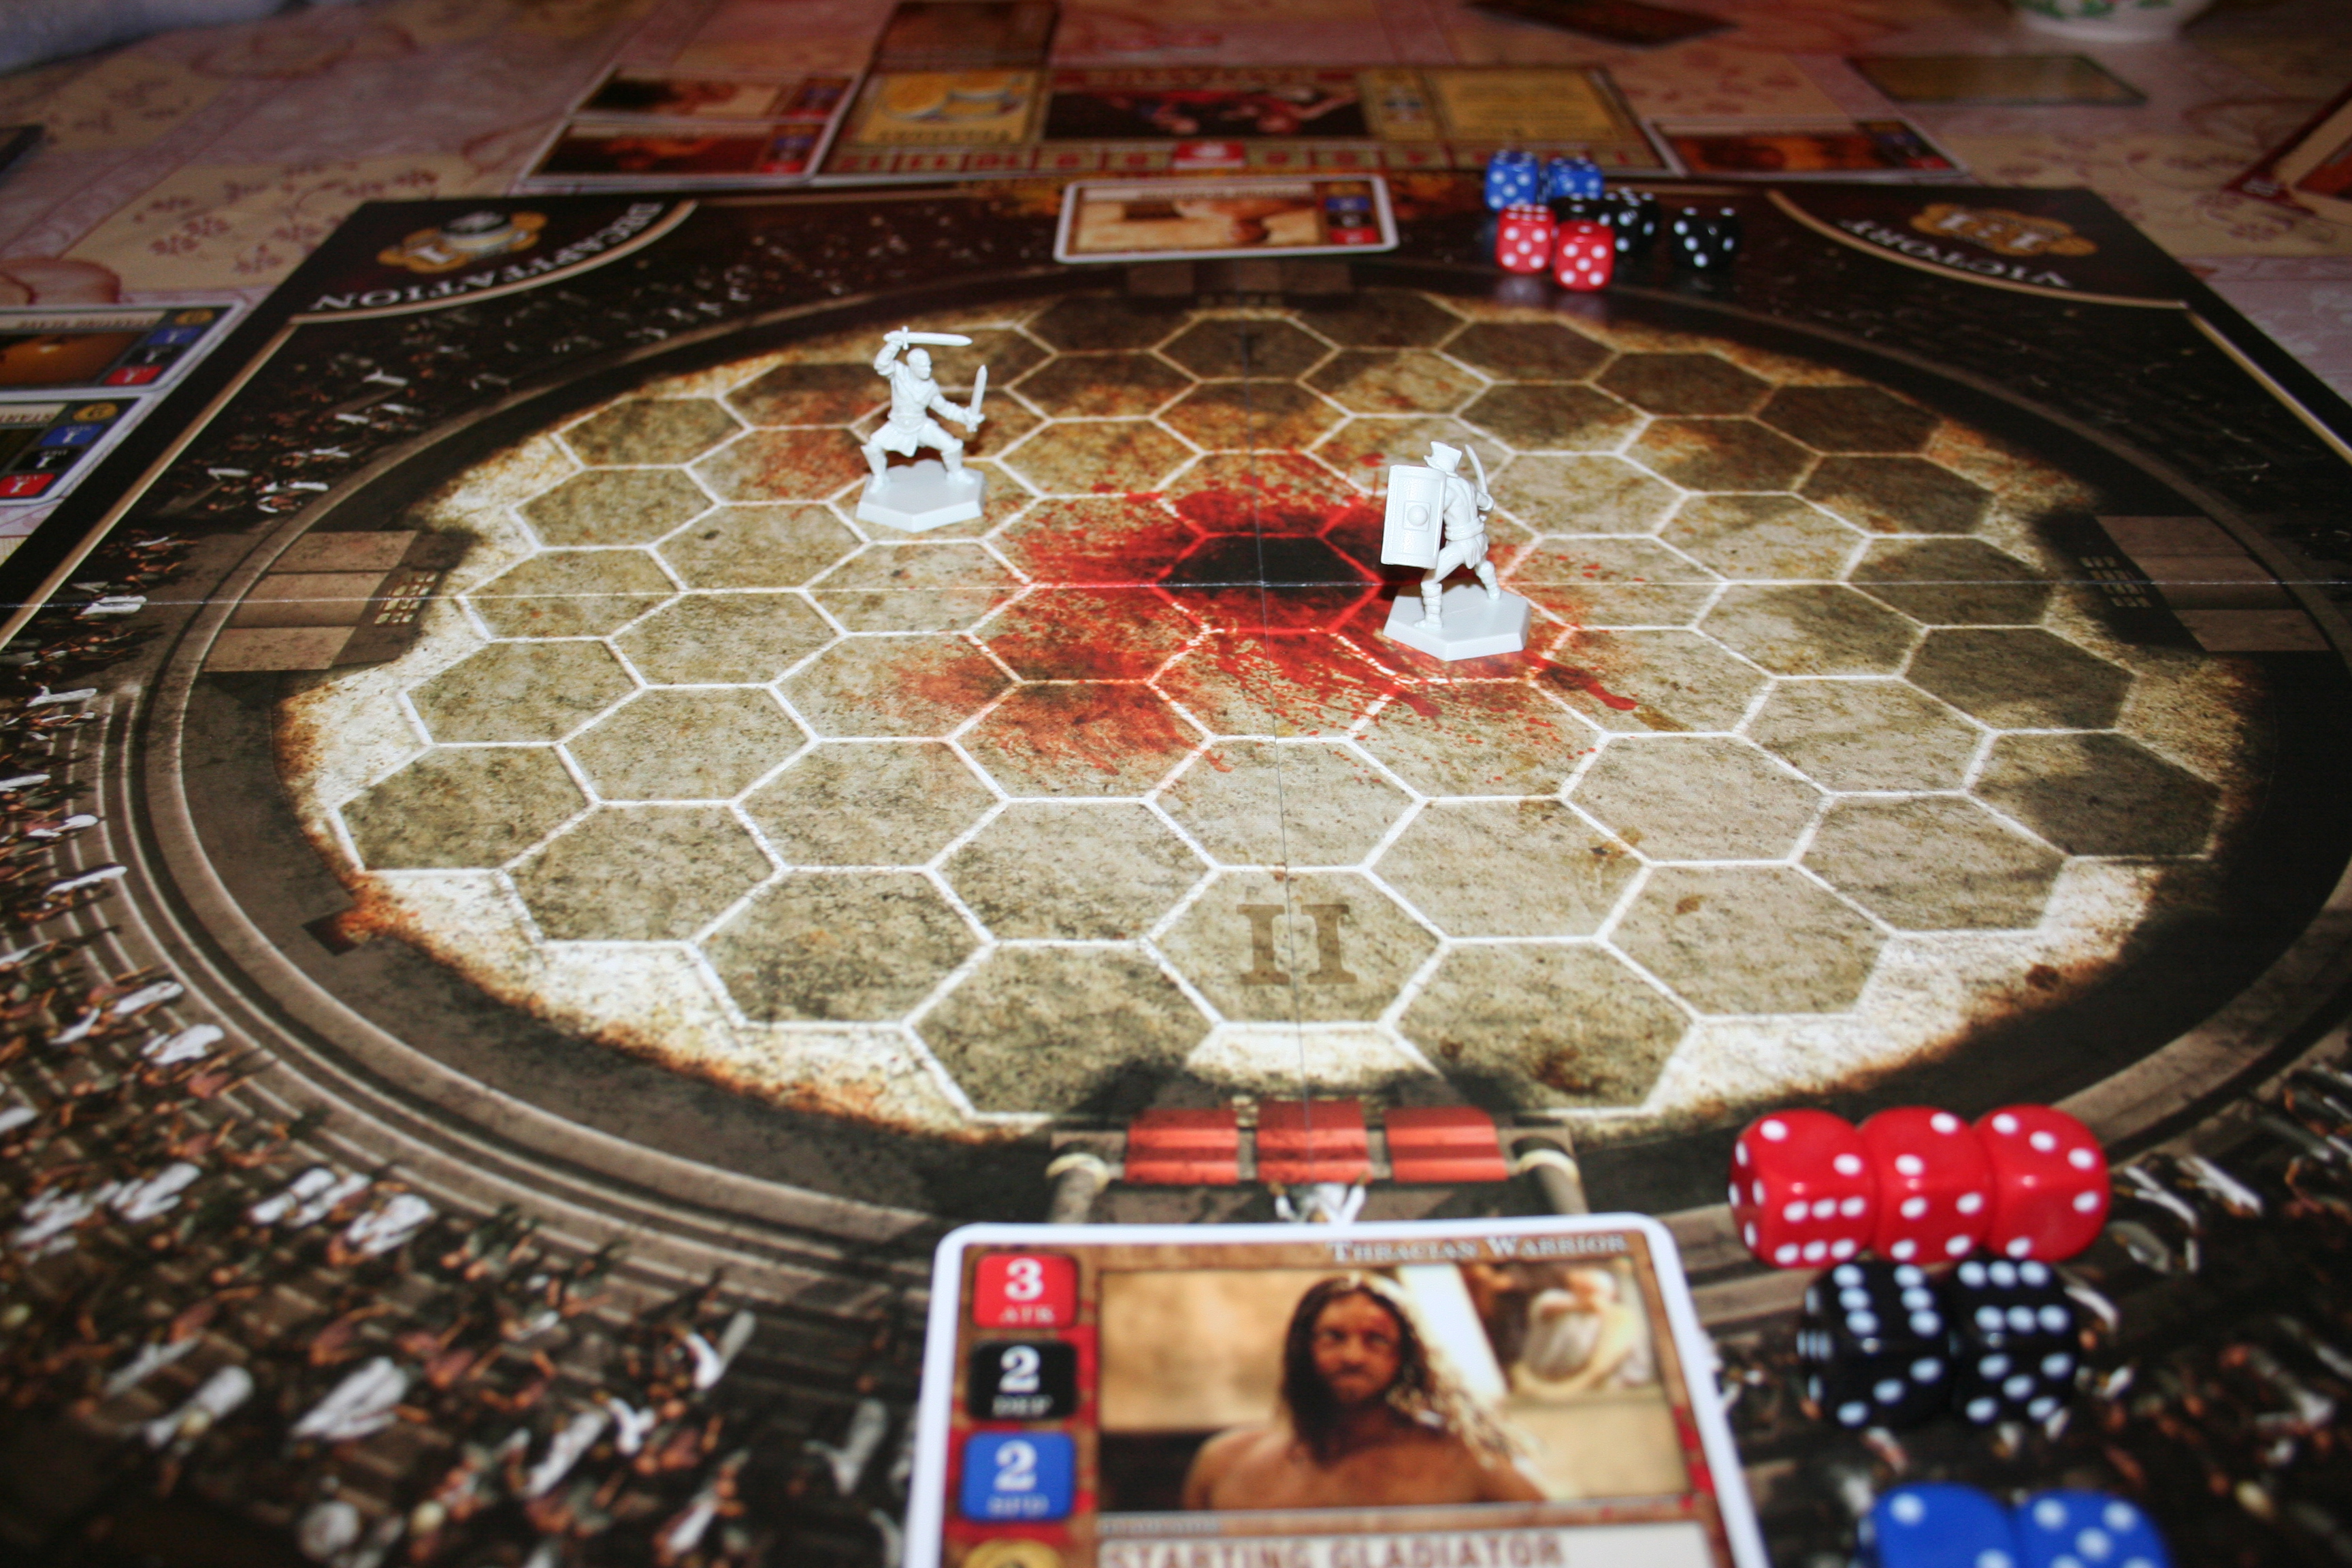
Hosting the Event – The host then invites two players to take part in the games (they can invite themselves). If a player declines they lose one influence. If they accept they place their gladiator figure in the arena in the starting position then place the card of the gladiator they are fighting, along with any Weapons or Armour they are also using.
A starting gladiator ready to battle.
Tribute – The owners of the gladiators are then paid tribute if their gladiators have favour or are champions – +2 gold for each favour token and +6 gold if they are a champion. If they don’t have any favour and are not champions they get nothing.
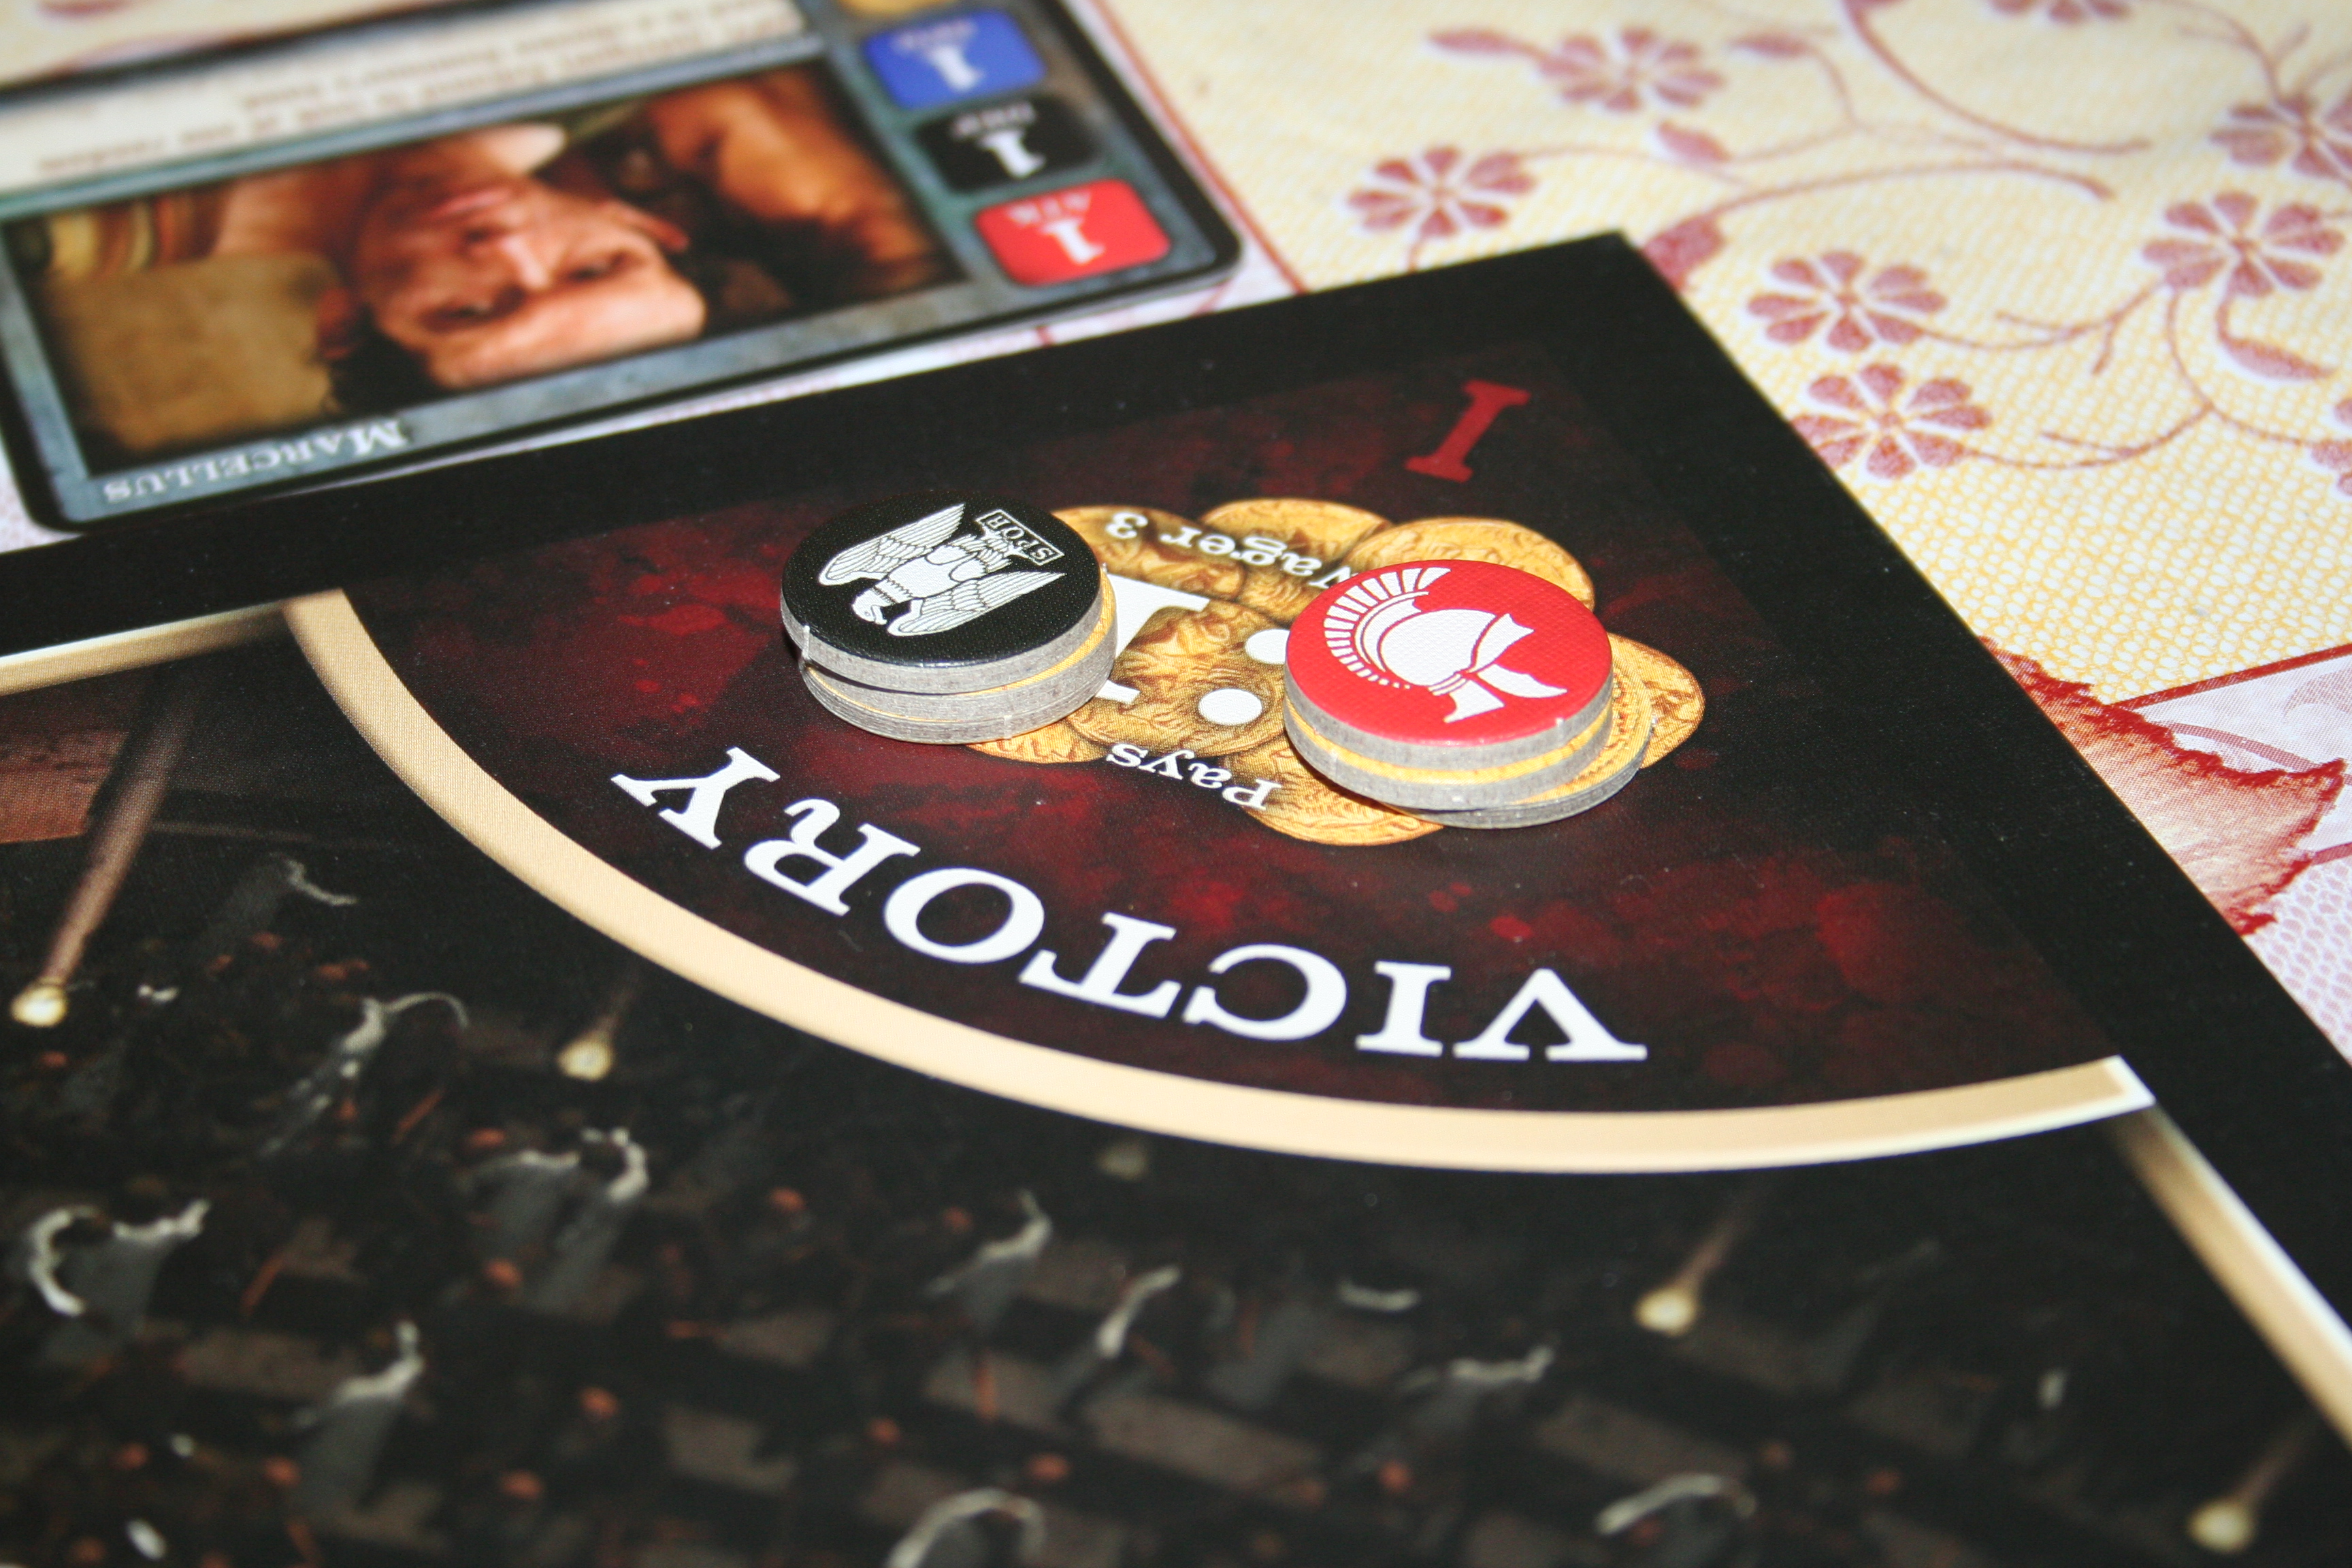
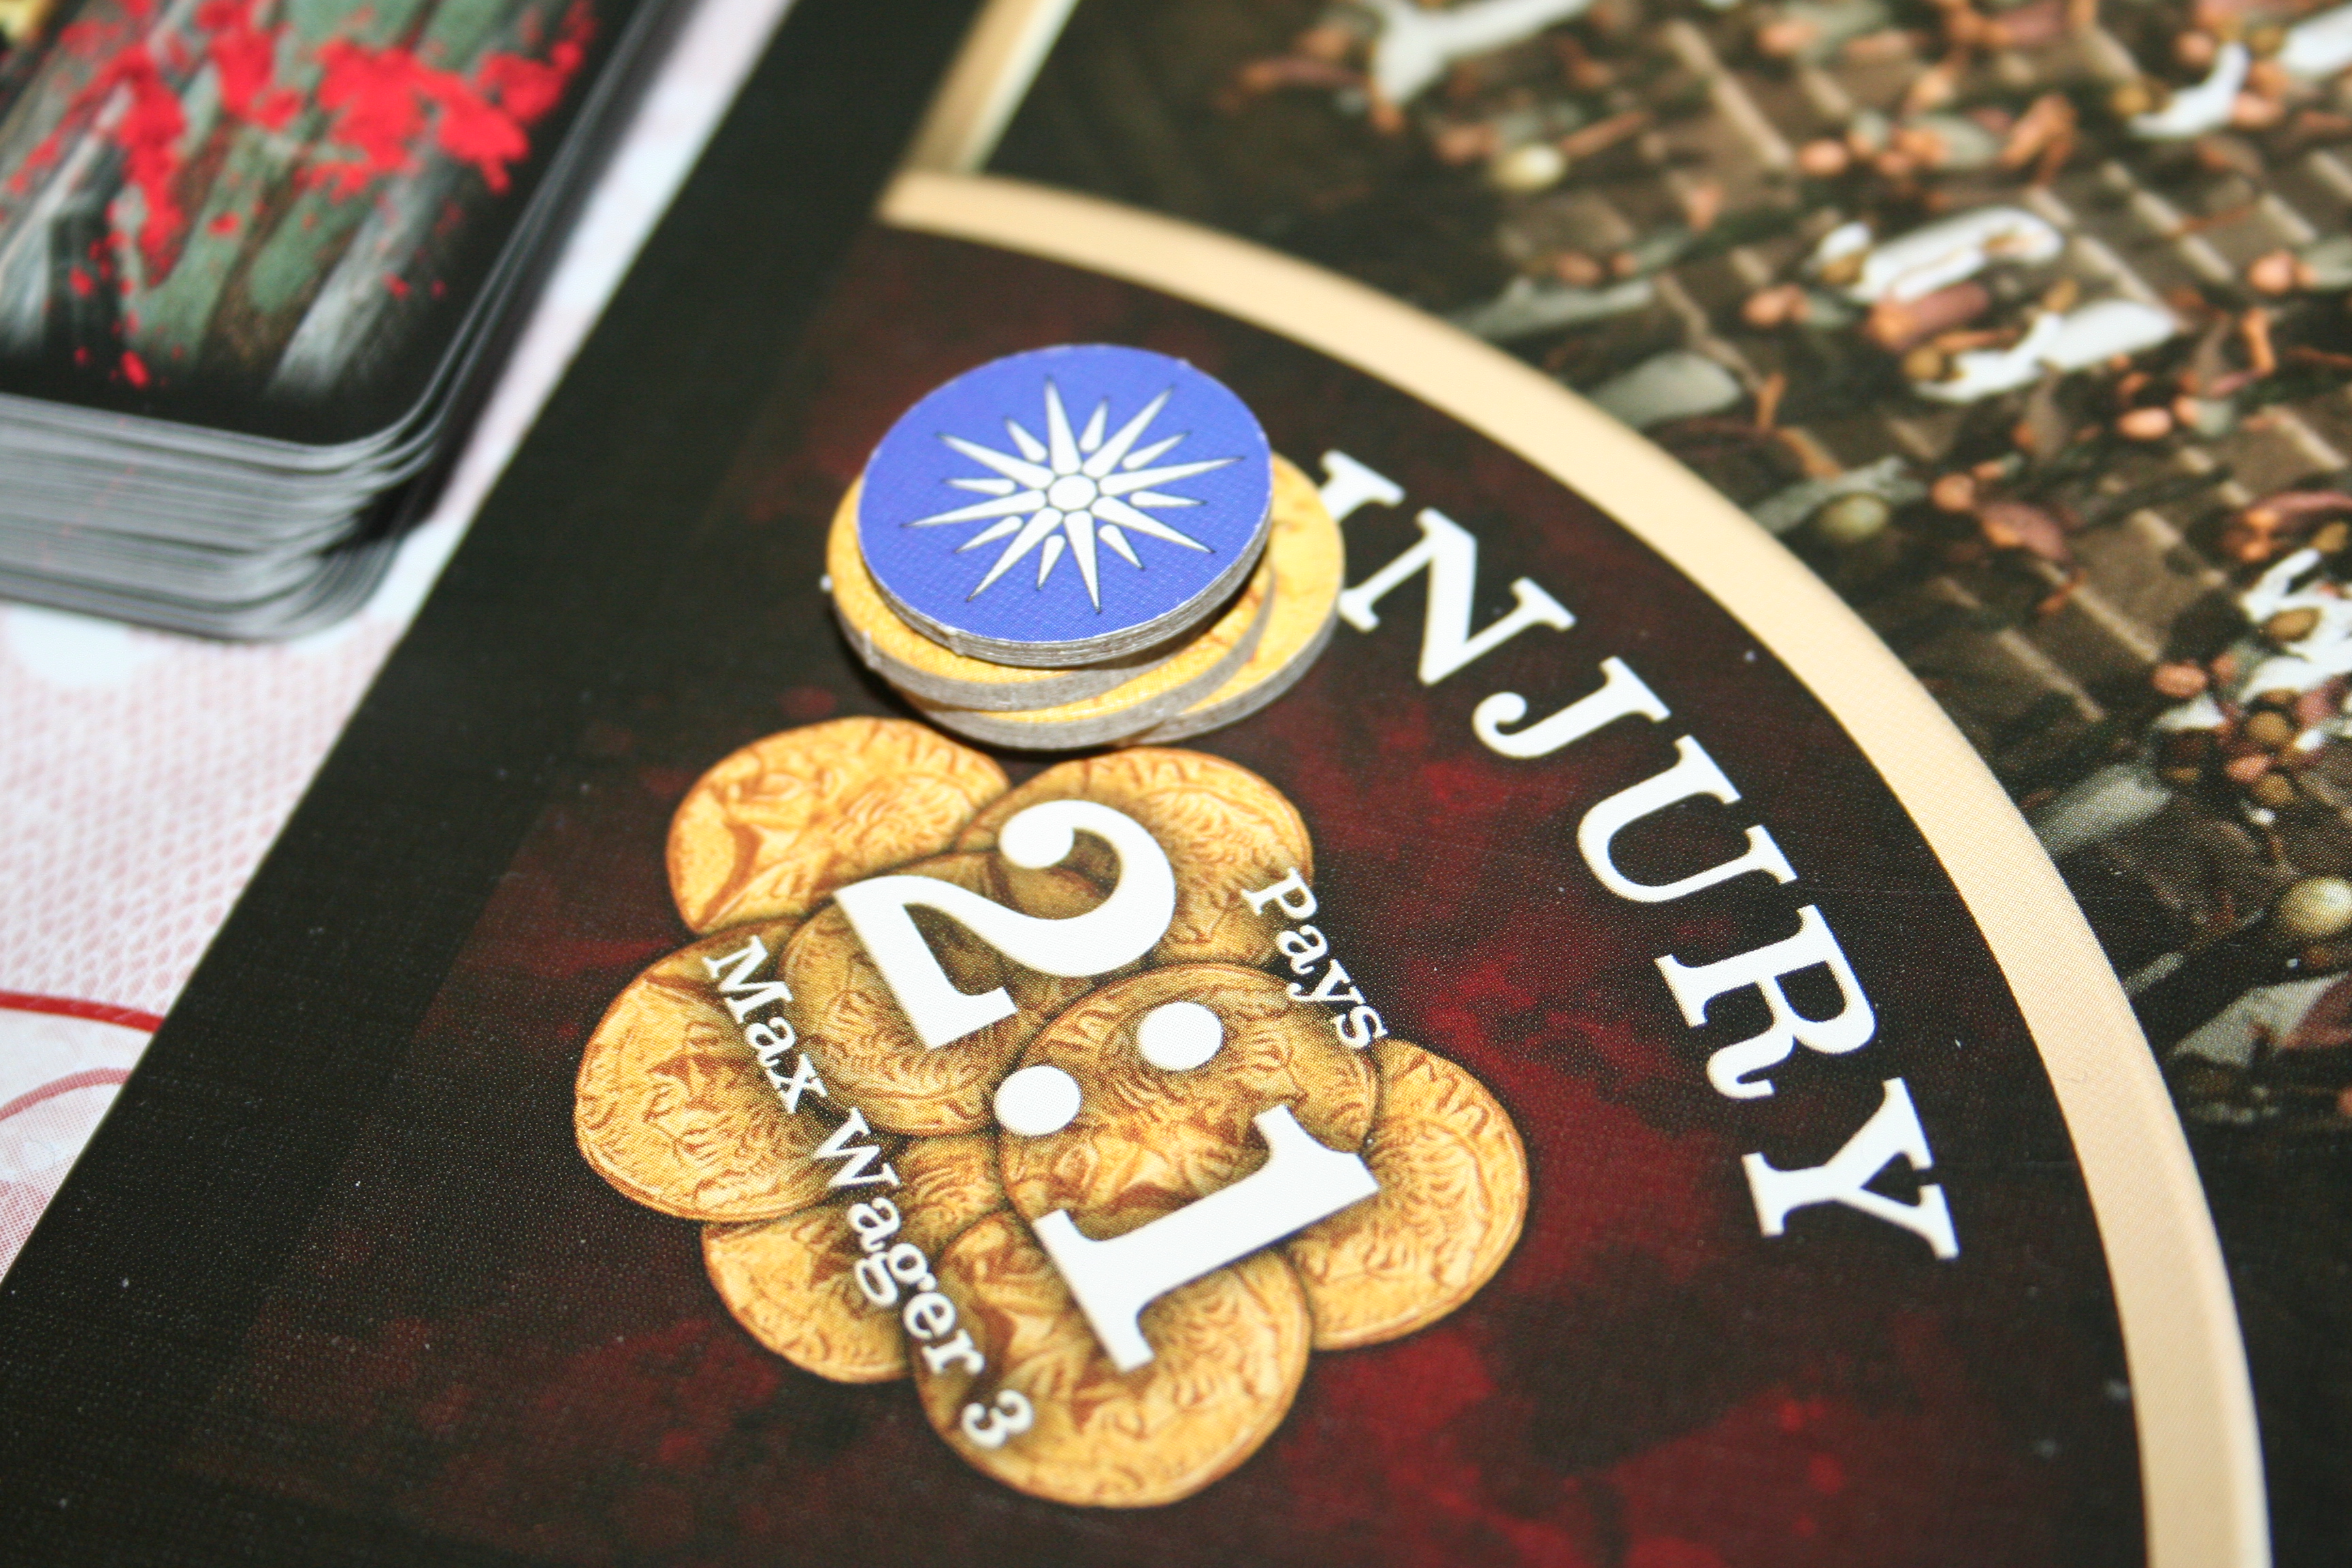
Place Wagers – It’s then time to place wagers, you can wager on who will win (competing players can’t wager against themselves) and how they will win (injury or decapitation). Three is the maximum wager on any one wager and the wagers you place are marked by putting you house wager tokens on top of your pile of gold on the wager you have made.
So a bet on combatant one to win returns 1:1 odds so you can double your money.
A bet on the fight ending in injury returns 2:1 odds so you triple your money.
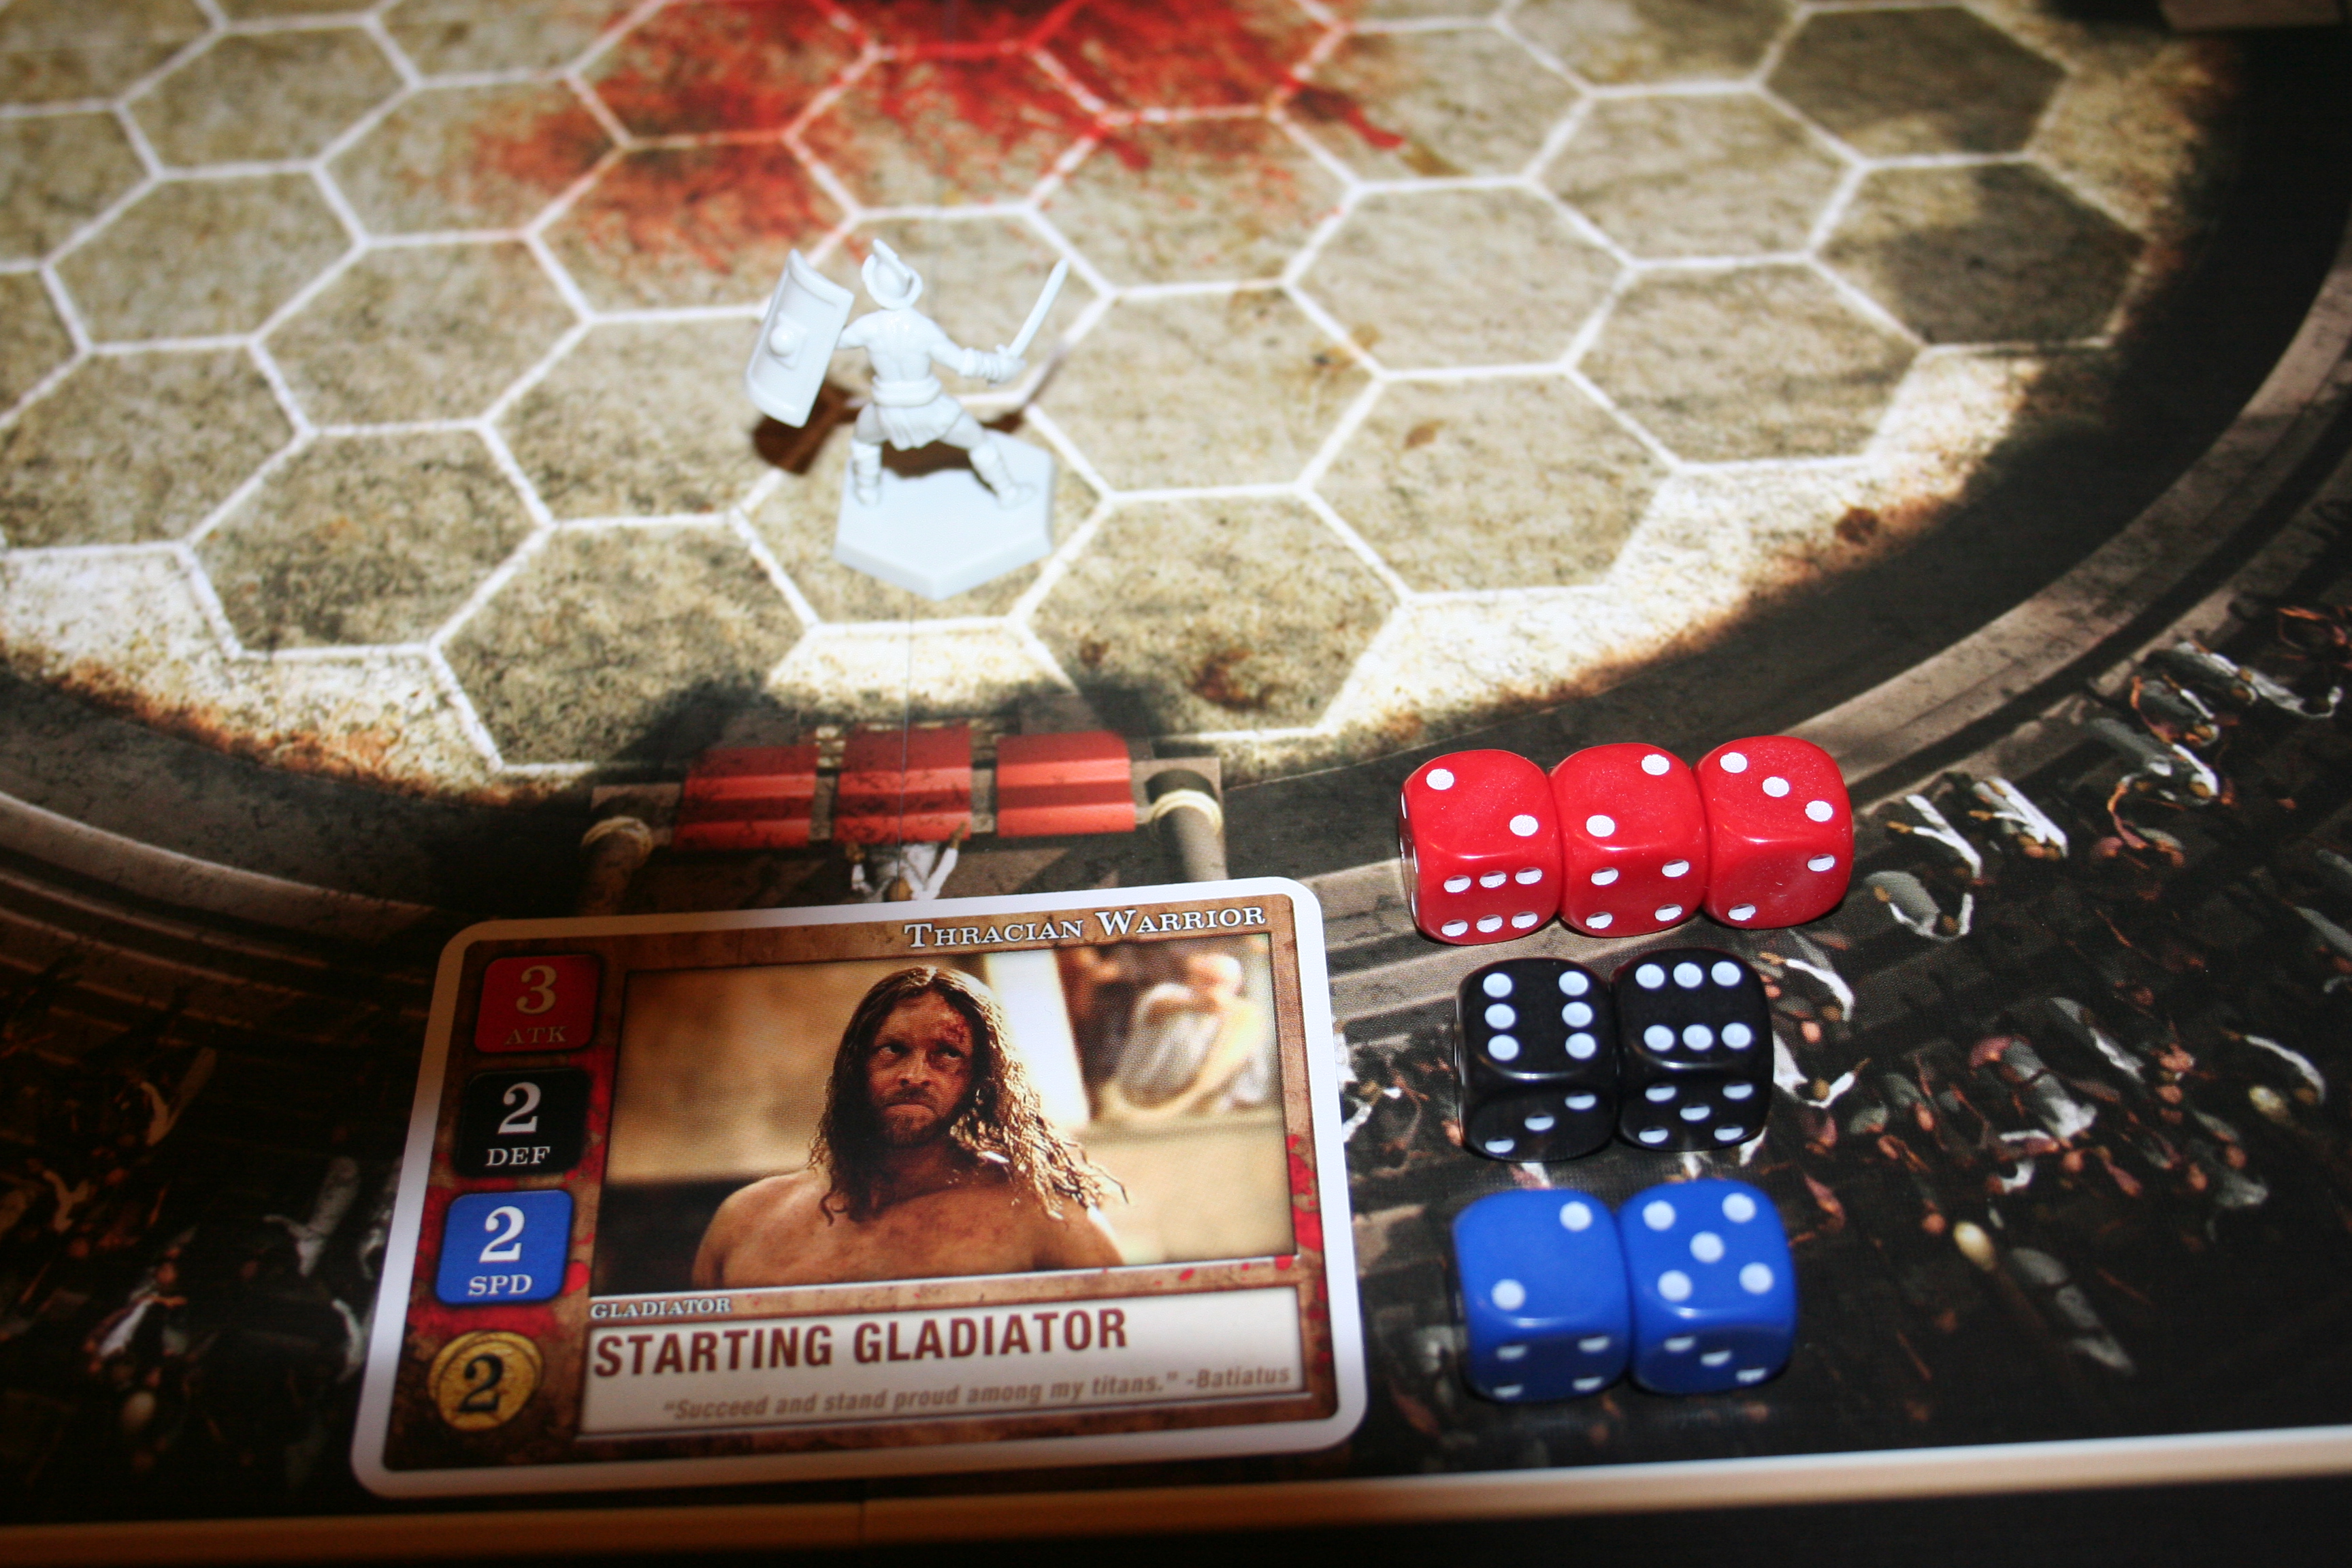
Combat! – Now the fight begins. Each fighting gladiator has statistics for Attack, Defence and Speed. They are given as many red dice as their attack statistic, as many black dice as their defence statistic and as many blue dice as their speed statistic:
3 Attack = 3 red dice, 2 Defence = 2 black dice and 2 Speed = 2 blue dice.
Each player then roles their total amount of speed dice to determine who moves first, the player with the highest total wins and decides who moves first. Your total number of speed dice dictates how many spaces you can move; so if you have two dice you can move two spaces. You can chose to move and then attack or if you’re already adjacent to your enemy you can attack and then move away. Once adjacent you attack by rolling your attack dice while the defender roles their defence dice. You then line the dice up from highest to lowest, opposite each other. Any place where one attack dice is a higher number than the defence dice is a hit and any place where a defence dice is higher than the attack dice is successfully defended. If they’re equal it’s also a successful defence. Where attack die outnumber defence dice any additional roles that have no matching dice count as a hit so long as they are three or above.
Two warriors ready for combat.
The dice are your health; so for each hit that is obtained the taker of the hit decides which dice to get rid of, lowering their attack, defence or speed for the next move. All attributes must be reduced to 1 before any can be completely removed. If one is completely removed then the player has yielded, if two are reduced to zero in one attack the player is wounded and if all three are reduced to zero in one attack the player is decapitated.
Victory and Defeat – The winning Dominus gains one influence. The winning gladiator revives one favour token, if it’s his third favour token he becomes a Champion. Wagers are then settled with the bank. If the loser was not decapitated the host of the games decides if he lives or dies with the thumbs up or down signal. To kill a loser who has favour will cost the hosting Dominus 1 influence per favour token and champions cannot be killed.
After all this the turn phases are repeated unless one player has a full 12 influence at this point, then they’re the winner! If they have reached 12 influence before this point they are not yet the winner as they can still lose influence before the turn of play is over.
Strategy:
MONEY IS POWER! Like in real life. If you are a broke Lanista (trainer of Gladiators) then you are a rather useless Lanista.
UNDERSTAND WORTH! Linked to the first point, knowing what/how much to bid for something in this game is everything. Knowing what you need and what’s not worth buying (at that time) will be the key to winning and losing.
HOST THE MOST! Bidding to be the host is always worth it, not only does it automatically give you influence you then have control too.
KNOW YOUR FRIENDS! While this is a rather back stab-y game it’s important to know the people you’re playing with and understand when they’re likely to stick with you and at what point they will abandon you and leave you to be eaten by dogs.
KEEP THINGS IN PERSPECTIVE! With such a large turn phase to the game it’s very easy to get caught up in just one round or one arena match and forget about the bigger picture and larger aim. Everything you do should be in aid of the bigger picture not just to get back at another player or just because you want to see a fight between two cool Gladiators.
History and Interesting Things:
While the board game itself does not have much notable history (at least nothing I can find) the historical events it’s based (very loosely around) do so that’s more what this section is going to contain.
The board game is only based on the first season of the TV show Spartacus: Blood and Sand, it being the only season in which Spartacus is a Gladiator rather than a rebel.
While historical facts on the war are highly debated it is often interpreted as a rebellion of oppressed people rising up against a slave owning oligarchy.
Historically Spartacus (the man) is supposed to have lived from 109 BC – 71 BC. The characters Crixus,Oenomaus, Castusand Gannicus, are also historically verified people who assisted in the uprising.
He was born a Thracianand supposedly died on the Battlefield near to Petelia (modern-day Strongoli, Calabria, Italy) as depicted in the TV show and film (probably without the “I’m Spartacus” fiasco).
This being Appian also that his body was never found.
6000 survivors of the battle where crucified alongside the Appian Way from Rome to Capua as depicted in the final episode of the TV show with the crucifixion of Gannicus.
Andy Whitfield who played Spartacus in the first season Spartacus: Blood and Sand (who’s face should be on the front of the game box rather than his replacements Liam McIntyre) sadly died on September the 11 2011 of on-Hodgkin lymphoma and the series was literally less than half as good without him.
While my obvious like for the TV show has made this review at least slightly biased I would still maintain this game is a good game by anyone’s standards. It is, however perhaps a touch complex and drawn out. For example; cancelled down version of just the gladiator battles would have made quite a good game just in itself. So this game is primarily for the patient and those who are naturally enthusiastic about games not for those who think monopoly is the epitome of (board) gaming.
Julius Caesar, The Roman Geezer, Squashed his Wife with a Lemon Squeezer:
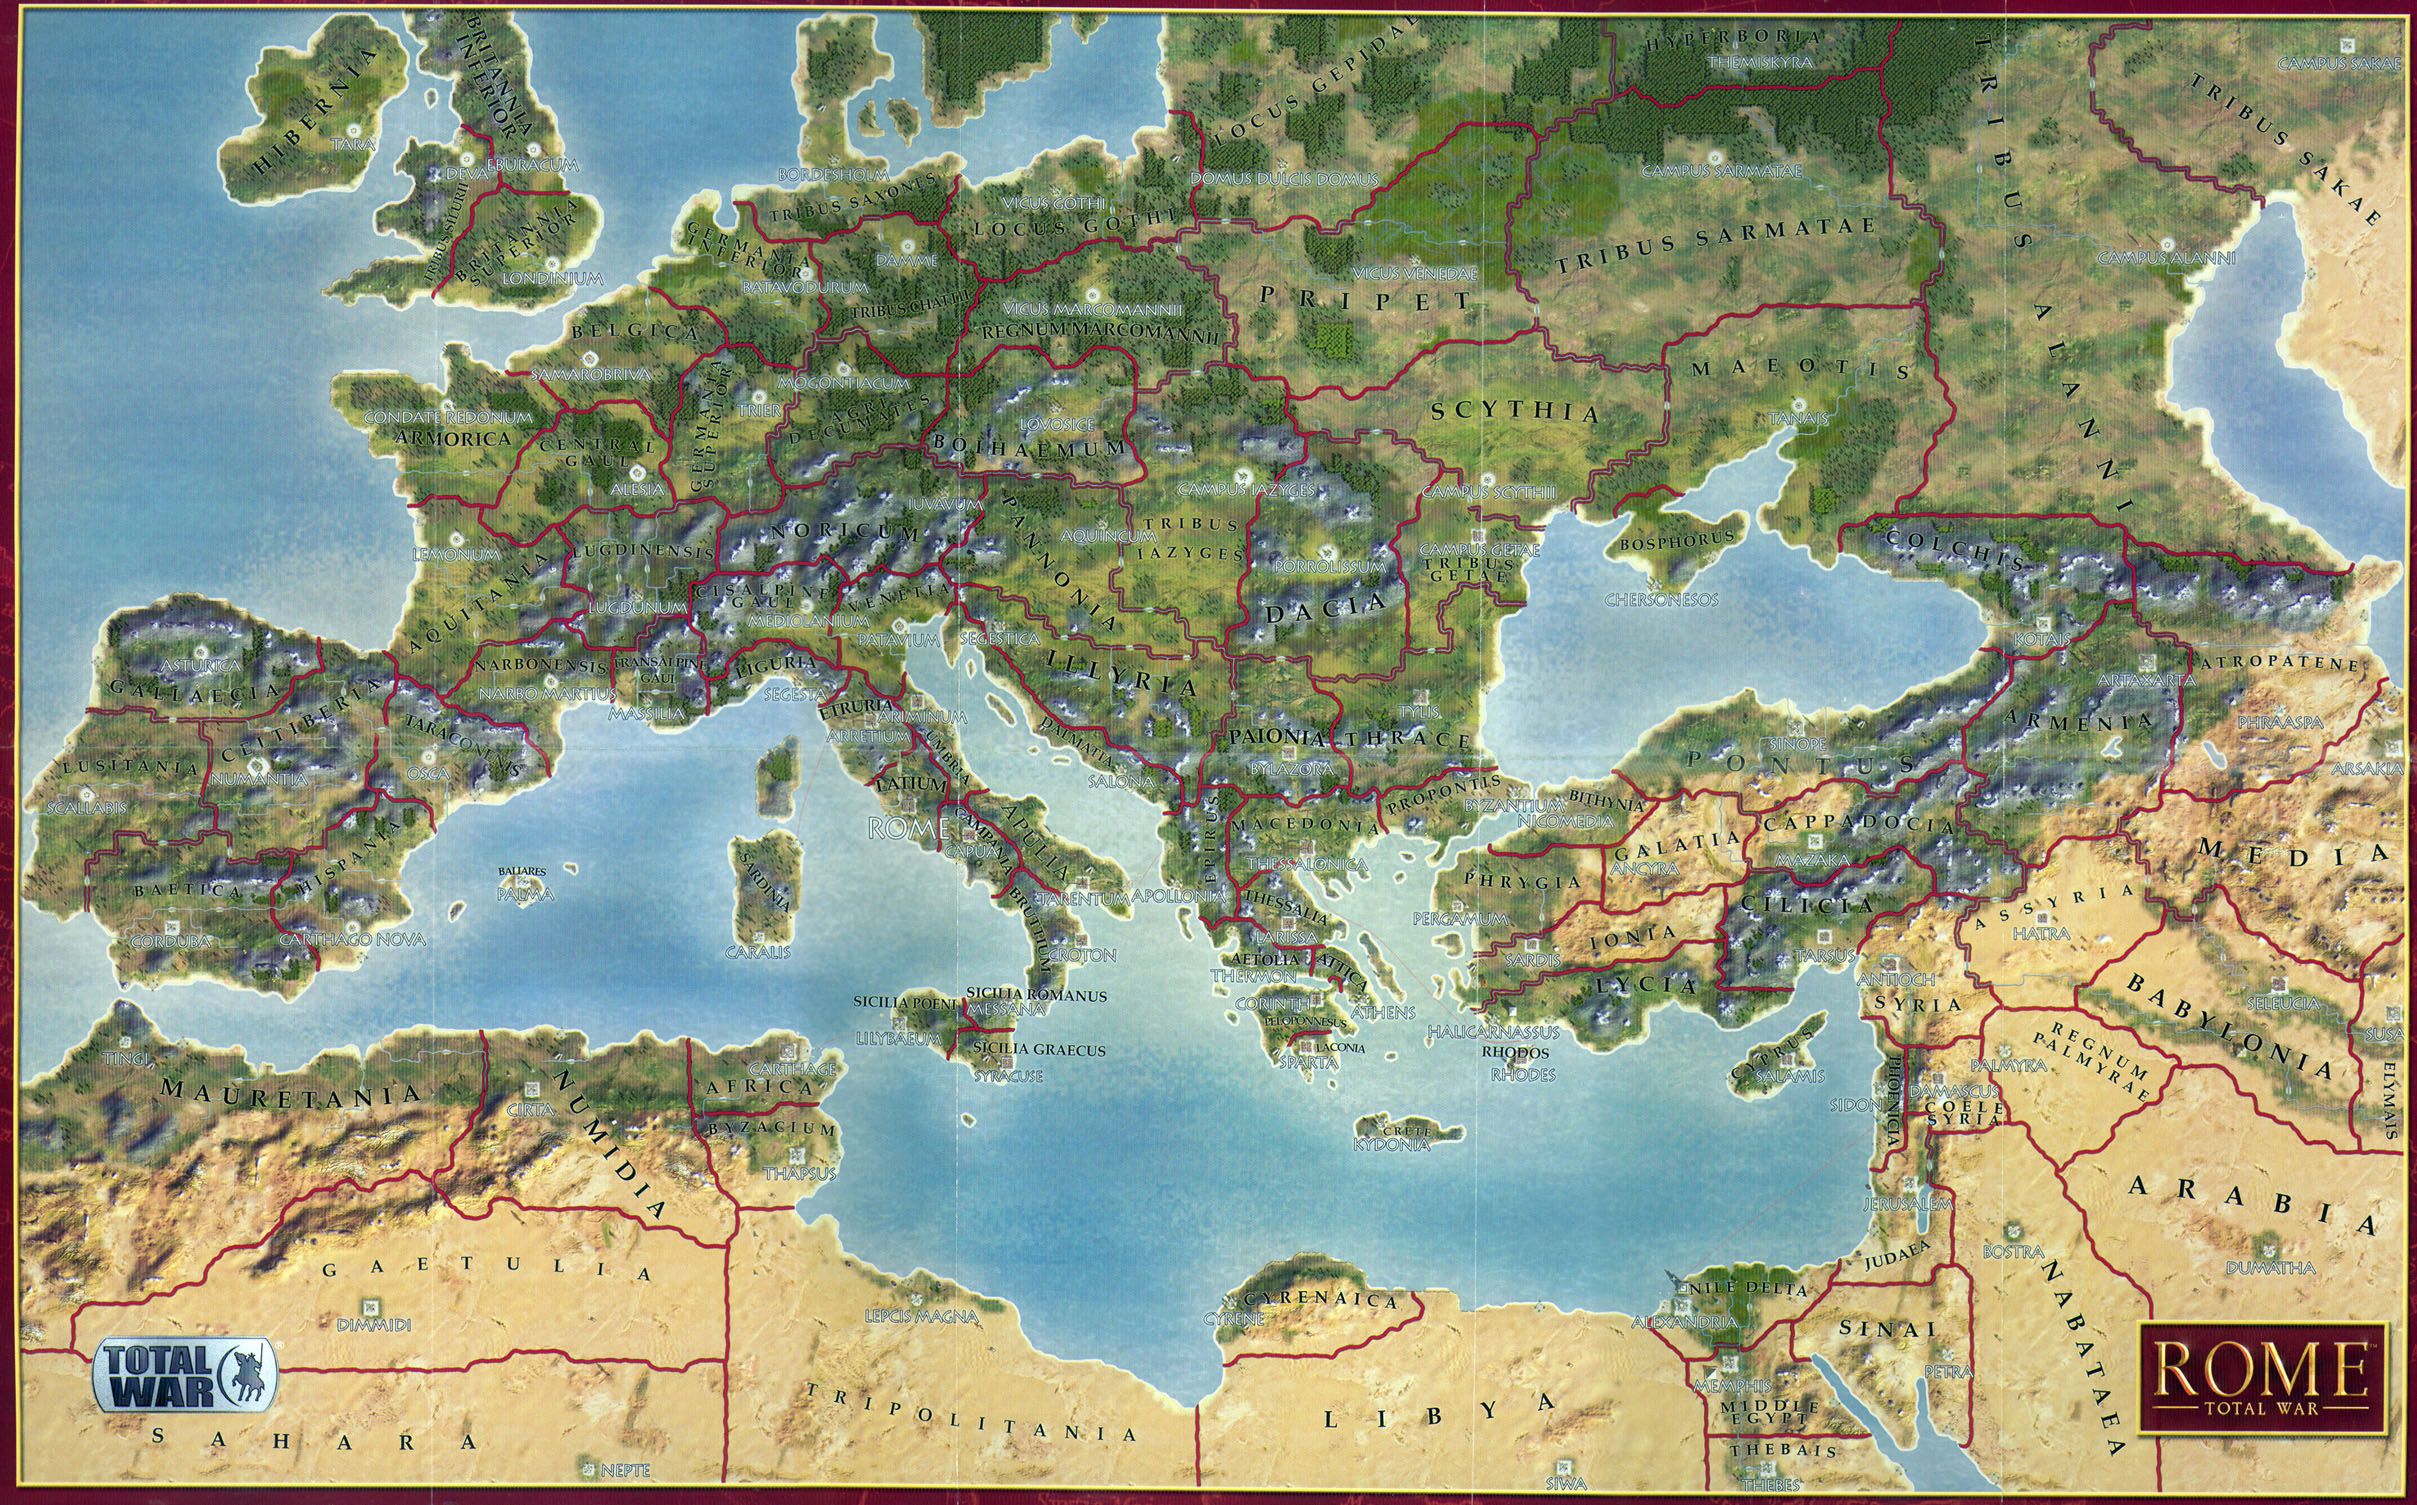
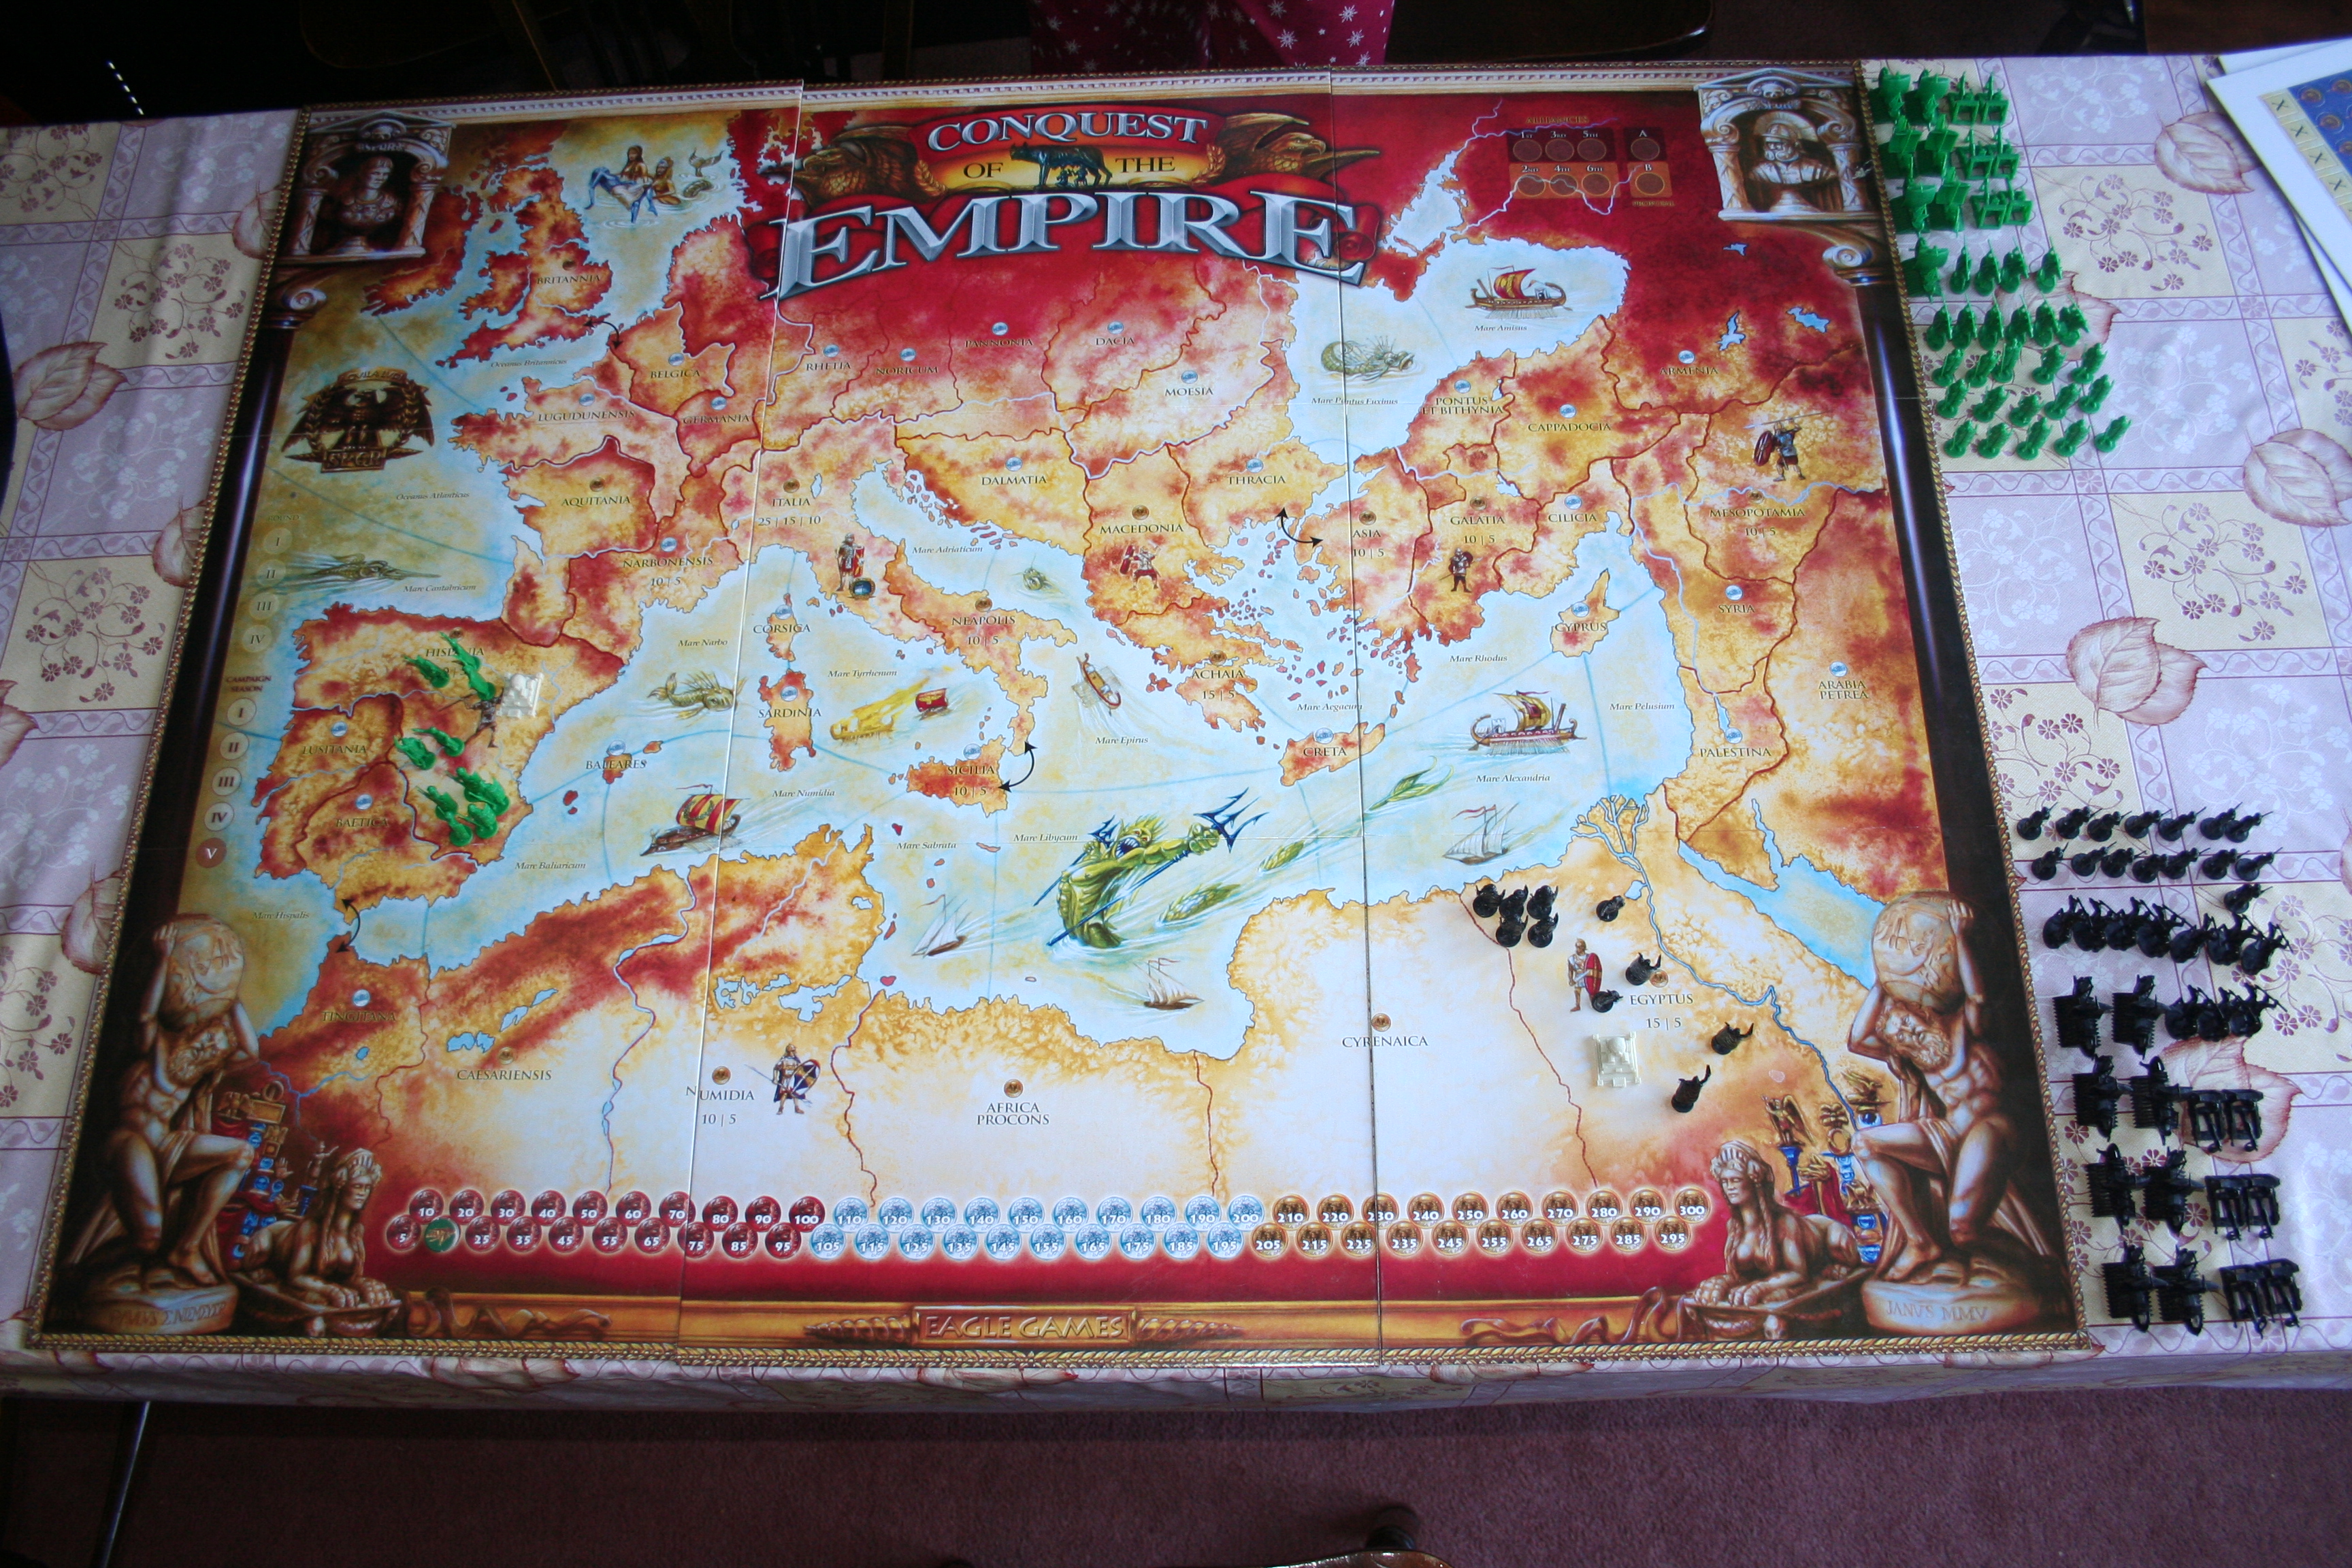
So as far I can figure Conquest of the Empire is just a table top version of Rome: Total War and being a huge fan of that game I’m also a huge fan of this game. In many respects it’s cooler; because you’re playing real people you actually feel some sense of victory when you crush them! But on the other hand, it’s obviously far more limited than Rome: Total War. To illustrate my point this is a picture of the Rome: Total War map:
And this is a picture of the Conquest of the Empire board:
Can you see the similarities?
Now, there are two sets of rules to this game, as I explain in the History and Interesting Facts part of the post but this post is only covering the Classic rules, as we haven’t had the time to play the other rules. Hopefully there will be another post covering the other set of rules before the month is over, so keep an eye out for that.
What’s In The Box:
1 Game board (see picture in introduction of it laid out)
Province tokens
Some of the Chaos tokens (the ‘X’s at the bottom of the other sheet are also Chaos tokens)
Influence/control tokens for each colour (except the bottom row)
8 Dice (for some reason ours has 12 but it did come from a charity shop)
16 Fortifications
16 Cities
1 deck of cards
Cards
20 Roads
Playing The Game:
Objective: To capture the other player(s) Caesar
The aim of the game is ultimately just to capture the other player(s) Caesar, which can lead to a fairly short game if you get lucky and the other person is careless; or if the other person is careful it can be a long complex game of strategy and well thought-out battling.
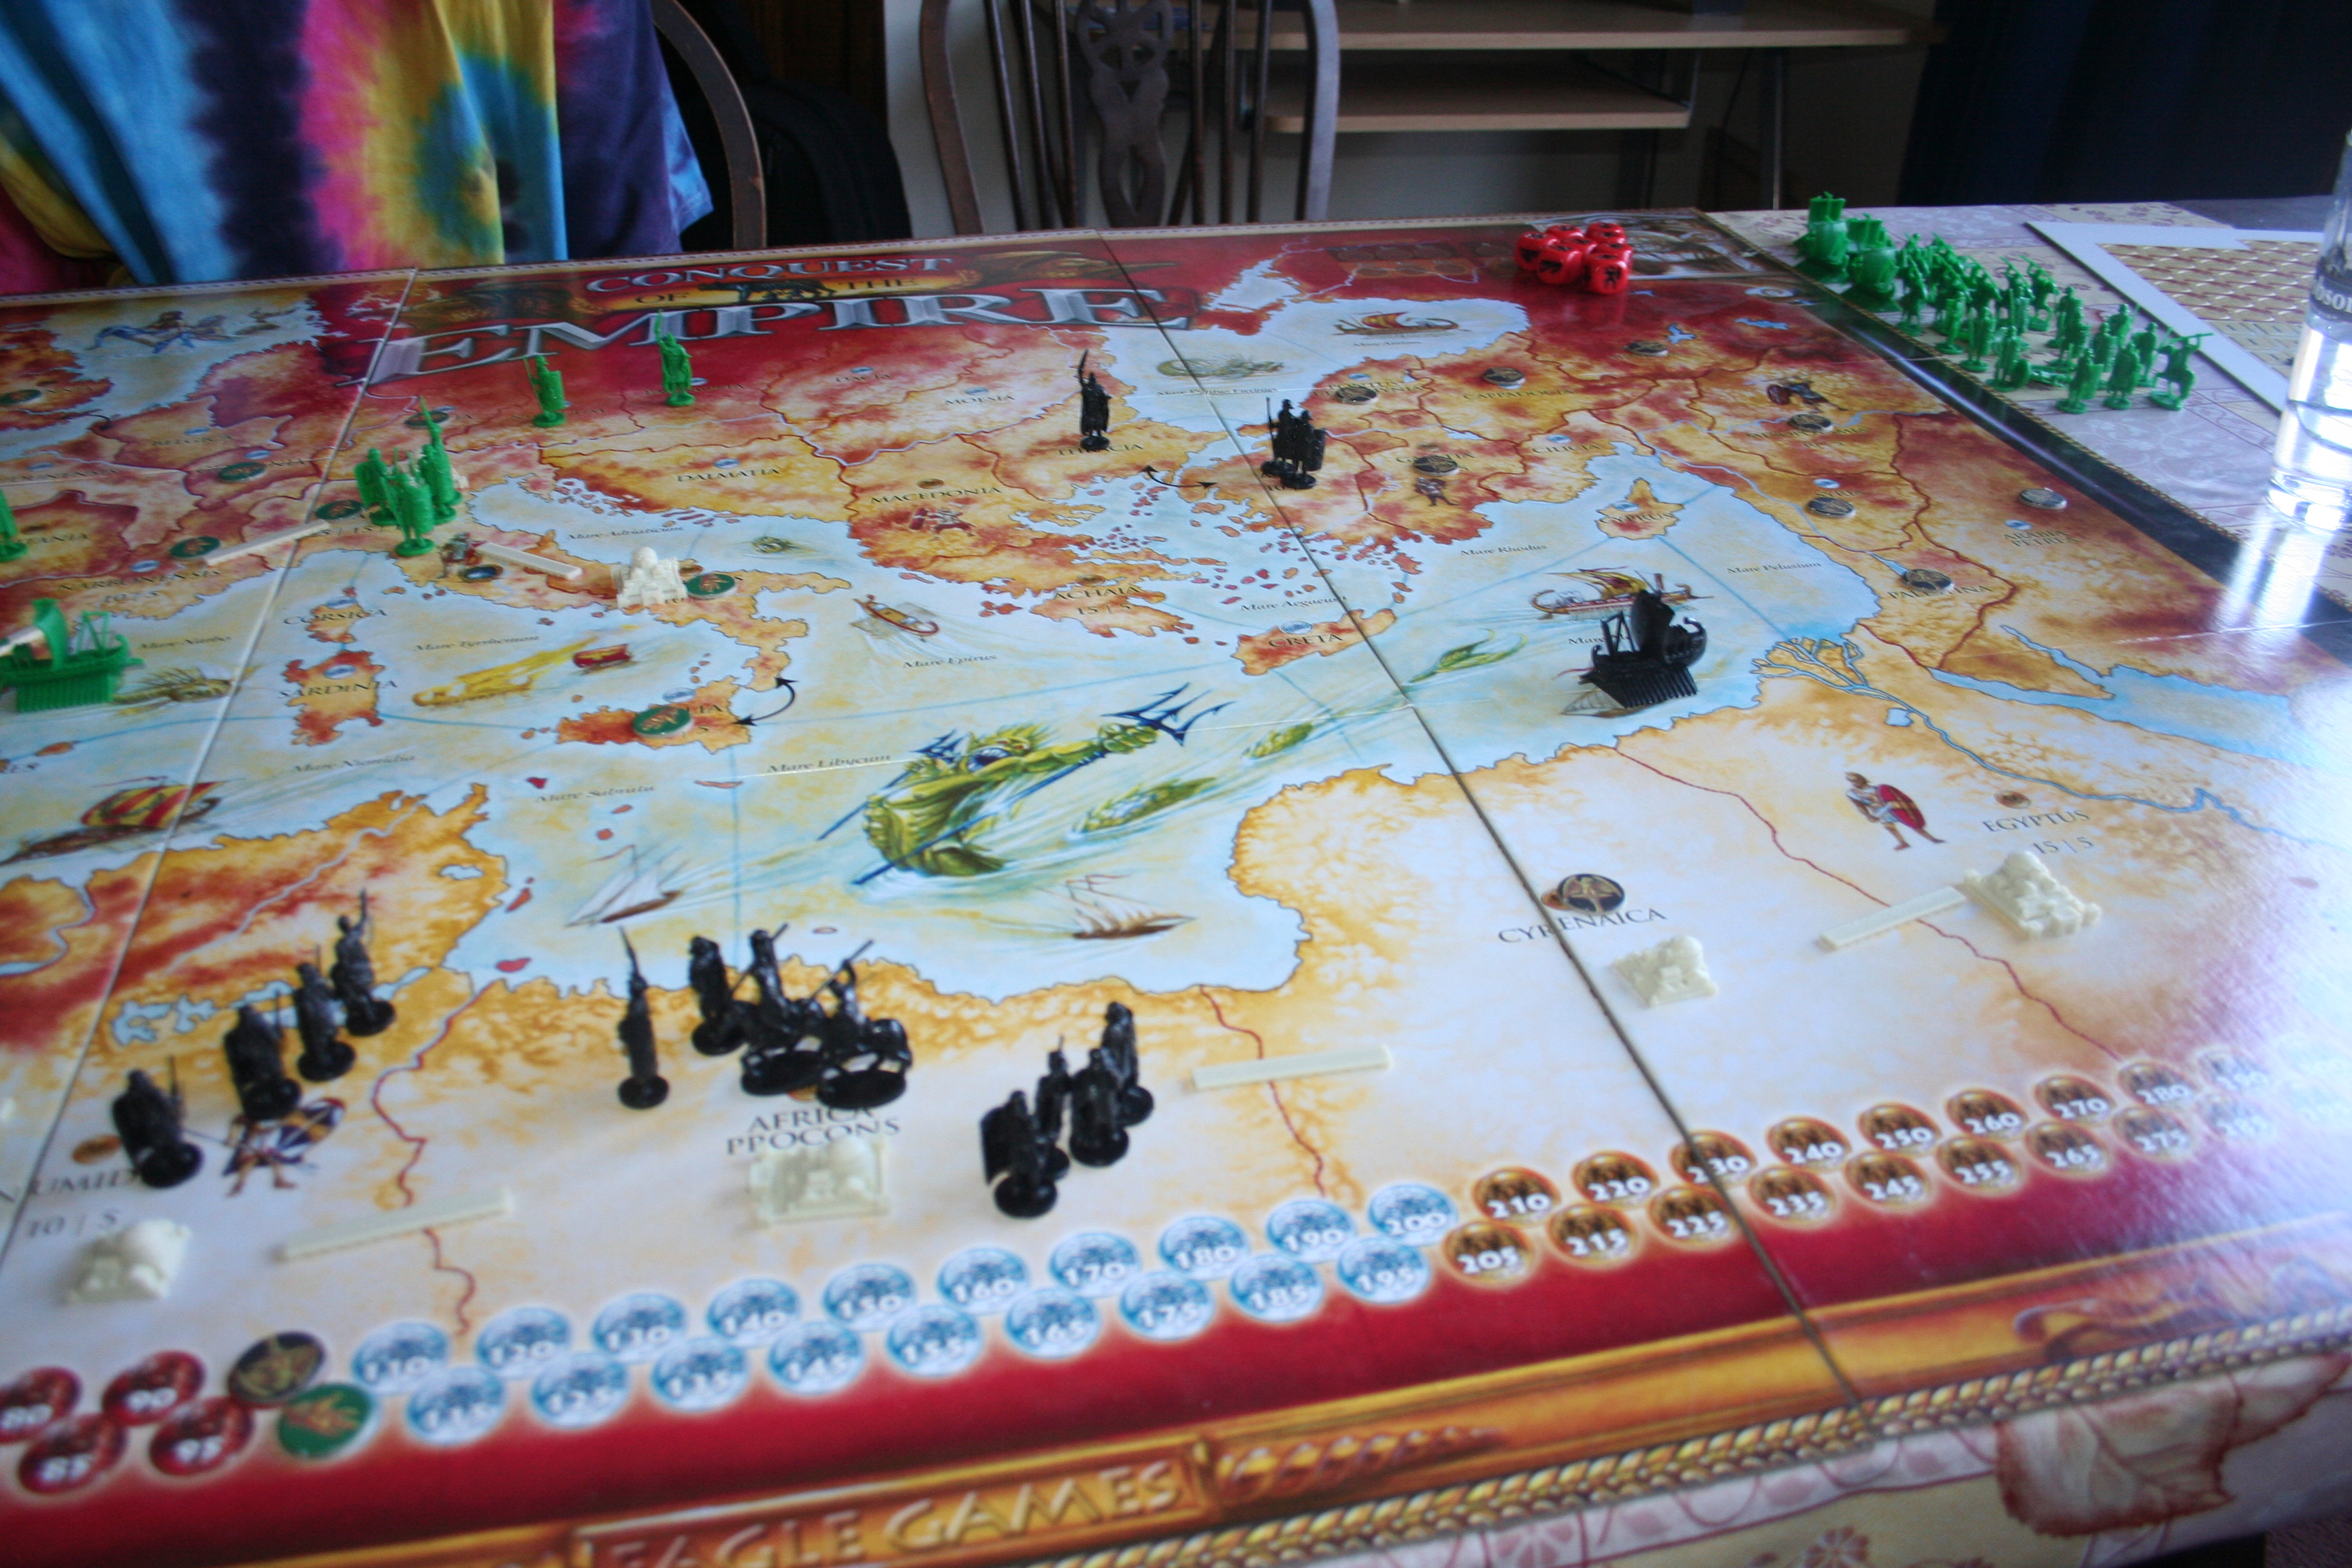
The board right at the beginning.
You start in one of the six starting provinces, these are shown on the board and the instruction book denotes which are available relative to how many players there are. The tribute scale at the bottom of the board is used to mark your income per-turn and increases if you capture provinces and decreases if you lose them depending on the worth of the province (marked on the board). you start on 15, as you home province is worth 10 but it also has a city in it which adds an additional 5.
The tokens for each player show the amount of money they get each turn.
Each turn is broken up into 6 sections:
Movement
Combat
Collect Tribute
Destroy Cities
Purchase New Pieces
Place New Pieces
So first up is movement, normal pieces can only move when attached to a General/Caesar. When they’re attached they form a legion; a legion may be up to 5 pieces (of any type) and then the General/Caesar to make a legion of six pieces overall. Without roads normal pieces may only move one space (being from one province to another) in a turn, however General/Caesar may move two, so they may move with a legion and then one further turn on their own. However they cannot fight by themselves – but are useful for conquering unoccupied provinces. The exception to this is roads; once on a road a player may move as far along that road as he/she likes. Galleys are the only units that can move without a General/Caesar, they can move up to two sea provinces even with no units in them.
The first move of the game.
The second part of a players turn is combat. Combat occurs when you move your pieces into a province occupied by an enemy and once you have finished all of your moving.
Just before combat.
Combat is somewhat similar to Battle Cry! (as reviewed here) in that it uses dice with symbols that show which piece have to be removed. You role as many dice as there are piece in your legion (up to 6) and the defender does the same. the relevant pieces are then removed according to the symbols on the dice, and either you fight again or one player retreats. Generals/Caesar are the last pieces to be removed from any legion and can only be captured when the rest of the legion has been destroyed. Captured Generals are kept by the winner and can be bartered with later in the move, if Caesar is captured the person who loses their Caesar has lost the game and is out.
A captured Caesar.
The next phase of a move is to collect tribute, that’s as simple as it sounds, you look at the tribute scale at the bottom of the board and collect the amount of tribute you are due.
A pile of gold!
The next phase is to destroy cites, you can do this in provinces you own if they are about to be captured to stop the other player gaining any benefits from them. This phase doesn’t have to be done as you may not be in a situation where its required.
The next phase is to buy pieces. You use your tribute to to buy pieces to build a bigger army. Pieces initially cost:
Infantry – 10
Cavalry – 20
Galleys – 20
Catapult – 30
Fortified City – 50
City – 30
Fortification – 20
Road – 10
However when inflation is trigger the first time (marked by the change in the tribute scale at the bottom of the board) cost doubles, when its triggered again (by the second change in the scale) the cost triples from the original prices.
A newly bought army.
The very last phase of a players move is to places his newly brought pieces. All new combat units must be placed in the home province of the player buying them, ships are placed on the coast of that province, or on the closest coast if you are landlocked. Cities are placed in the relevant province that you want a city in, only one city per-province and only one fortification per-city. Roads can only be built between two cities in adjacent provinces but multiple road sections between multiple cities can be used to make one long road.
Roads!
This process is then repeated until there is only one players Caesar remaining.
Strategy:
Now, like most games on this blog I don’t claim to be a master ,but here are a few things I picked up that are important:
DON’T FOR GET ABOUT YOUR CAESAR! That’s how I won the game we played, he was left in a province by himself. Always know where he is and always have him protected away from the action (unless you have no choice but t0 have him in the action.)
MONEY IS POWER! Conquering provinces is important to generate more tribute so you can buy more units so you can have more power.
DON’T FORGET ABOUT SHIPS! Ships look like they can be a very useful tool to attack your enemy where he/she is not expecting.
DON’T FORGET YOU CAN DESTROY YOUR OWN CITIES! Also destroying a city will destroy a road that runs between it and another city as roads can only exist between two cities. This could help slow a fast enemy advance.
BRUTE FORCE IS KING! Due to the luck/probability of the dice actually being 100% tactical is difficult, so just out manning the other player in all conflicts is advised.
History and Interesting Things:
While I have stated the publication date of the game as 2005, and hyper linked the 2005 game on BoardGameGeek, the original version of the game was released in 1984 by Milton Bradley and it’s sole designer was Larry Harris, Jr.
However the original version of the game’s catapult rules were considered to be “broken” so the 2005 version of the game was issued with two sets of rules, one that was similar to the original rules but with fixed catapult rules (the classic rules, the ones played in this article) and another completely new set that were based on Martin Wallace’sStruggle of Empires(these are Conquest of the Empire II rules).
The original version of the game also had different combat rules and the rules in the 2005 version were changed along with the dice that have images that correspond to the different units.
The game is thought to be very similar to the game Axis & Allies, this may be because it’s also designed byLarry Harris, Jr. (and because of this Axis & Allies is obviously going on our Games We Wantpage).
The original version of the game is now completely out of print and therefore a prized collectors piece.
However, that’s what Wikipedia says but you can buy a 1984 original copy from America for around £55 on Ebay here (eBay listing was active at time of publication).
(This may be from the film Gladiatorand therefore may not be historically accurate).
Like I said in my introduction, the game really is a physical version of Rome: Total War, just less complex and in some ways more fun.
It is also the largest game we have played to date, which makes it just a little bit more awesome.
To Conclude:
I like this game, I like it a lot, but I was always going to – as I said in my introduction, it’s just table top RTW. However this version of the rules has quite a lot of ambiguity but with careful reading and a bit of logic you can think your way through this. There are a few thing I think should be done differently, for example you should be able to build units in places other than your home provinces, other cities would have had barracks and been able to train men etc. Also it just feels wrong to collect your money half way through your turn, everyone knows turns begin with collecting money, it’s true of so many games, both table top and computerized. However I understand the building units one turn and not being able to move the till the next because it represents a training time.
The biggest issue with this game though is this:
Everything thrown in the box!
POOR BOX DESIGN! Now you may say that this is irrelevant to the game in the sense that it doesn’t affect game play. But it does, if you’ve had to spend 20 minutes sorting out pieces because there in a mixed mess you’re not going to have the same amount of fun playing the game as if they were all sorted already in a vacuum-formed tray in the box like 90% of games I’ve played (like Battle Cry!.) The only other game I’ve come across to rival this is the Pirate of the Caribbean edition of Buccaneer! Which you can read my rant about at the end of the post on it here.
But all in all Conquest of the Empire is a good and fun game (perhaps not quite as good/well thought out as Battle Cry! and definitely not as versatile). It’s also very large which for some unknown reason makes it more exciting…
We’ll have to wait and see if the other way of playing it is as good or perhaps better.
P.S. I (Miriam) wouldn’t usually add on to a post like this, but it was more like 2 hours sorting time than 20 minutes which makes this, in my opinion, an epic design flaw… Especially when trying to determine if all the pieces were still there.
As is self-evident from the name of the game Battle Cryis a strategy war game. It recreates the American Civil War. Players play as the Union or the Confederates, in other words, North or South America and can play through each of 30 scenarios from the war. The board is set up using Terrain Tiles with different images on them to create different parts of the country. Each scenario is defined in the Rule Book and has a pictorial representation of the starting layout of the board. My favourite thing about these descriptions is that there’s a little historical information provided about each scenario, but at the bottom, right after it tells you who originally won that battle it says: “The stage is set, the battle lines are drawn, and you are in command. The rest is history.” And it leaves you to find out who the best strategist is!
Dave and I did initially play the game slightly wrong, because we were in a rush. But this just reinforces our firm belief that you should thoroughly read the rules before starting any game.
Our first attempt at playing this game – we set up the board wrong.
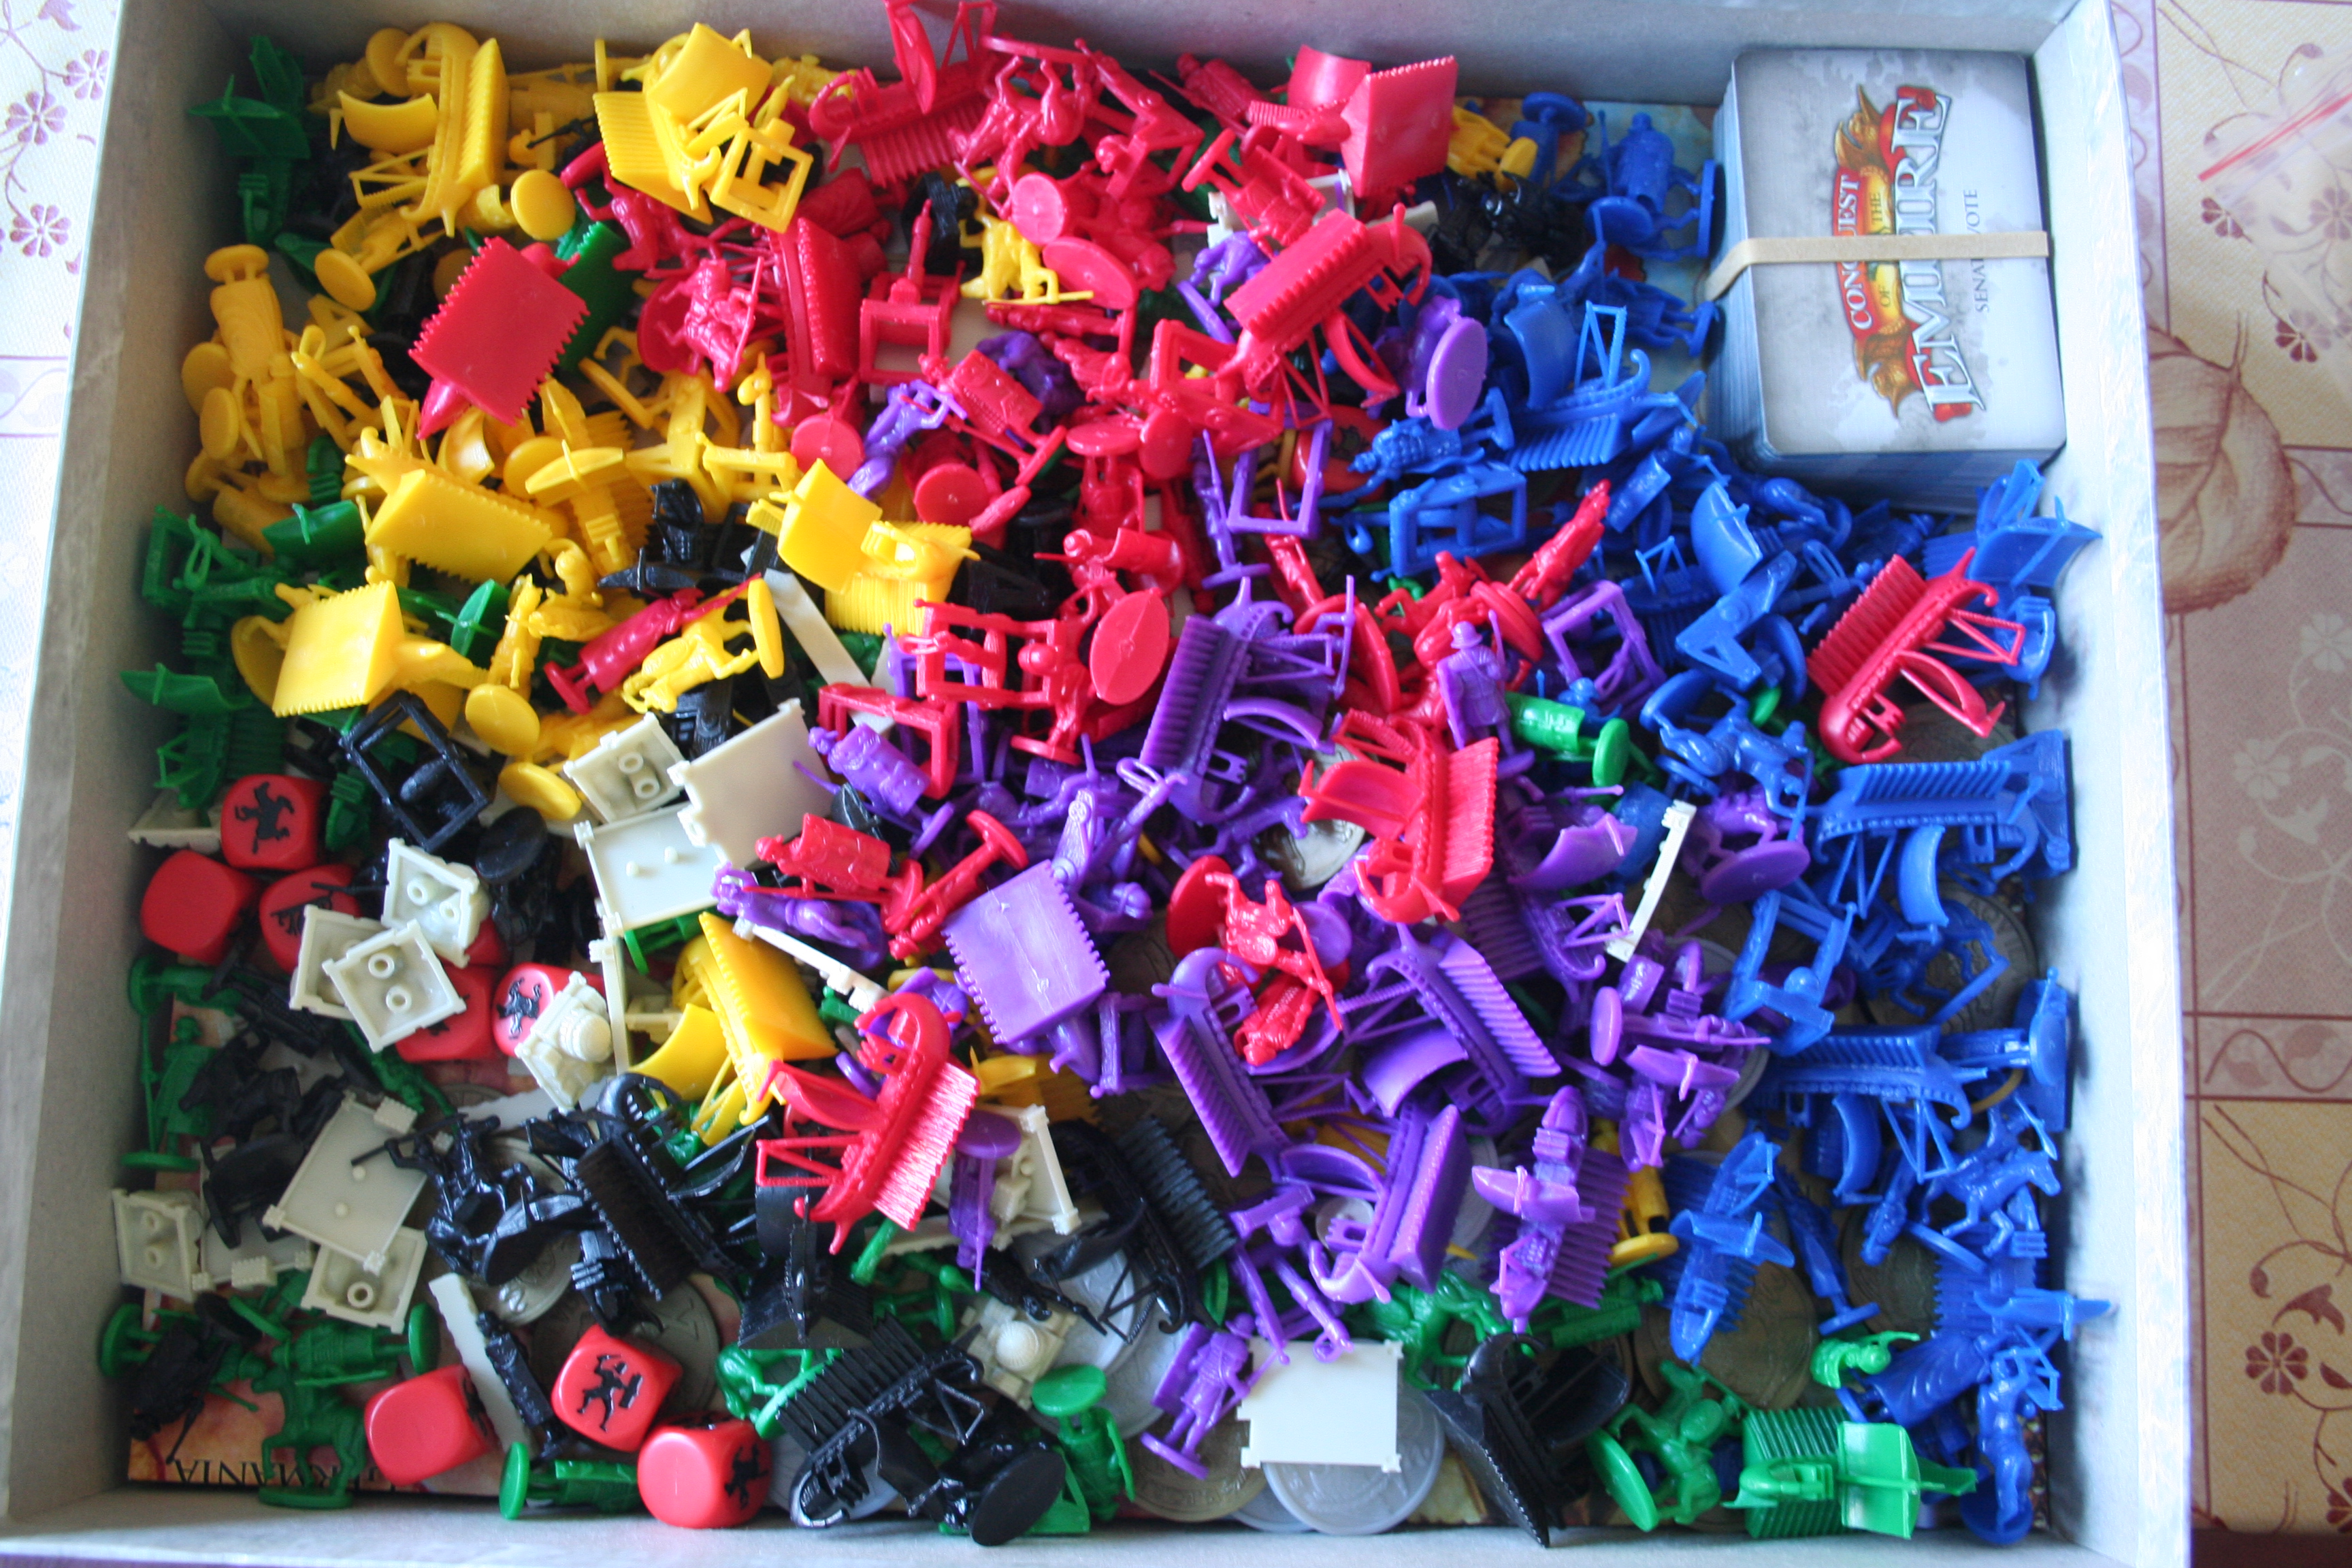
What’s In The Box:
The stuff. I know the layout of the box looks weird, I have since changed it, but taking another photo was a lot of effort…
8 Battle Dice
9 Double-sided Entrenchment/Fieldwork Tokens
46 Double-sided Terrain Tiles
14 Double-sided Flag Tokens
60 Command Cards
3 Artillery with Flags and 6 Artillery Crewmembers
3 Generals with Flags, 3 Cavalry with Flags and 6 Cavalry
10 Infantry with Flags and 30 Infantry
Plus also (and in a different picture just for fun):
The other stuff. The stuff that didn’t fit in the first photo.
The Game Board, Terrain Reference Sheet and Game Rule Book.
Playing The Game:
Objective: To capture a given number of your opponents flags before they do yours and win the match!
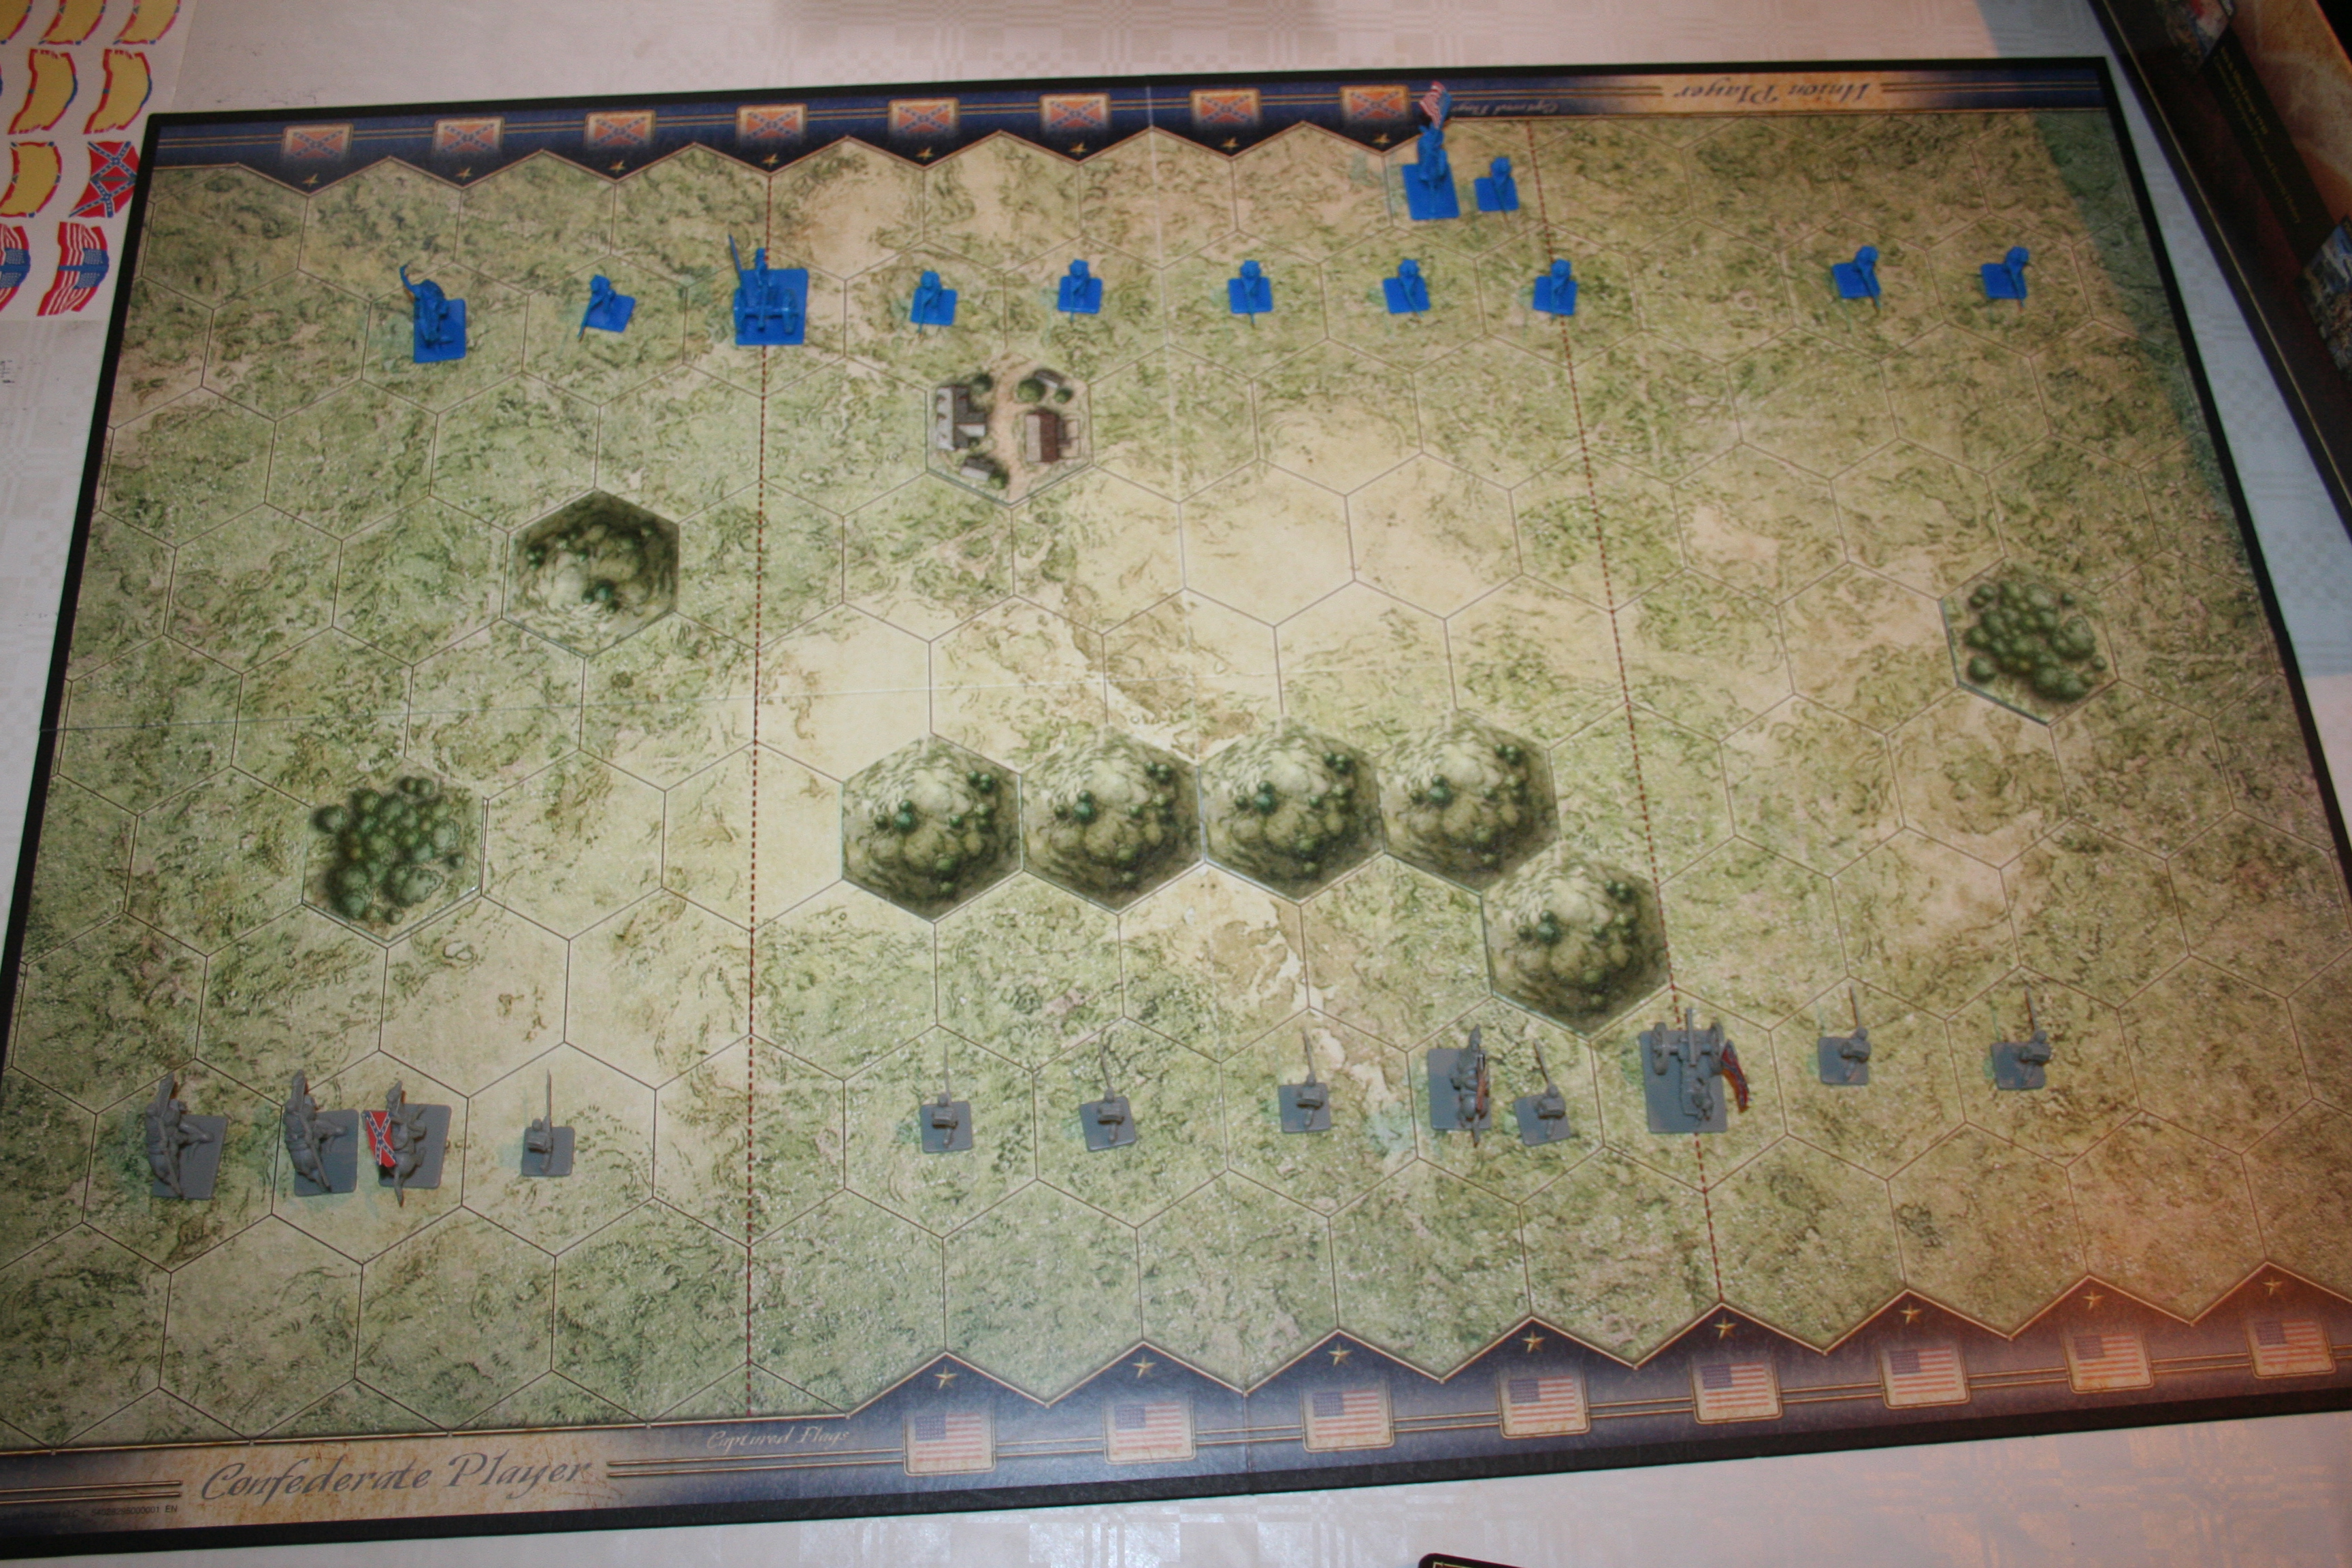
Although this game has a few scenarios that’re a little time-consuming to set up, it’s actually not all that complicated. Turns consist of five parts: playing a Command Card, giving orders, moving, battling and drawing a new card. I’ve only played two of the available scenarios so far, but both have been really good. The starting set up for the board on the simplest set up is this:
The starting set up for the simplest scenario, called First Bull Run. Blue is Union, Grey is Confederate.
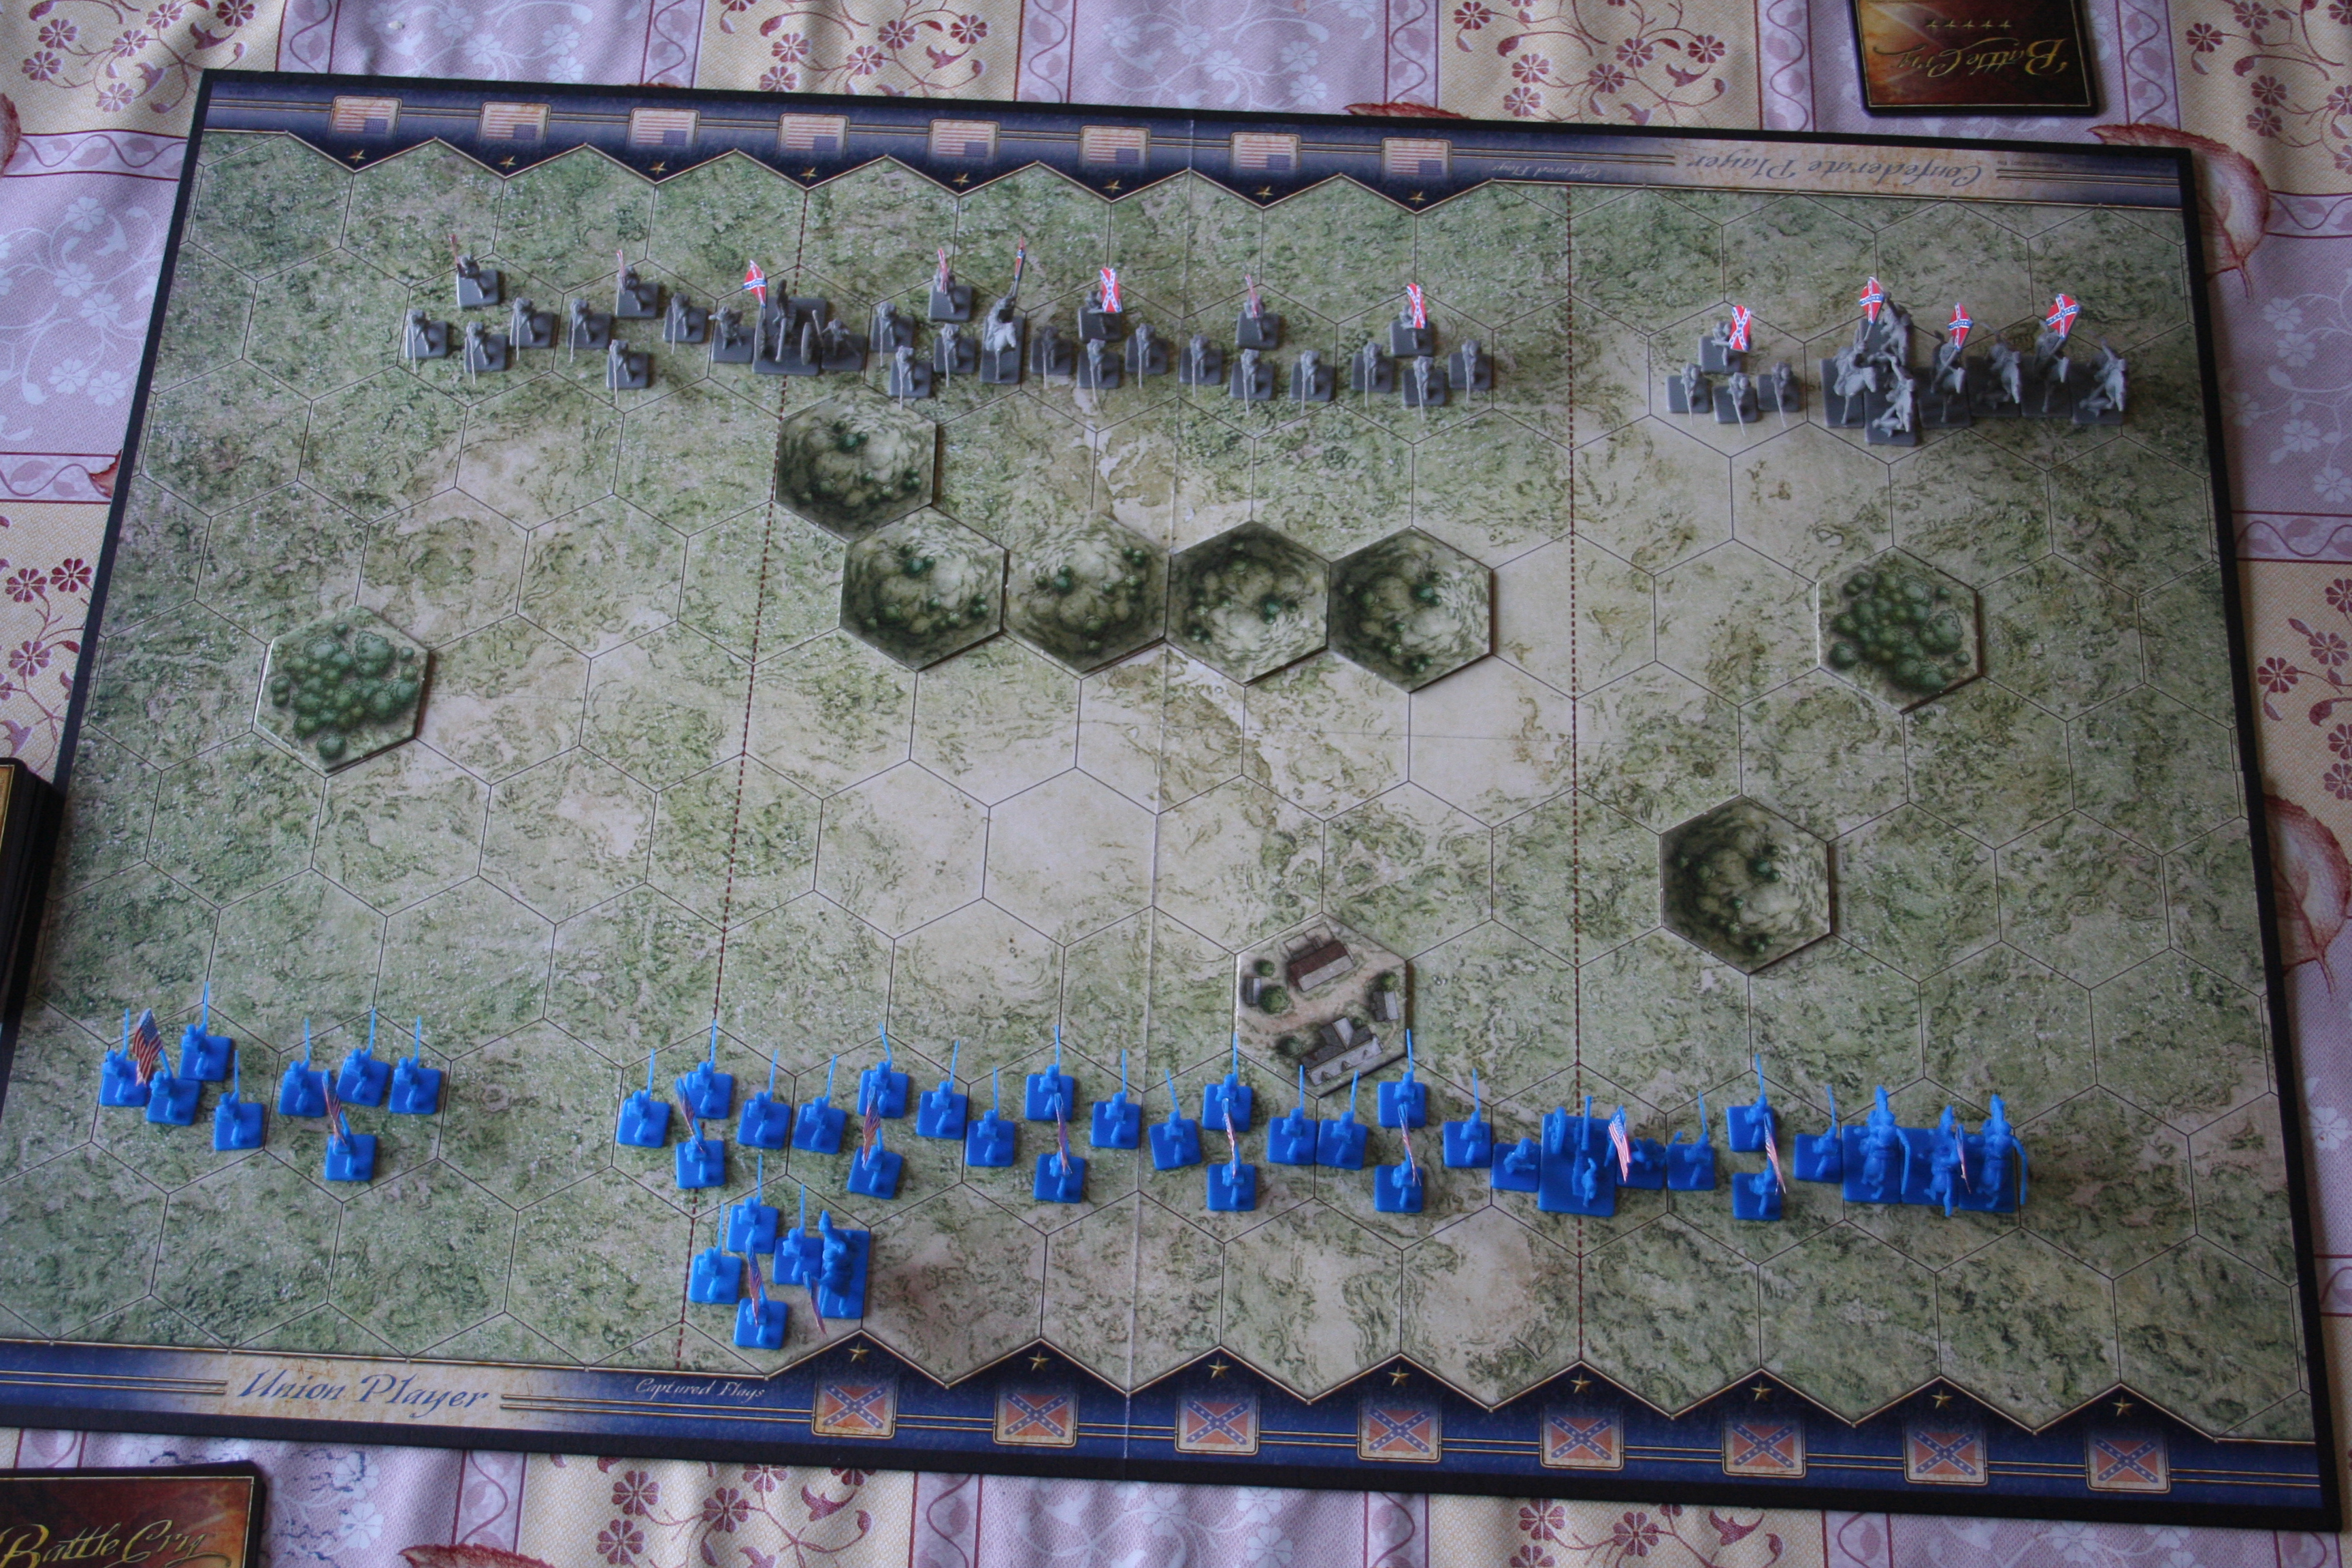
To give you an idea of how simple this set-up is comparatively, here’s a photo of the next one on in the Rule Book:
A slightly more complex (and time consuming) set up.
There’re a fair few men on the board here, but it’s a lot simpler than it appears – the occupants of one hex on the board are a unit and all move together. Infantry can only move 1 hex at a time, Cavalry moves 3 hexes, Artillery moves 1 hex, and a General can move 3 by itself or if it’s in a unit with Cavalry, but can only move one when in a unit with Infantry.
Command Cards:
There are two different kinds of Command Cards; the Section Cards and the Tactic Cards and Dave and I have ranked the Section Cards in terms of usefulness. The least useful are the Scout cards, these allow you to order one of your units in one section of the board, then draw two cards instead of one, and choose which one to keep, discarding the other. Next are Probe cards, you can now give two orders to two of your units in one section of the board. Yet more useful is Attack, you guessed it already, you can now give three orders to three units in one section of the board. But the most useful of these cards are the Assault cards, these allow you to give one order per card you have including the one you’re playing, to units in one section of the board. The section of the board you give orders in is always specified on these cards and can be either Centre, Left Flank, or Right Flank.
A Section Command Card in play.
The Tactic Cards are very different, they allow you to do a whole host of things that the Section Cards don’t, such as placing Fieldwork Tokens on the board, which changes the terrain, and impacts on sight lines, amongst other things. There are, however, a lot of Tactic Cards, so I’m not going to go into any detail about them. But you can have a photo of one!
An example of a Tactic Command Card in play.
Giving Orders and Moving Units:
Once you’ve read out the Command Card you’ve chosen to play you put it face up on the board and announce which units you intend to move. You must order all units before moving any of them. Next you move your units, taking into consideration terrain restrictions and remembering that a unit cannot battle unless it’s been ordered, even if it does not move.
Battling and Retreating:
Now you can battle! Any unit that’s close enough to an enemy unit (or an Artillery unit that was ordered but not moved) can now try to eliminate some of the opposing soldiers. This is done by rolling Battle Dice. Terrain restrictions, distance from target and type of soldier all effect how many dice you roll, and therefore how likely you are to succeed in doing any damage.
For example; if you’re attacking an enemy unit that’s on a hill hex, you roll one less Battle Dice than normal depending on how far away from the target you are, because you’re attacking uphill, which puts you at a disadvantage.
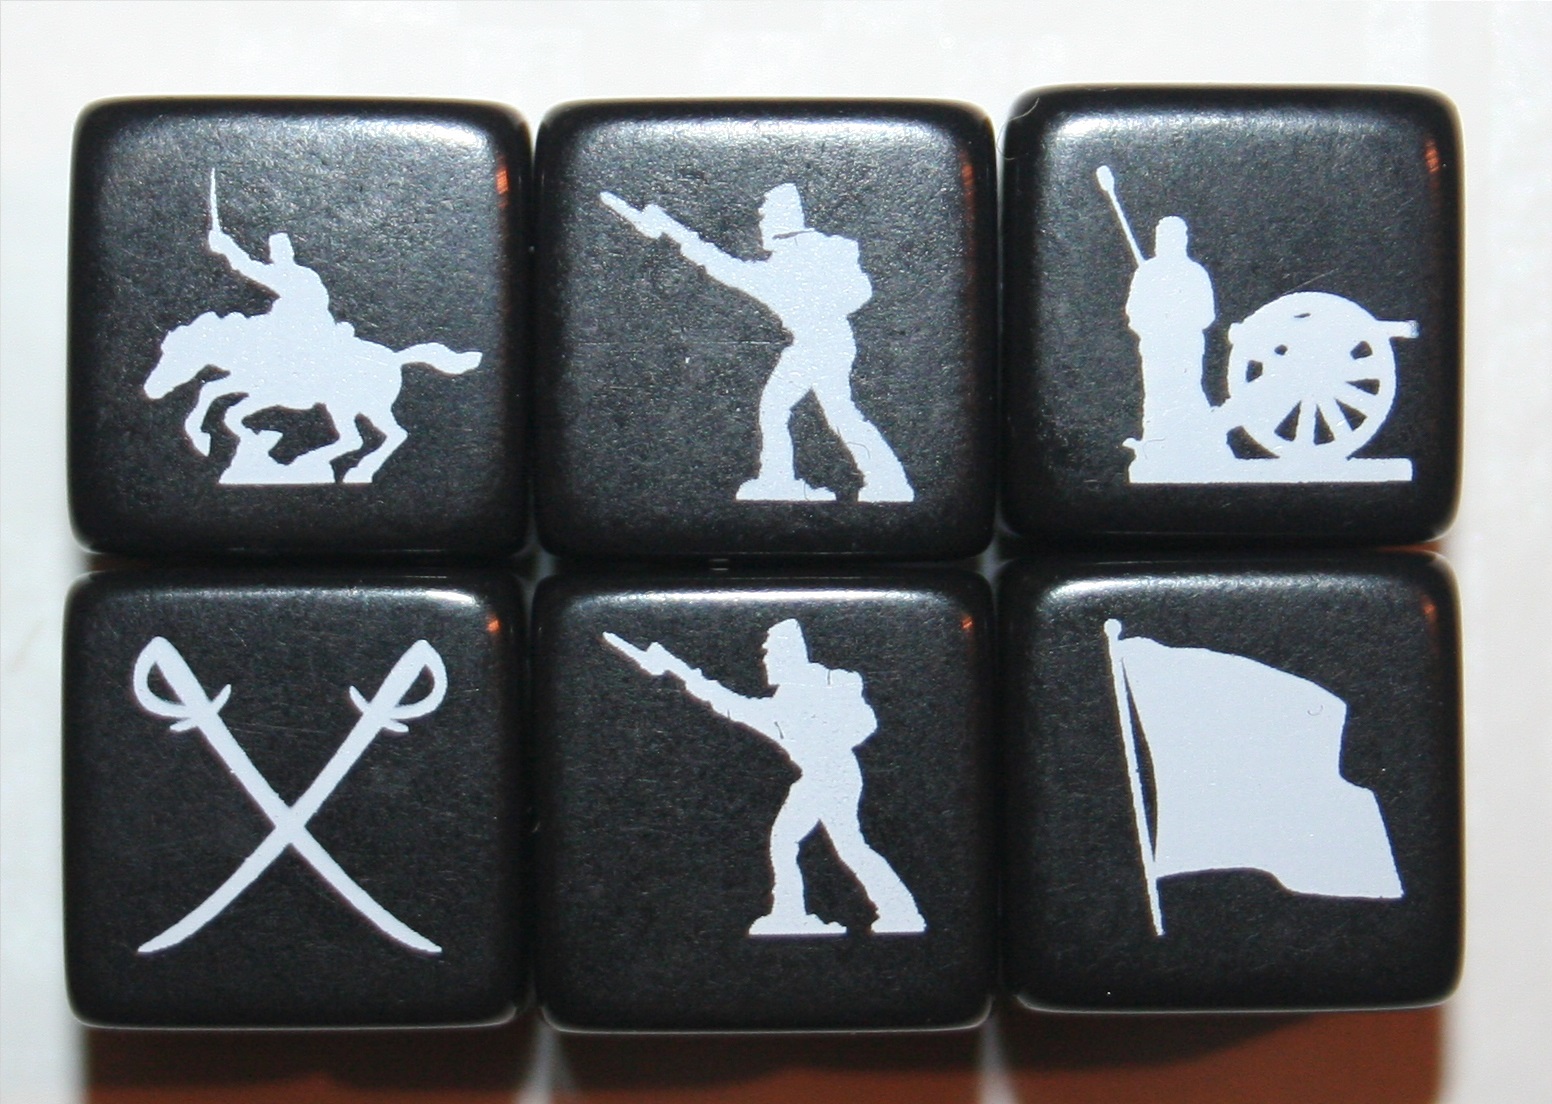
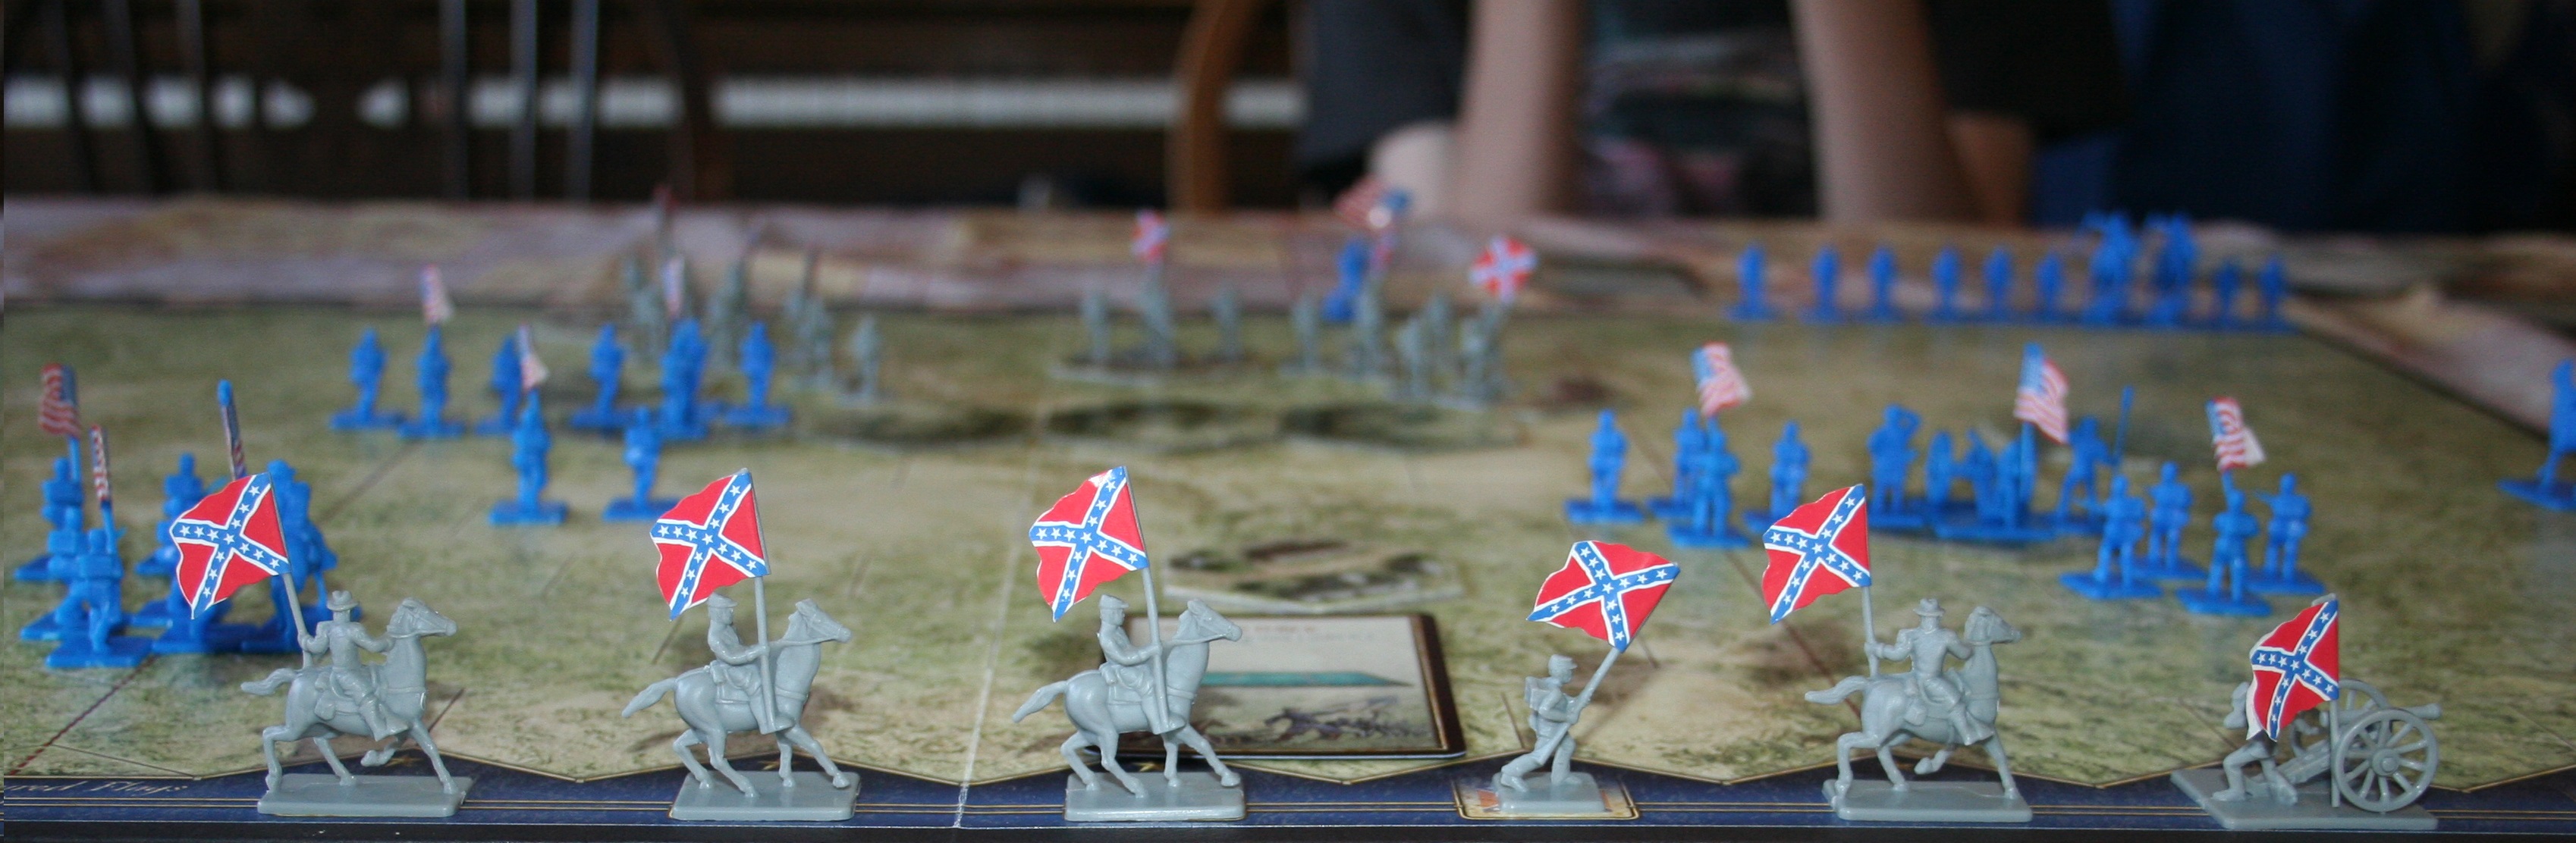
All units have one member that has a flag in them, when fighting an enemy unit, you always remove the flag bearer last.
I won’t go through how each unit attacks, but I’ll use Cavalry as an example. Every unit has a different range to the others, Infantry can attack enemy units up to four hexes away, Artillery up to five hexes away, and Cavalry must be adjacent to the unit they wish to attack.
Depending on where you are in relation to the unit you’re targeting you roll a certain number of Battle Dice. Cavalry always roll three, unless terrain battle restrictions state otherwise.
Of the three Battle Dice rolled here two were hits. As you can see, the small image on the dice is of a Cavalry figure. When rolling to eliminate opponents you must roll the correct symbols.
These are all six of the sides of the Battle Dice, and each symbol means something different. Infantry, Cavalry and Artillery are fairly self-explanatory – for every one of those symbols rolled, you can capture one of the equivalent enemy pieces if there is one in the unit you’re attacking. The cross sabres are the only symbol that can remove a General from the board, however, if there’s no General in the unit, sabres also remove anything else. The flag is a retreat:
The Battle Dice. As you can see, there are two Infantry symbols showing. This is because there are two sides of each die with the Infantry symbol on them. Making them the easiest units to capture.
A flag rolled means that the unit you’re attacking must retreat one hex, however, it can’t retreat onto an occupied hex, unless that hex has a General on it that’s not attached to a unit, the General then become attached to the unit and must move with it.
Different Kinds of Terrain:
There are hexes on top of the board, these are the Terrain Tiles. In both the scenarios I’ve played so far there are only three kinds on the board: Woods, Hills and Homestead hexes. These alter the course of the game in that they place restrictions on movement, line of sight and accuracy. So can be used to your advantage, or to severely disadvantage your opponent. All of these act as blocks in the line of sight when you want to attack a unit, but the Woods and the Hills can be incredibly useful. From the top of a hill the range of an Artillery unit is increased by 1, whilst the accuracy of an attacking unit is decreased by 1. Likewise, on a Woods hex the attacking units accuracy is decreased by 1, but the unit inside the Woods has no such impediment.
Winning the Game!
One the page in the Rule Book assigned to whichever scenario you’ve chosen to play there will be a small amount of information underneath the picture of the starting set up. This will include the historical background to that particular battle, which General both sides are commanding as, who moves first, and most importantly, how many flags you need to capture to win. The first player to achieve having this number of their opponents flags, immediately wins the match. However, to play a complete match, you’re supposed to reset the board and change sides, and the winner is determined after both matches are complete. This probably often ends with a draw, but I haven’t yet played a complete match in this way. The game we played the first player to capture six flags won:
My victory stand at the end of the game!
Strategy:
This game is tactical, it requires strategic thinking and a little bit of foresight. I’ve found that on the First Bull Run the best way to play is just to push forward in more or less a straight line, going up hills wherever you can, or into woods. If you’ve got possession of the hills and woods you’ve got the advantage, because your enemy is less likely to be able to capture you when they attack.
This isn’t a huge amount of help, as it’s things that’re mostly just common sense, but I’m not particularly strategically minded, so although I’m not bad at this kind of game, I also don’t make plans when I play them. Just take each turn as it comes, kinda thing.
History and Interesting Things:
The first game to be published under this name was published in 1961. The concept of this game was the same as the version we’ve got, but much much simpler. Each side only has 22 pieces, the grid is square, not hexagonal, and there’s only one battle scenario available to play.
An online version of this game was released in November 2008, to GameTableOnline.com and can be played player vs player or player vs computer.
I don’t have anything else to write about the history of the game, so have some points about the Civil War instead: Before William Tecumseh Sherman became a famous Union General he was demoted for apparent insanity.
More men died in the Civil War than in any other American conflict, and two-thirds of them died of disease.
During the war Robert E. Lee’s Virginia estate was confiscated and turned into a cemetery by the Union.
Robert E. Lee was the bloodiest General of the war.
President Lincoln was shot at, and almost killed, nearly two years before his assassination riding to the Soldiers’ Home (his summer residence) from the White house on an August evening in 1863.
On the Union side, black soldiers refused their pay for 18 months because they were being paid less than their white comrades.
Harriet Tubman led a raid to free slaves during the war, this one raid freed more than 720 slaves – more than 10 times the number she had freed in 10 years on the Underground Railroad.
I read about the history of the war here, and got my game info off of Wikipedia.
To Conclude:
So this game is great for a few reasons; it’s easy to understand, it’s easy (though time-consuming) to set up, and there are so many different scenarios that it’s going to be a long time before it stops being interesting!
I recommend it to anyone who enjoys a proper sit-down game. It takes about an hour to play a scenario, with around 15 minutes set up time (this’ll probably become less as we get more familiar with the board and different layouts). For anyone with a son or daughter who’s an up-and-coming tactician, this would be a fantastic game to play with them.
If this is a game that’s up your street, go out and get a copy, and have lots of fun re-writing the course of history!
This one is not, under any circumstances a quick game, and is likely therefore, to be a long-ish post. The fastest time we’ve ever played it in is an hour, and that’s because we set ourselves a time limit. Otherwise the game could take days. Escape From Colditz is a game set in the World War II prison camp at Colditz Castle. The idea for the game came from a plan formed by a group of British POW’s (Prisoners of War) to escape from Colditz using sheets and floorboards to create a glider. The game itself is a little more complicated than that, but that is the story the game is based on.
We used to play Escape From Colditz when we were younger, and we never had our own copy of the game. So recently my brother decided that it was a game we definitely needed, and he bought a copy. Since it arrived in the post we’ve played it several times with different numbers of players and different time limits.
Rules and Interesting Things:
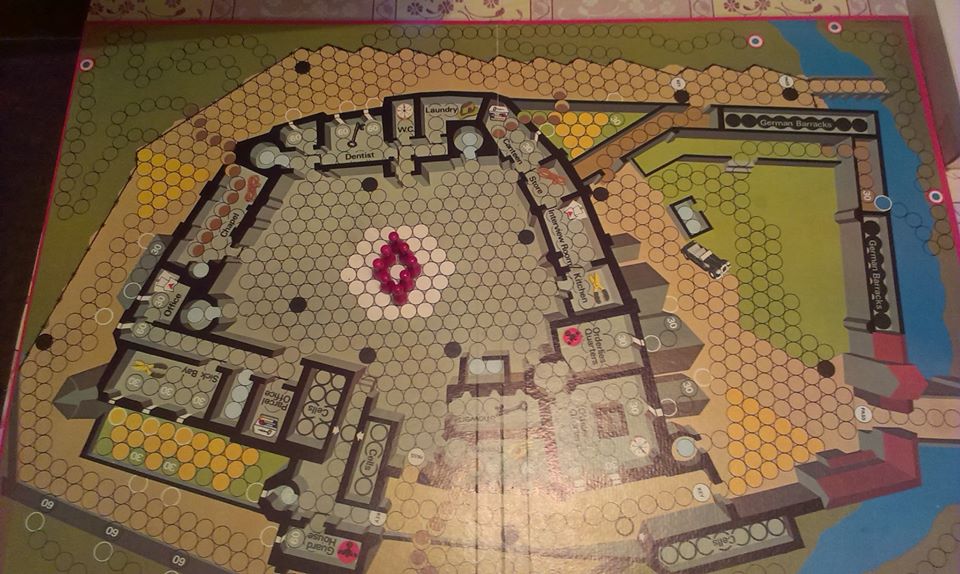
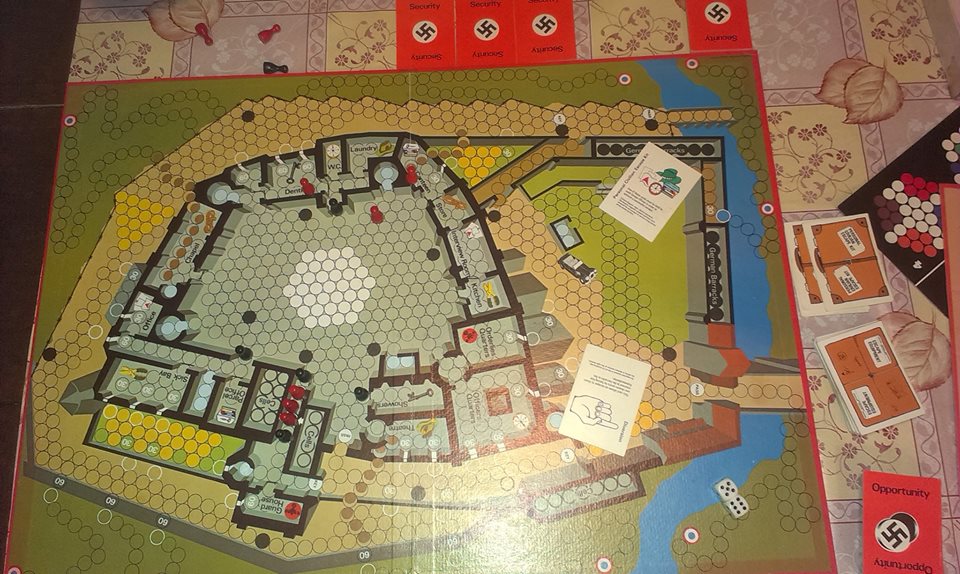
This game was created by Pat Reid, a British Army Officer, and one of the few to successfully escape from Colditz Castle in World War II. The game is for 2-6 players, and the board is the floor plan of Colditz. The rule book tells us that the board is based on a true plan of the castle, but that was adapted to have all necessary features on one floor. This accuracy to Colditz is one of its most interesting features.
At the beginning of the game each player decides who they are going to play as, there are five escape teams to choose from, British (red), French (brown), American (blue), Dutch (orange) and Polish (green) and one player must play as the Security Officer (black). A different number of POW’s and Guards are allocated depending on how many players there are, as follows:
2 players: 8 POW’s and 6 Guards
3 players: 7 POW’s per player: 12 Guards
4 players: 6 POW’s per player: 14 Guards
5 players: 5 POW’s per player: 15 Guards
6 players: 4 POW’s per player: 16 Guards
The fact that the Guards are always outnumbered by the POW’s is historically accurate, as, during the war, the prisoners always vastly outnumbered the Guards. It was only by the harsh way of living, random public executions, and other similar means, that the Guards were able to keep authority over the prisoners.
Pieces are moved by the throw of two dice. A player may use all their moves on one piece or otherwise split the roll between as many of their pieces as they like. They have to move the whole number thrown and they cannot allocate any of their number of moves it to another player’s pieces. A double entitles the player to another roll.
There are five packs of cards involved in the game, Personal Civilian Escape kit, Escape Equipment, Escaper’s Opportunity, German Security and Do or Die cards. The Opportunity cards, Escape Kits, Escape Equipment and Do or Die cards are all only useful for the escapee’s, the only cards the Security Officer can use are the German Security cards.
To attempt escape, each prisoner must collect an “escape kit”, this consists of food, a compass, forged papers, and a disguise. Once collected this cannot be taken from you or lost in any way. The items collected as part of the escape kit do not exist as escape equipment. To obtain the escape kit the player must get four of their POW’s into the rooms in the castle that have the relevant symbols for each necessary item, they can then claim an escape kit.
To make a successful escape attempt each player must also collect other escape equipment, this can be rope, which comes in 30ft lengths, wire cutters, keys and forged passes. Ideally each player would have some of everything. To collect equipment a player must get their POW’s into a room with the symbol of the piece of equipment they want, they must have either two POW’s in the same room, or one in each of the rooms with that symbol, before they can collect the relevant equipment.
Start positions if playing with two people. EO is playing as Britain.
Opportunity and Security Cards:
Opportunity cards are specifically for the use of the POW’s. Likewise with Security Cards, which are specifically for the Security Officer. To collect a Security or Opportunity card a POW or the Security Officer must roll either a 3, 7 or 11. They are then allowed to take a card from the top of the deck before they continue with their turn. Opportunity Cards can be used as soon as they’ve been collected, or they can be held for later. However, each POW or Security Officer can only hold three at any one time. POW’s have an advantage over the Security Officer here, as, if playing with more than two players, they can choose to either discard one of their Opportunity Cards or they can pass it over to another POW. The Security Officer must discard a card if he/she has collected more than three. Opportunity Cards and Security Cards are incredibly useful, an Opportunity Card might provide a POW with a piece of equipment, or allow them to hide from the Security Officer at some point, it may even allow them access to a tunnel, which will aid their escape attempt. For the Security Officer, Security Cards are a little different, they may allow you to search a room (the SO cannot enter any of the rooms in the castle without the relevant card giving them permission to search it, meaning that POW’s are generally safe whilst in the rooms), or call Appel, which recalls every players pieces to their starting position, and other similar things.
Do or Die:
A Do or Die card is dealt to every Escape Officer at the beginning of the game, these are not read and are kept face down until they are used. Once an EO has decided to use their Do or Die card, they then turn it over and read it. It will tell them how many rolls of the dice they have to try and get one of their prisoners out of Colditz. The prisoner starts from anywhere inside the grey area of the board (the inner courtyard) and must reach one of the safe targets outside of the castle walls within the number of throws specified. The prisoner must leave through the main gate and pass and key points no longer effect them. If the prisoner does not manage to escape, they are “dead” and their whole team is removed from the board and from play.
There are even more rules to this game than i’ve mentioned in my brief (haha) overview here, however, you can gather the general outline of the game. It’s quite strategic, and definitely a challenging game for anyone! We thoroughly recommend it for hours of fun, we played the other evening and had a very silly argument, that anyone who has either of us on facebook may well have seen, about whether or not I, playing as the SO could continue to shoot one of his escaping prisoners if he was playing a diversion card (one of the Opportunity Cards). I said no, therefore I won. He said yes, which would mean he had won.
Our unresolved ending.
This argument has no resolution so far.
All the information presented to you here came either from our experiences of playing the game, or from the rule book itself, if you’re interested, go find a copy!


