Number of Players: 2
Year of Publication: 1999/2010 (Anniversary Edition)
Creator: Richard Borg

As is self-evident from the name of the game Battle Cry is a strategy war game. It recreates the American Civil War. Players play as the Union or the Confederates, in other words, North or South America and can play through each of 30 scenarios from the war. The board is set up using Terrain Tiles with different images on them to create different parts of the country. Each scenario is defined in the Rule Book and has a pictorial representation of the starting layout of the board. My favourite thing about these descriptions is that there’s a little historical information provided about each scenario, but at the bottom, right after it tells you who originally won that battle it says: “The stage is set, the battle lines are drawn, and you are in command. The rest is history.” And it leaves you to find out who the best strategist is!
Dave and I did initially play the game slightly wrong, because we were in a rush. But this just reinforces our firm belief that you should thoroughly read the rules before starting any game.
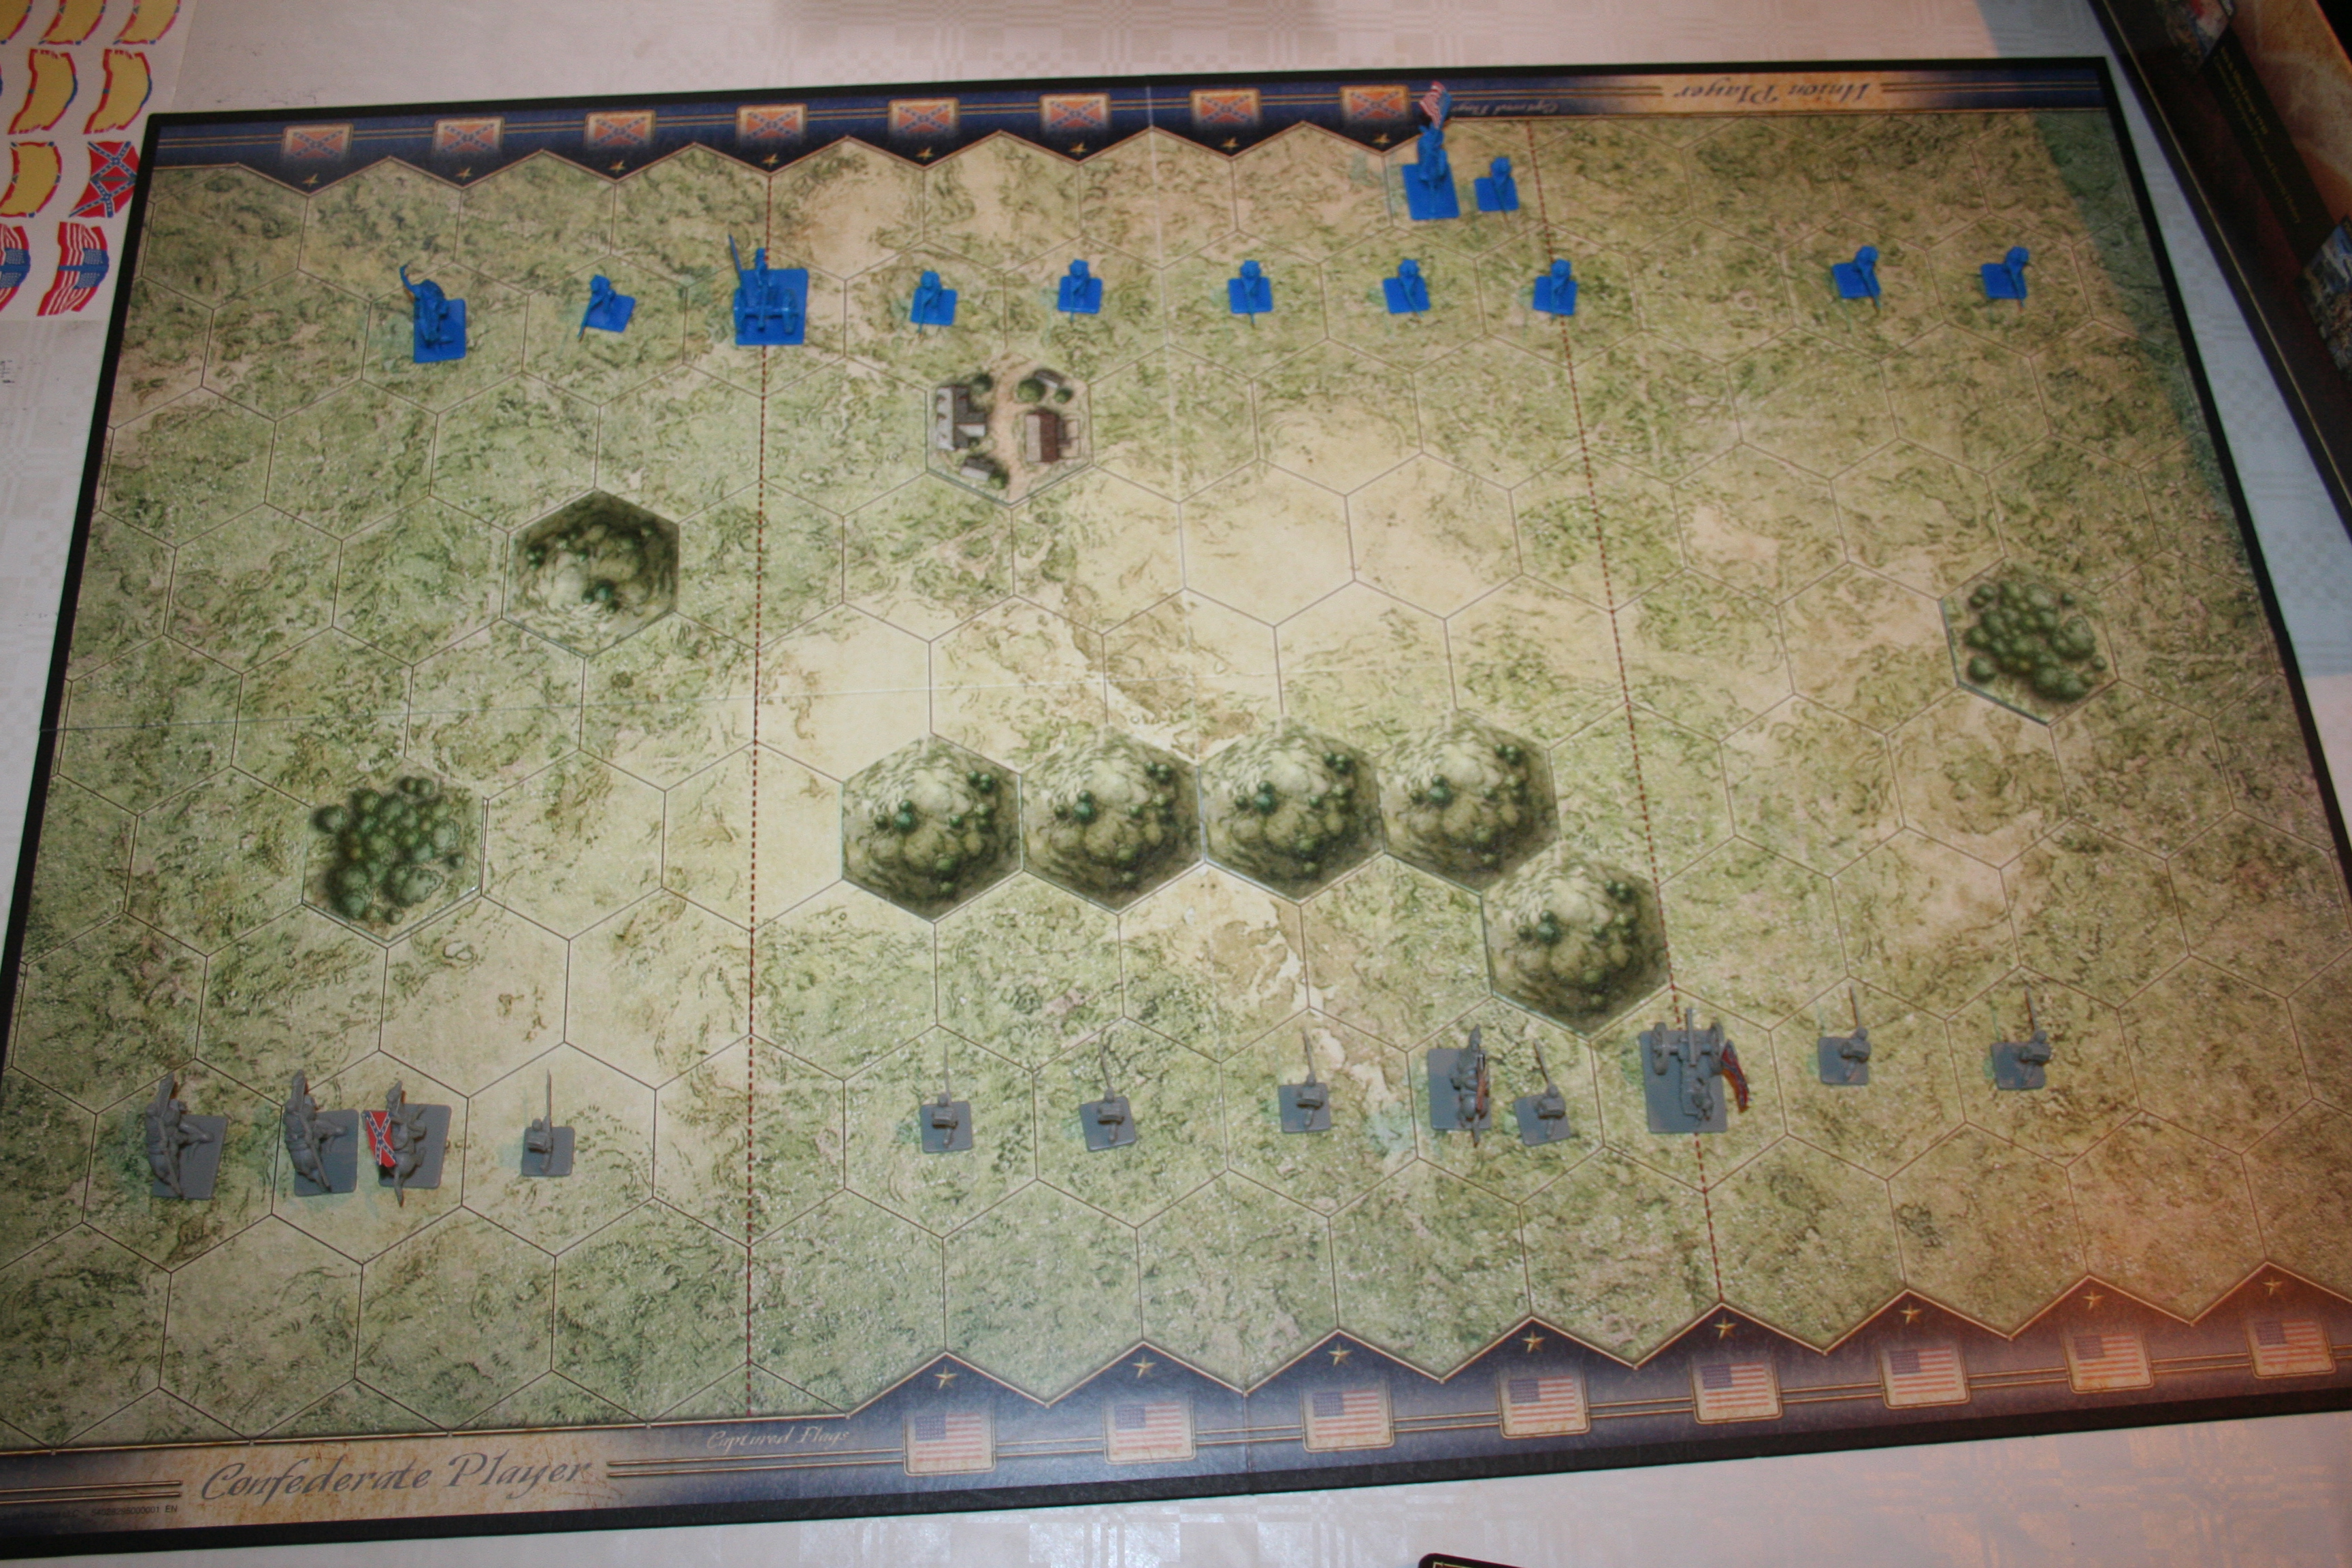
What’s In The Box:
- 8 Battle Dice
- 9 Double-sided Entrenchment/Fieldwork Tokens
- 46 Double-sided Terrain Tiles
- 14 Double-sided Flag Tokens
- 60 Command Cards
- 3 Artillery with Flags and 6 Artillery Crewmembers
- 3 Generals with Flags, 3 Cavalry with Flags and 6 Cavalry
- 10 Infantry with Flags and 30 Infantry
Plus also (and in a different picture just for fun):

The Game Board, Terrain Reference Sheet and Game Rule Book.
Playing The Game:
Objective: To capture a given number of your opponents flags before they do yours and win the match!
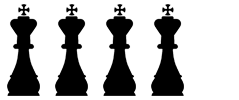
Although this game has a few scenarios that’re a little time-consuming to set up, it’s actually not all that complicated. Turns consist of five parts: playing a Command Card, giving orders, moving, battling and drawing a new card. I’ve only played two of the available scenarios so far, but both have been really good. The starting set up for the board on the simplest set up is this:
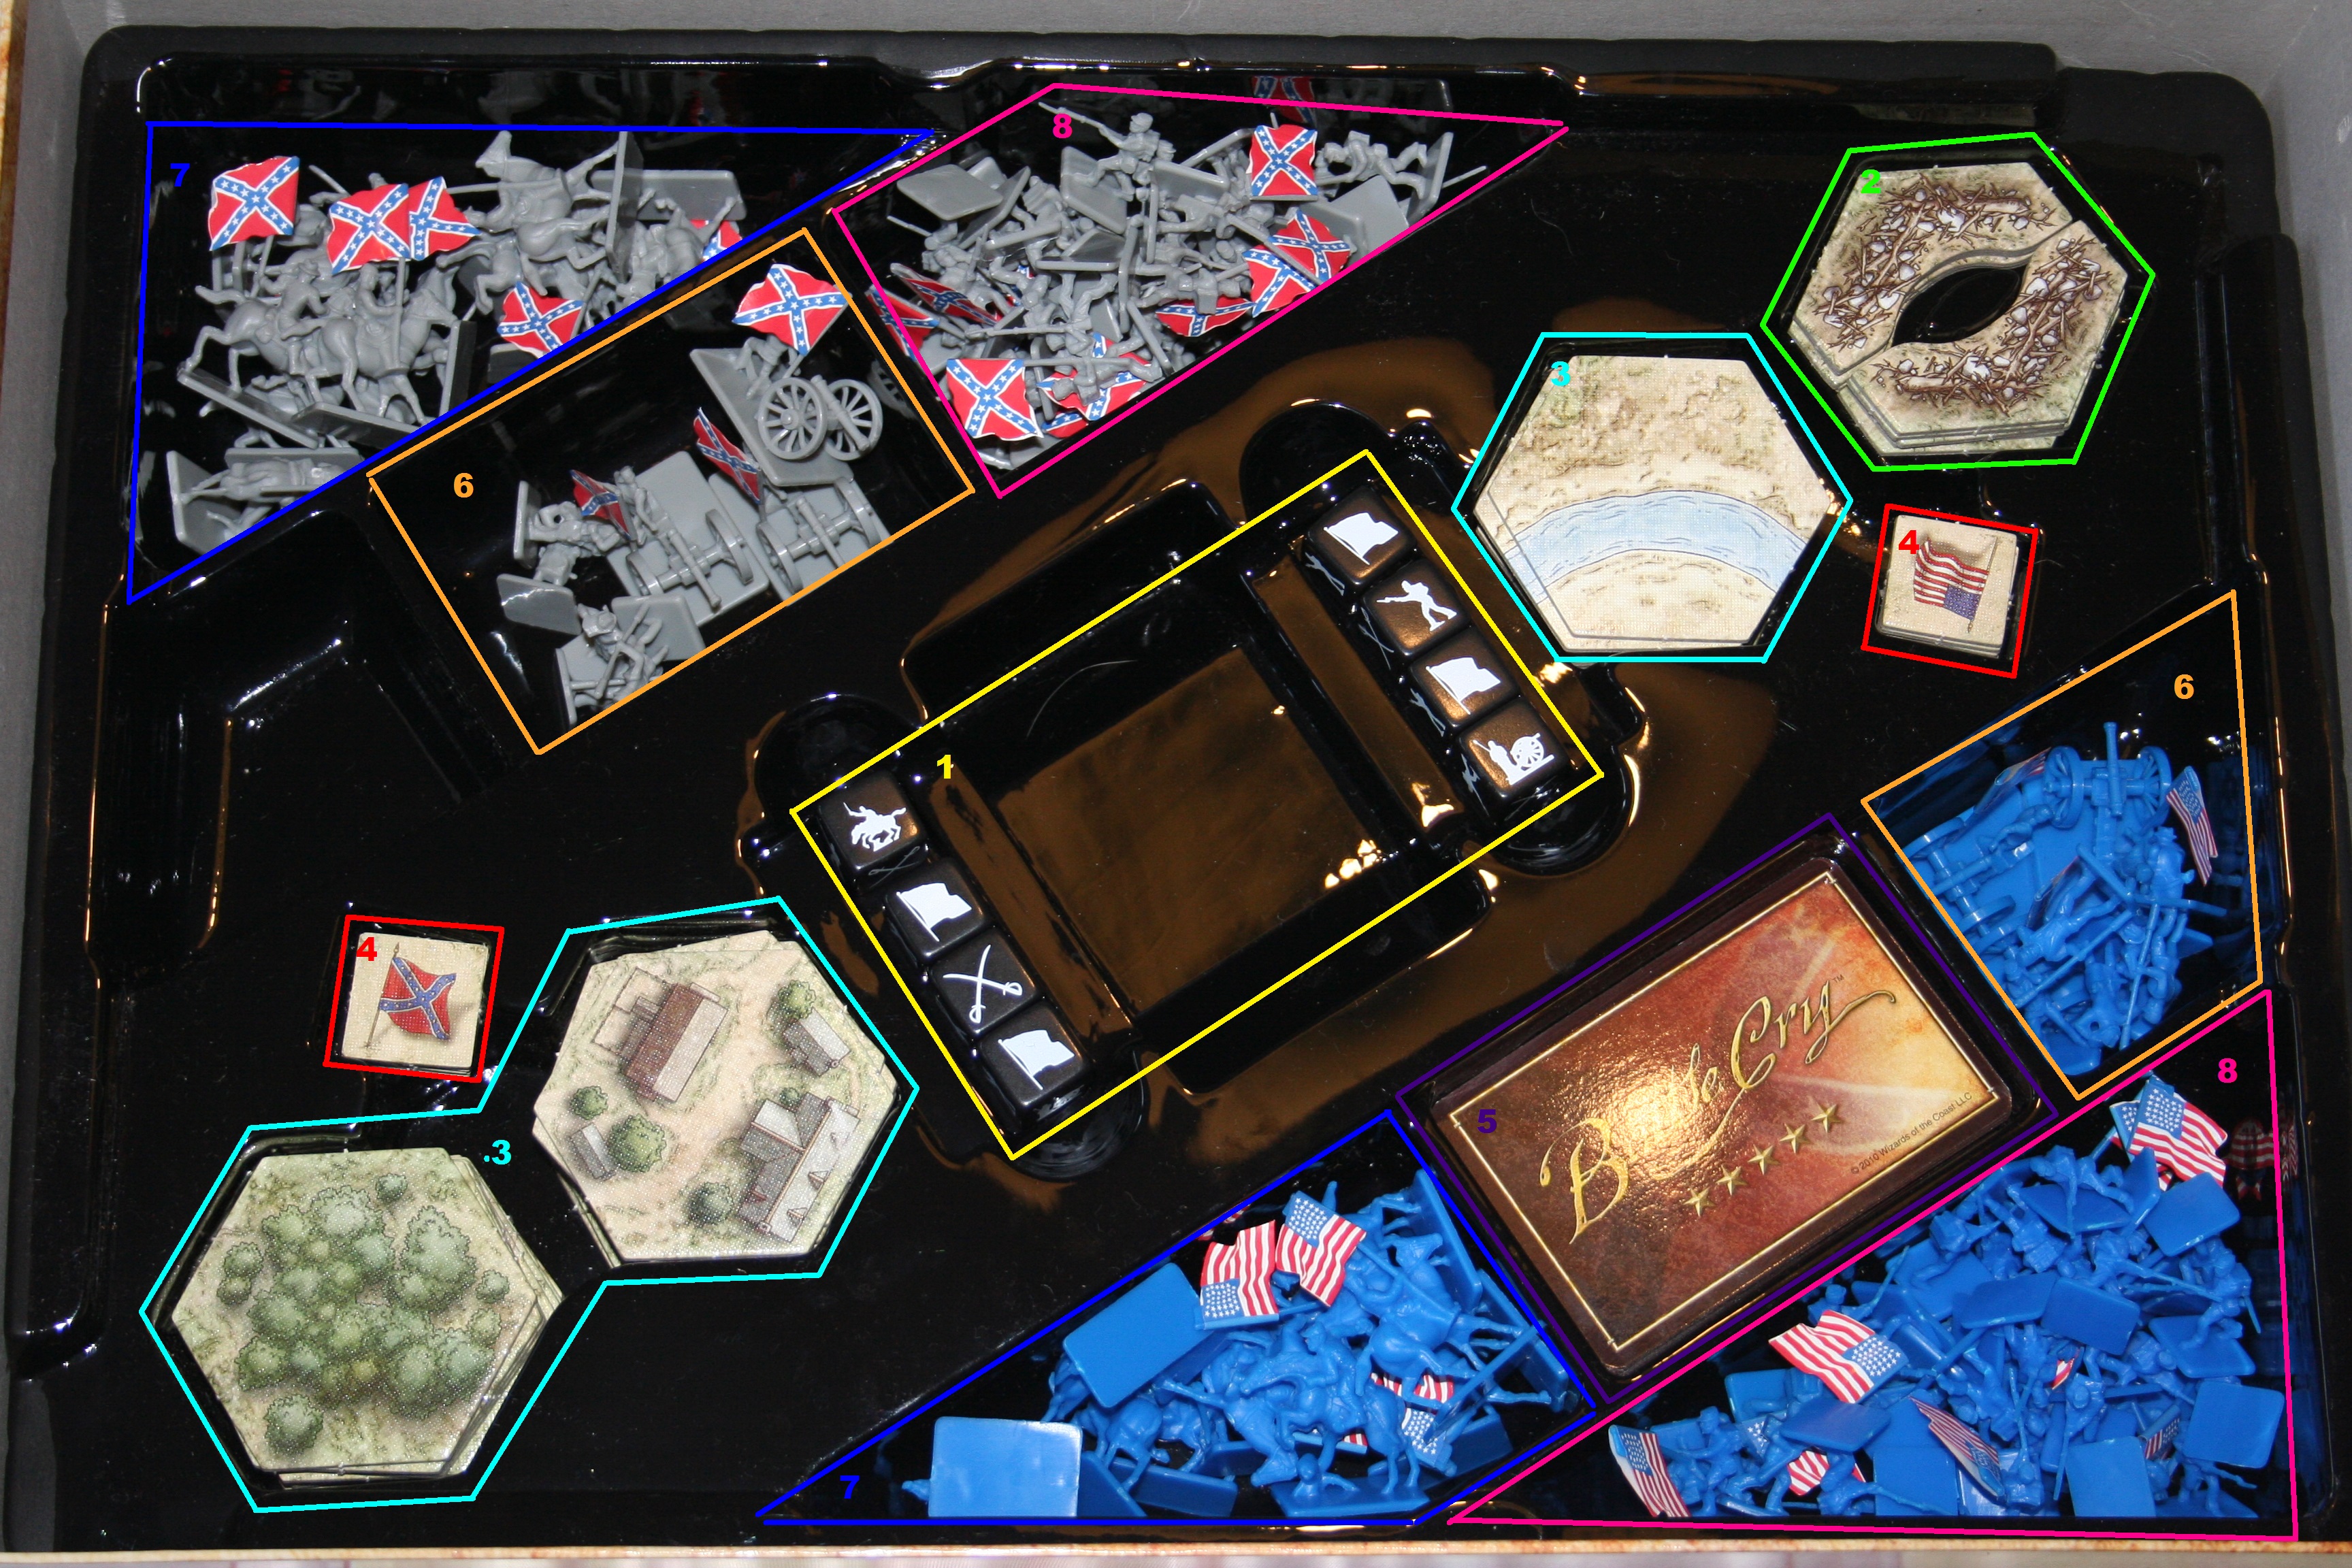
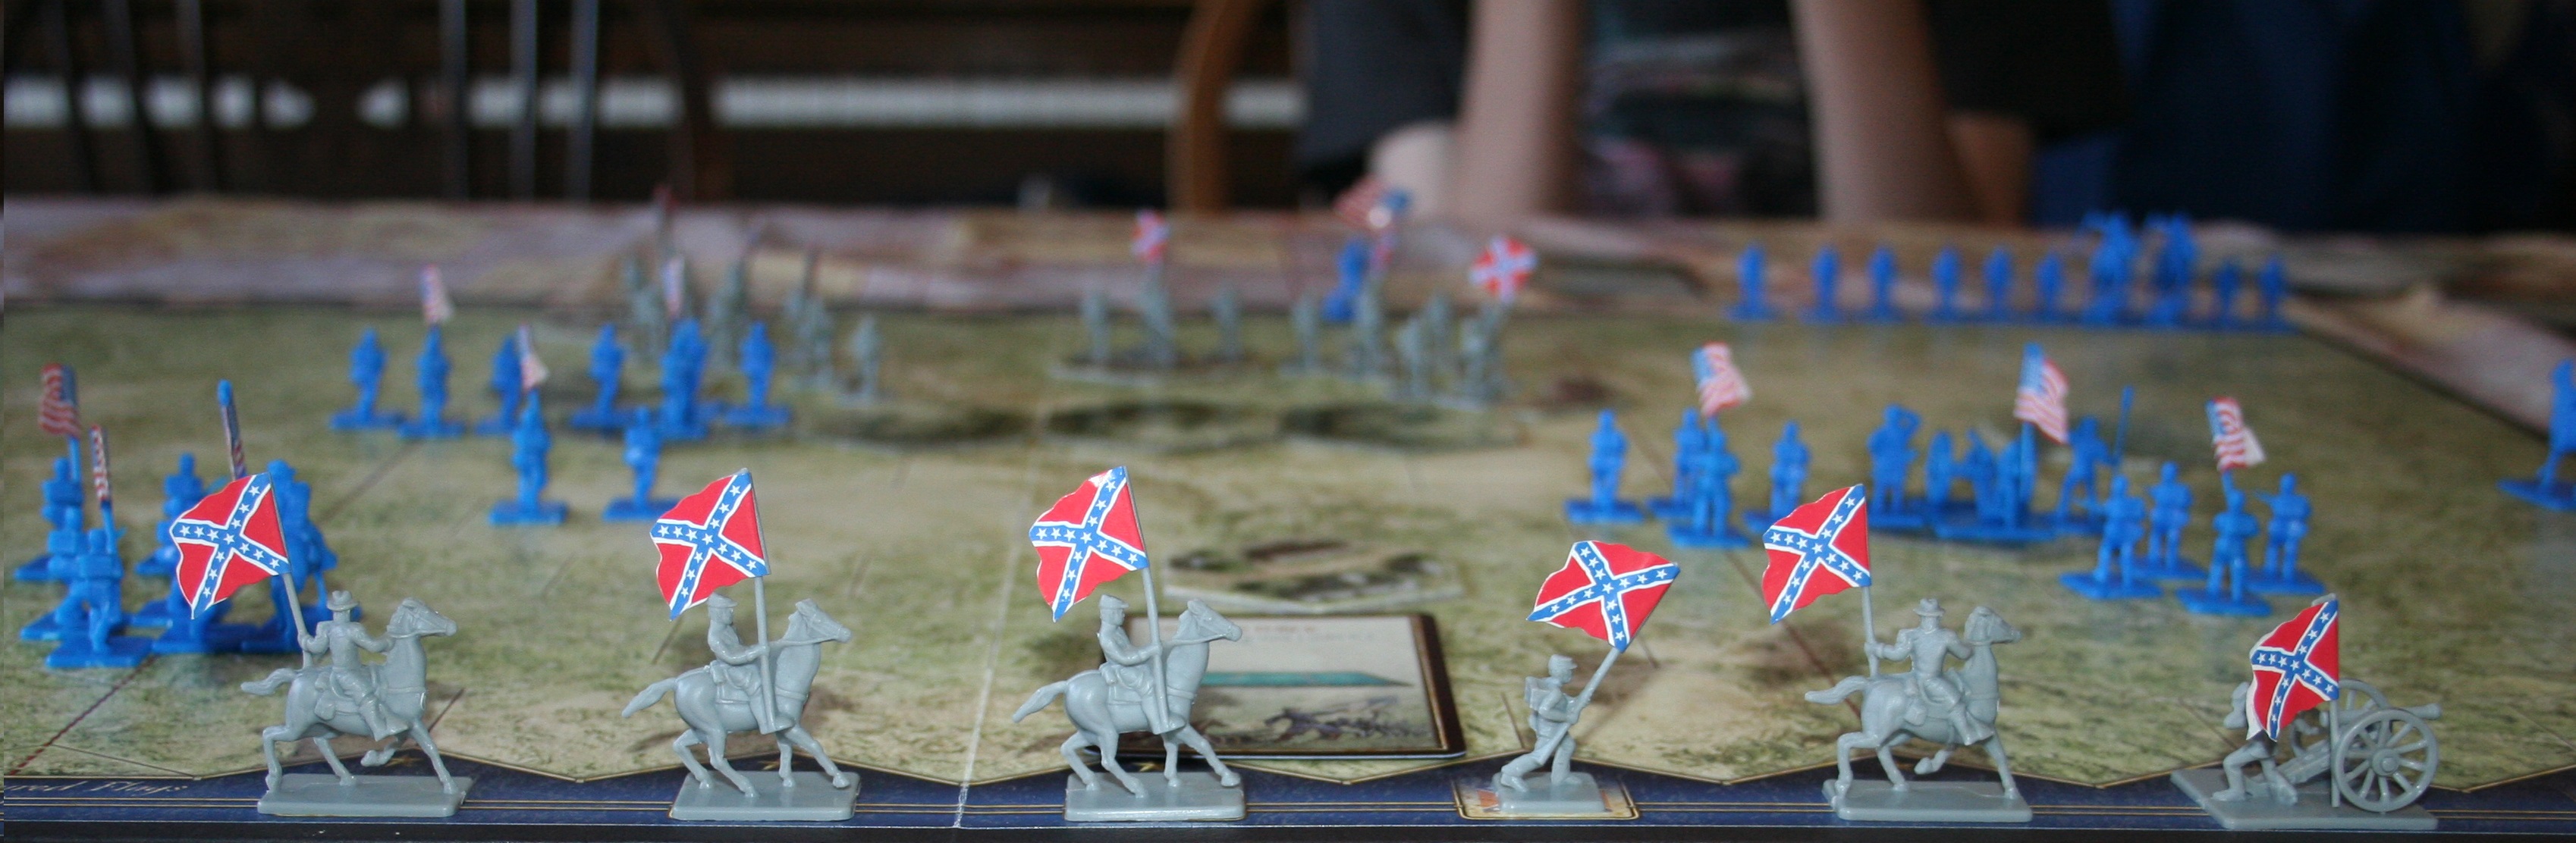
To give you an idea of how simple this set-up is comparatively, here’s a photo of the next one on in the Rule Book:

There’re a fair few men on the board here, but it’s a lot simpler than it appears – the occupants of one hex on the board are a unit and all move together. Infantry can only move 1 hex at a time, Cavalry moves 3 hexes, Artillery moves 1 hex, and a General can move 3 by itself or if it’s in a unit with Cavalry, but can only move one when in a unit with Infantry.
Command Cards:
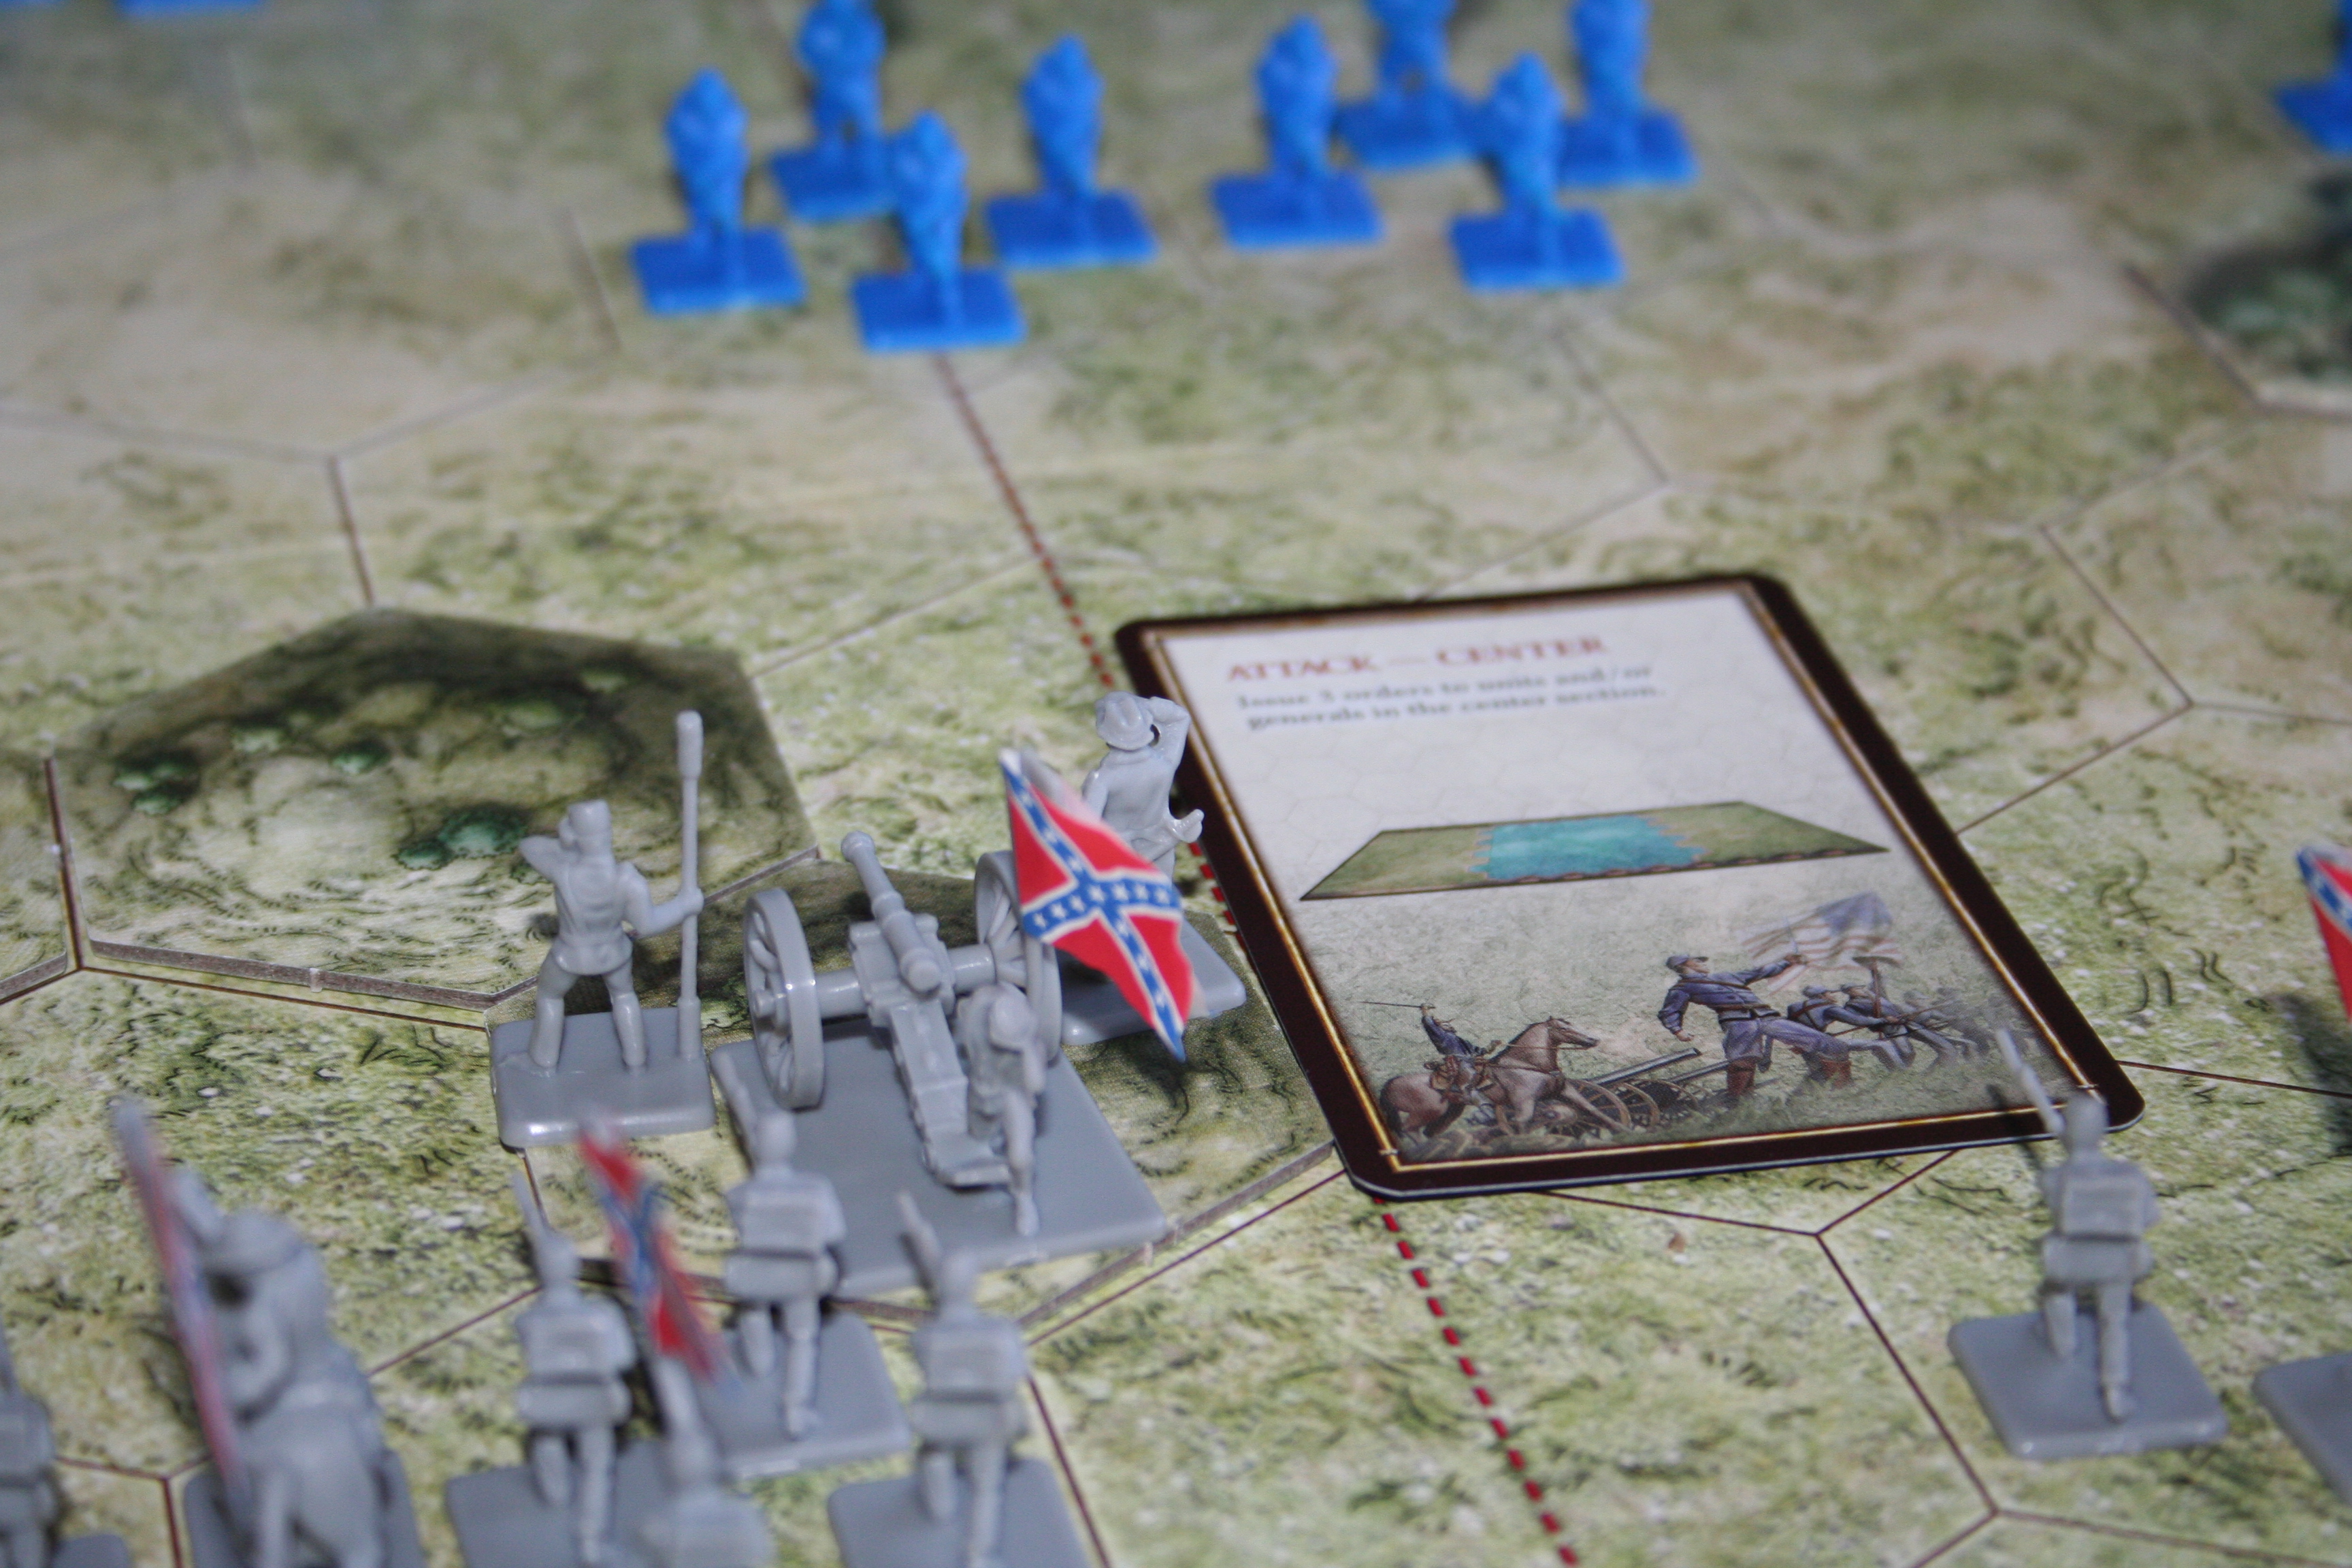
There are two different kinds of Command Cards; the Section Cards and the Tactic Cards and Dave and I have ranked the Section Cards in terms of usefulness. The least useful are the Scout cards, these allow you to order one of your units in one section of the board, then draw two cards instead of one, and choose which one to keep, discarding the other. Next are Probe cards, you can now give two orders to two of your units in one section of the board. Yet more useful is Attack, you guessed it already, you can now give three orders to three units in one section of the board. But the most useful of these cards are the Assault cards, these allow you to give one order per card you have including the one you’re playing, to units in one section of the board. The section of the board you give orders in is always specified on these cards and can be either Centre, Left Flank, or Right Flank.
The Tactic Cards are very different, they allow you to do a whole host of things that the Section Cards don’t, such as placing Fieldwork Tokens on the board, which changes the terrain, and impacts on sight lines, amongst other things. There are, however, a lot of Tactic Cards, so I’m not going to go into any detail about them. But you can have a photo of one!

Giving Orders and Moving Units:
Once you’ve read out the Command Card you’ve chosen to play you put it face up on the board and announce which units you intend to move. You must order all units before moving any of them. Next you move your units, taking into consideration terrain restrictions and remembering that a unit cannot battle unless it’s been ordered, even if it does not move.
Battling and Retreating:
Now you can battle! Any unit that’s close enough to an enemy unit (or an Artillery unit that was ordered but not moved) can now try to eliminate some of the opposing soldiers. This is done by rolling Battle Dice. Terrain restrictions, distance from target and type of soldier all effect how many dice you roll, and therefore how likely you are to succeed in doing any damage.
For example; if you’re attacking an enemy unit that’s on a hill hex, you roll one less Battle Dice than normal depending on how far away from the target you are, because you’re attacking uphill, which puts you at a disadvantage.
All units have one member that has a flag in them, when fighting an enemy unit, you always remove the flag bearer last.
I won’t go through how each unit attacks, but I’ll use Cavalry as an example. Every unit has a different range to the others, Infantry can attack enemy units up to four hexes away, Artillery up to five hexes away, and Cavalry must be adjacent to the unit they wish to attack.
Depending on where you are in relation to the unit you’re targeting you roll a certain number of Battle Dice. Cavalry always roll three, unless terrain battle restrictions state otherwise.

These are all six of the sides of the Battle Dice, and each symbol means something different. Infantry, Cavalry and Artillery are fairly self-explanatory – for every one of those symbols rolled, you can capture one of the equivalent enemy pieces if there is one in the unit you’re attacking. The cross sabres are the only symbol that can remove a General from the board, however, if there’s no General in the unit, sabres also remove anything else. The flag is a retreat:
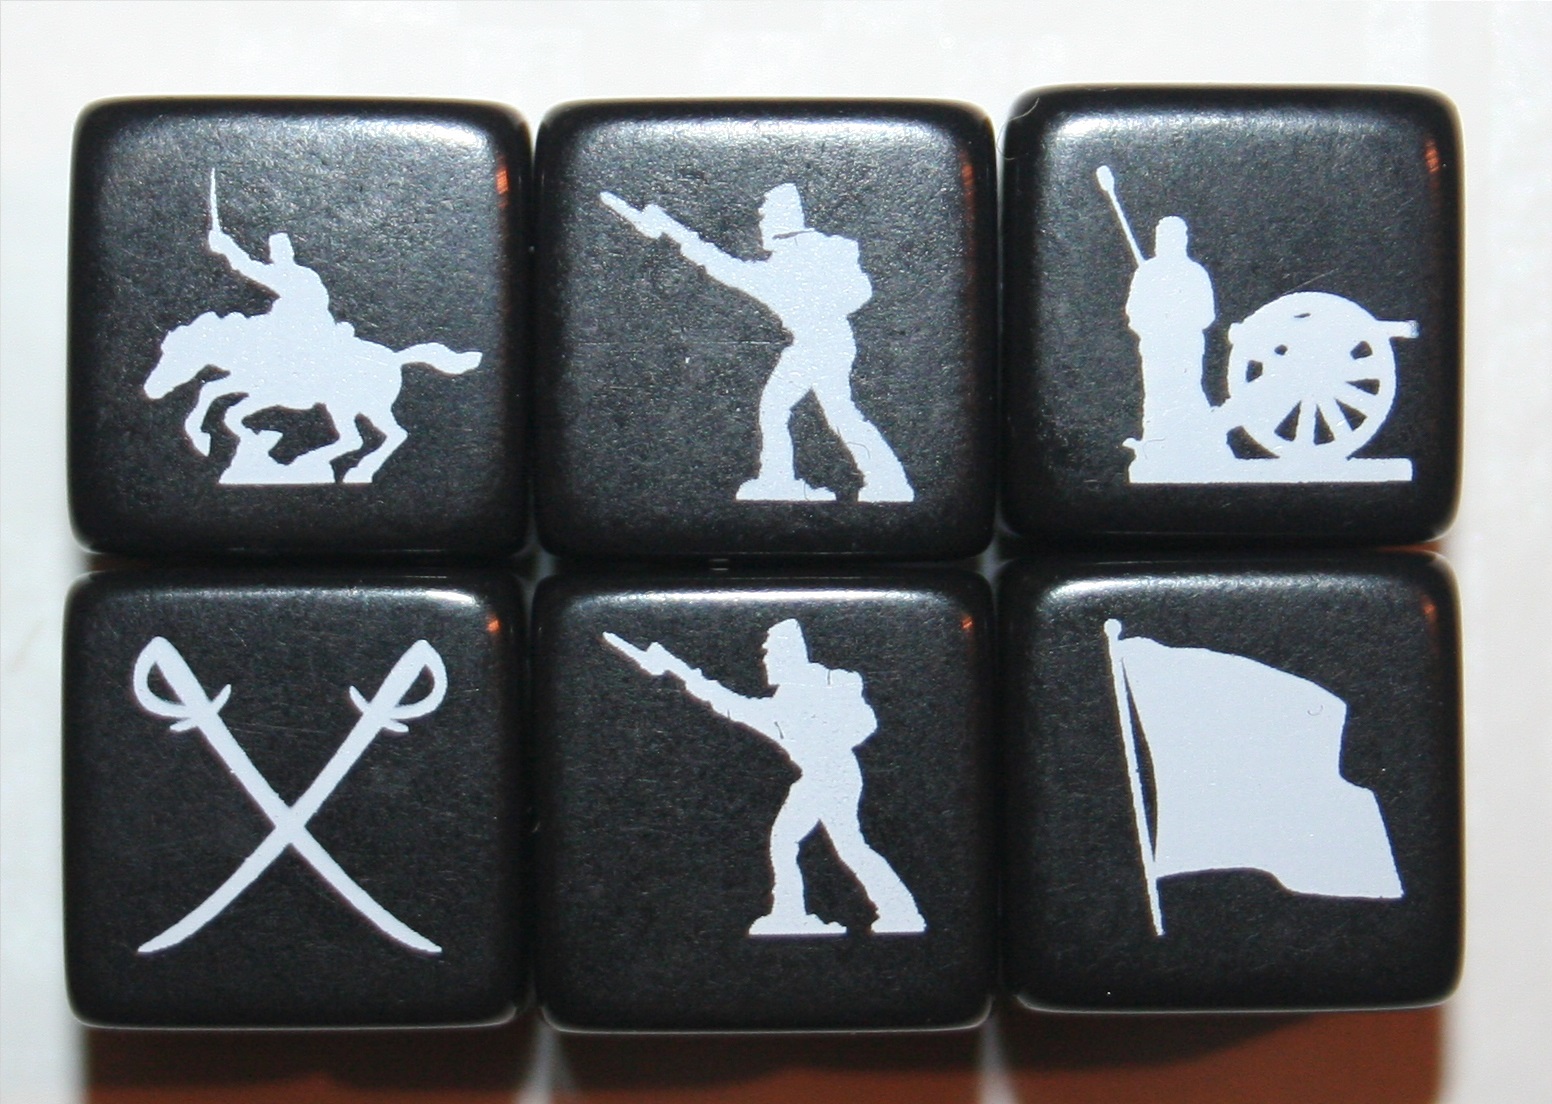
A flag rolled means that the unit you’re attacking must retreat one hex, however, it can’t retreat onto an occupied hex, unless that hex has a General on it that’s not attached to a unit, the General then become attached to the unit and must move with it.
Different Kinds of Terrain:
There are hexes on top of the board, these are the Terrain Tiles. In both the scenarios I’ve played so far there are only three kinds on the board: Woods, Hills and Homestead hexes. These alter the course of the game in that they place restrictions on movement, line of sight and accuracy. So can be used to your advantage, or to severely disadvantage your opponent. All of these act as blocks in the line of sight when you want to attack a unit, but the Woods and the Hills can be incredibly useful. From the top of a hill the range of an Artillery unit is increased by 1, whilst the accuracy of an attacking unit is decreased by 1. Likewise, on a Woods hex the attacking units accuracy is decreased by 1, but the unit inside the Woods has no such impediment.
Winning the Game!
One the page in the Rule Book assigned to whichever scenario you’ve chosen to play there will be a small amount of information underneath the picture of the starting set up. This will include the historical background to that particular battle, which General both sides are commanding as, who moves first, and most importantly, how many flags you need to capture to win. The first player to achieve having this number of their opponents flags, immediately wins the match. However, to play a complete match, you’re supposed to reset the board and change sides, and the winner is determined after both matches are complete. This probably often ends with a draw, but I haven’t yet played a complete match in this way. The game we played the first player to capture six flags won:
Strategy:
This game is tactical, it requires strategic thinking and a little bit of foresight. I’ve found that on the First Bull Run the best way to play is just to push forward in more or less a straight line, going up hills wherever you can, or into woods. If you’ve got possession of the hills and woods you’ve got the advantage, because your enemy is less likely to be able to capture you when they attack.
This isn’t a huge amount of help, as it’s things that’re mostly just common sense, but I’m not particularly strategically minded, so although I’m not bad at this kind of game, I also don’t make plans when I play them. Just take each turn as it comes, kinda thing.
History and Interesting Things:
- The first game to be published under this name was published in 1961. The concept of this game was the same as the version we’ve got, but much much simpler. Each side only has 22 pieces, the grid is square, not hexagonal, and there’s only one battle scenario available to play.
- An online version of this game was released in November 2008, to GameTableOnline.com and can be played player vs player or player vs computer.
- It won the International Gamers Award in 2001 for the General Strategy: 2-Player category.
- I don’t have anything else to write about the history of the game, so have some points about the Civil War instead: Before William Tecumseh Sherman became a famous Union General he was demoted for apparent insanity.
- More men died in the Civil War than in any other American conflict, and two-thirds of them died of disease.
- During the war Robert E. Lee’s Virginia estate was confiscated and turned into a cemetery by the Union.
- Robert E. Lee was the bloodiest General of the war.
- President Lincoln was shot at, and almost killed, nearly two years before his assassination riding to the Soldiers’ Home (his summer residence) from the White house on an August evening in 1863.
- On the Union side, black soldiers refused their pay for 18 months because they were being paid less than their white comrades.
- Harriet Tubman led a raid to free slaves during the war, this one raid freed more than 720 slaves – more than 10 times the number she had freed in 10 years on the Underground Railroad.
I read about the history of the war here, and got my game info off of Wikipedia.
To Conclude:
So this game is great for a few reasons; it’s easy to understand, it’s easy (though time-consuming) to set up, and there are so many different scenarios that it’s going to be a long time before it stops being interesting!
I recommend it to anyone who enjoys a proper sit-down game. It takes about an hour to play a scenario, with around 15 minutes set up time (this’ll probably become less as we get more familiar with the board and different layouts). For anyone with a son or daughter who’s an up-and-coming tactician, this would be a fantastic game to play with them.
If this is a game that’s up your street, go out and get a copy, and have lots of fun re-writing the course of history!
