Winner: Draw
History:
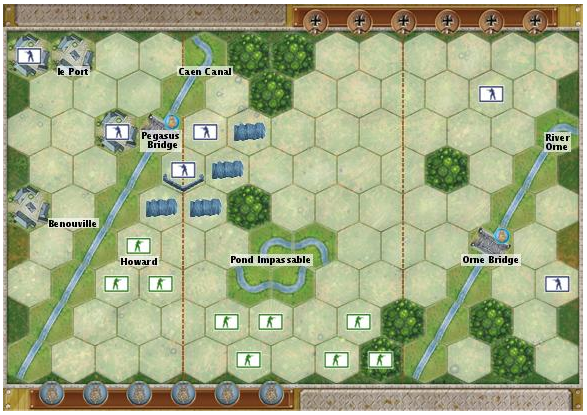
Set on the night of June 5th, 1944 this scenario recreates the brief battle for Pegasus Bridge. Or Bénouville Bridge, as it was known at the time, in Normandy, France. Major John Howard led the men of the Oxford and Buckinghamshire Light Infantry in the first airborne assault of D-Day, his objective being to capture both Pegasus Bridge and Orne Bridge. At a few minutes past midnight the Horsa Gliders land in a patch of field only yards away from their objective. The men stream out of the gliders totally surprising the German forces, there’s a brief and furious fight involving a machine gun in a sandbag nest right by the Pegasus Bridge. The British forces secure the Bridge, and the Orne equally as quickly, losing only two men in the process.
The bulk of British troops here start behind the impassable pond, meaning that they must be maneuvered around it to get involved in the battle. The Allied player has the natural advantage in this scenario; they have more men to begin with, receive more Command Cards, and play first.
Strategy and Tactics:
The Allied player here has the upper hand, but if they play badly that’s going to be completely irrelevant. In this game a certain amount of your success as a player is determined by which Command Cards you draw, as on some occasions you may need to give orders to a section of the board that you don’t have the Command Card for, and so can’t. How quickly and efficiently you kill enemy units is also determined by the roll of the battle dice. So some amount is down to luck and chance. But aside from that we’ve found so far that once you’ve found a decent defensive position (for example in a patch of trees) it’s ideal to stay there for as long as possible, all the while you can fire on your enemy from there you should stay as the woods reduce the chances that you’re going to lose men when the enemy fires on you.
In this scenario the German forces have barbed wire and sandbags. These are inconvenient, for an Infantry unit to be able to remove them they have to move into the space that the barbed wire is in, and then remove it instead of battling. So it can be completely suicidal to remove them as you end up adjacent to you enemies units and unable to attack them. Leaving you as a clear target. It’s also important to remember that the rive does not effect line of sight. You can fire on an enemy unit across a river provided that they are within range and no other terrain restrictions that would prevent you attacking them apply.
I found, when playing as the Allied forces, that trying to take the patch of wood on the right flank of the board, by the Orne Bridge, was a strong position to be in. That bridge is under defended and so the woods is a good position from which to either attack the lone German unit at the top of the board there, or to swoosh down and take the bridge from the other German unit. The blue medals on the two bridges count as victory points if the bridges are held by British forces. Meaning that that player has to destroy less of the Axis units to win the scenario.
For Axis forces it’s tactically ideal to get you lonely unit in the top of the right flank down into the patch of woodland before anyone else can, this is a good defensive position to be in, to prevent anyone trying to take the Orne Bridge. Your second unit there could then be on the bridge, between them they’ll put up a good fight against any optimistic British forces.
When we played this scenario we left the Axis units mostly where they were in the center and on the left flank, only really moving the one in the top left corner to bring it closer to the action. On reflection it would probably have been a good idea to shift the unit in the town right next to Pegasus Bridge further down the river to attack the British, because we didn’t actually use it that much.
To Conclude:
This is the starter scenario, so it’s been simplified from the original battle. The Germans has a machine gun in their sandbag nest by Pegasus Bridge that’s been replaced with regular Infantry in this one. But as starters go it’s very good, it’s an easy board to navigate, and the use of only one type of unit allows you to completely get to grips with how they move and battle. It would’ve rated higher, but that it’s been deliberately simplified for learning purposes, so the scenario doesn’t have as much going for it as some of the later, more complex ones do. It’s well designed as an introduction though, and sets you up in good stead for future scenarios.
Running Score:
David: 2
Miriam: 2


PEGASUS BRIDGE
I– A true History to read :
http://www.editions-pantheon.fr/francoise-h.-gondree/essais/pegasus-bridge-le-pont-de-l-espoir.html
2– A stolen Museum – A scandal to denounce :
the robbery of the private museum of aspeg “Musée de Pegasus Bridge “ by the political militaro touristique lobby called comité du débarquement………….
https://www.pegasusbridge.fr/70anniversaire-du-debarquement-le-denomme-comite-darromanches/
…the great pain of the actors of DDay…….Major J. Howard……..14 years of impunity……………complaints are still going on against him…………………..
http://www.pegasusbridge.fr
can you attack someone that is on the bridge and can they shoot back?
Sorry for the late reply.
I actually am not sure myself. I haven’t played this particular game in over a year now and would need to review the rules to be sure.