Memoir ’44 – 04 – Pointe-Du-Hoc

4 - 5

Winner: David

Full Scenario

History:

The rules of the game tell us a brief history of this battle; June 6th, 1944.

It was felt by the Allies that the position the Germans held on top of the cliffs at Pointe-Du-Hoc was too strong. They had guns with them that could, from the top of the 100 foot cliff, accurately hit anything attempting to land on the beach.

The Second Rangers (an American unit formed specifically for this mission), under the command of Colonel James E. Rudder were assigned to stop them. After a difficult landing, under heavy fire from the Germans they managed to reach the top of cliffs. Here they found that the guns had been withdrawn from their stations several days beforehand and only dummies left in their casements. One Ranger patrol went south searching for the missing guns.

Two concentrations of Germans had remained; one in the south-west antiaircraft bunker, the other in the observation bunker. Despite repeated attacks these resisted and were the most dangerous of the German forces in the area.

The single Ranger unit finally found the guns sitting quietly, unguarded, in an apple orchard inland. They placed incendiary devices inside them and completed their mission.

Pointe-Du-Hoc
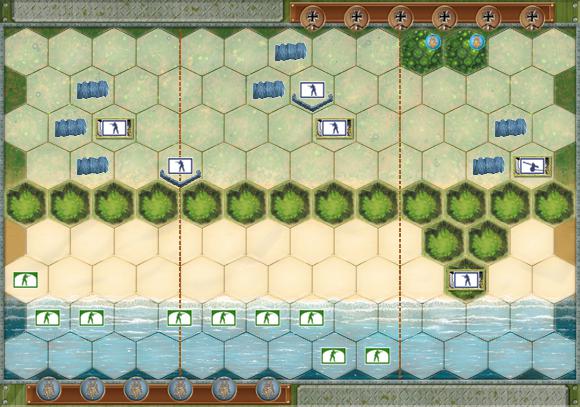
Pointe-Du-Hoc
The Steup.

Strategy:

Allies:

Landing on the beach puts you at a fairly strong disadvantage to the Axis player; you’re in the sea, which gives you movement restrictions, and retreat penalties, but you get six command cards and you move first, so it’s not all bad.

  • You have to factor in that you cannot scale the cliffs in one move, the special rules for this scenario state that you must use two moves, to scale a cliff from the beach side.
  • However, your units are Rangers, so they can all move two hexes and still battle, which is a big advantage, and makes life much harder for the Germans.
  • The victory condition is four medals; we found that the most promising way to achieve this was to storm straight up the middle and try and take out the units in the sandbags, plus the left-hand one in the bunker. Then capture medals at the back to win. You should also try and do this as quickly as possible.
  • In this scenario I would say that keeping your units pretty close together was probably a better bet than spreading them thin, simply because the victory condition in not so high as in other scenarios, and it’s easier to outgun a unit if you’ve several of your units attacking them.
Axis:

You get the fun of defending in this one. Dave and I did have a bit of a debate about whether or not it was more advantageous to stay in the bunkers and let the Allied player come to you, or to go out and meet them. We played it both ways.

  • You’ve got a bit of an interesting set up, on the top of the cliff. You’re position is very good defensively, but a little annoying until the Allied player has moved a fair few of their units.
  • You’ll probably find that although you can attack maybe on or two of their units, you can probably only do so with one battle die, which is an incredibly tedious (although completely acceptable, and sometimes necessary) way of destroying a unit
  • My main comment for this one is to not (if possible) let your enemy destroy your artillery. Because of its range this unit is incredibly useful, but annoyingly, also fairly easy to obliterate if an enemy unit gets close enough. PROTECT IT. That’s what your unit in the bunker on the point is for – to stop anything getting to your artillery.

General strategy point: be aware of the spread of your units in relation to your command cards. It’s very unwise to bunch all your units in one section of the board, as there may come a time when you have no command cards relevant to that section, which renders your turn useless and gives your opponent the upper hand.


Running Score:

David: 11

Miriam: 5


Advertisement

Memoir ’44 – 03 – Sword Beach

Winner: David

Full Scenario

History:

The set up!
The set up!

Morning. June 6th. 1944. The 8th Brigade Group of the 3rd British Division, supported by Commandos of the 1st Special Service Brigade and the Sherman tanks of the 13th and 18th Hussars make up the first wave of Allied forces to land on “Sword” beach, near the mouth of the Orne River.

The objective of the day was for the Allied forces to retake the city of Caen, and although the French troops captured the Casino at River Bella, the Allies failed in this objective. The sea was difficult that day, the tanks were supposed to land first and engage the enemy before the infantry landed, however, tanks and infantry ended up landing together. This coupled with the German resistance meant that the inland advance was seriously delayed. The failure to retake Caen was one of the biggest set-backs of D-Day and the consequences were still felt well into July of that year.

Strategy and Tactics:

Axis:

You have a defensive advantage in this scenario. Not only are the Allied forces advancing from the sea, which initially gives them a terrain disadvantage, but some of your forces are also already holed up in bunkers. Bunkers are useful as they give a -2 to tanks and a -1 to infantry when being attacked. You also possess the only artillery unit in this scenario. This is, if you manage to prevent its destruction, probably your most useful unit, as it has the longest attack range.

Despite these advantages you also have fewer troops than your opponent, and your only tank unit starts in a useless position, from which you have to order it twice to get it within attacking range of the Allied forces. You also have one less command card, and move second.

Okay, so that aside, tactically we found that arranging your troops towards the back of the board and then waiting for the Allied forces to come to you was a fairly sound way of playing the scenario. Though it’s definitely worth dragging your tank unit out of the corner early on. I would also generally say that it’s worth keeping the units that are already in the bunkers in them, unless for some dire reason you have to retreat or lose that unit.

Because wood hexes provide a -1 for attacking a unit in the woods it’s also worth trying to position your in Lion Sur Mer in the most forward of the two woods hexes next to it, this moves you closer to the fighting action whilst giving the unit a decent terrain advantage and enabling it to be close enough to try and prevent Allied forces taking the town and claiming the medal there, that contributes to their victory points.

Other than that, I would say, try not to let yourself get surrounded by the Allies, because they’ve got a lot more firepower than you, and also, if possible, knock out their tank units first, as these move further and have a fighting advantage over infantry units as well as needing less hits to destroy a unit.

Allied:

Although you start in the sea, you have an advantage in number units and number of command cards, as well as being the side that starts the scenario. Not only do you have three tank units to the one that your opponent possesses you also have three special forces units available to you, these are able to move up to two hexes and still battle, where regular infantry can either move one and battle, or two and do nothing.

Your first task is to get your units out of the sea, this is slow going because of the terrain restrictions that the sea imposes, but we found that it was tempting just to move either one block of your units out, maybe just from, say, the left flank, or to maybe move one unit from each section of the board, depending on your command cards. This is however, not a good idea. If you move one unit from each section too far from its comrades you make it an easy target, remember that you’re at a disadvantage with the bunkers, not to mention the hedgehogs and barbed wire that’s between you and the Axis forces.  And if you only move one block and ignore the others you also make those units targets because if they’re in the sea and they get attacked a retreat roll on the battle dice counts as a hit because you cannot retreat and so must sacrifice one member of your unit for every retreat rolled.

If you start out with any command cards that enable you to annihilate your opponents artillery unit this is a big score early in the game, it levels the playing field a lot. Not only does it have only two pieces to a unit, making it the easiest to destroy in terms of dice rolls needed, but it also makes it much harder for the Axis player to just sit and wait for you, as they can no longer pick off your units from such a distance.

Surrounding bunkers is a good way of destroying a unit completely, if you attack a bunker with three units instead of just one, you’re less effected by the defensive advantage they give to the Axis player.

Lastly, don’t forget about the medals in the three towns at the back of the board. Each one of these counts for one of the five victory points you need to win the scenario if you capture, and hold, the town. They’re worth going after because they mean you need to physically destroy less enemy units.

To Conclude:

I really enjoyed this scenario from both sides. As you can see from the running score we’re keeping – I lost. But it was fairly close both ways round. It was more a lack of useful command cards than any tactical errors made. This scenario is also great because you get artillery and special forces units in play, as well as bunkers, hedgehogs and barbed wire, which adjust the way you have to think about moving around the board. This is great because by this point you’re familiar with the infantry and tank units, and then the game gives you something new to play with. It also starts to pick up the pace of play. Dave mentioned in his last post that he thought it felt a little slow, I agree with him, but I think that this scenario really cranks the game up a bit, making it much more interesting.

Running Score:

David: 8

Miriam: 4


Getting A Feel For History – Escape From Colditz

5 - 5 - Strike Thro

3.5 - 5

Number of Players: 2-6

Year of Publication: 1973

Creator(s): Bob BrechinBrian DegasMajor P.R. Reid M.B.E., M.C. (Designers) and Antonio Catalán (Artist)

This one is not, under any circumstances a quick game, and is likely therefore, to be a long-ish post. The fastest time we’ve ever played it in is an hour, and that’s because we set ourselves a time limit. Otherwise the game could take days.
Escape From Colditz is a game set in the World War II prison camp at Colditz Castle. The idea for the game came from a plan formed by a group of British POW’s (Prisoners of War) to escape from Colditz using sheets and floorboards to create a glider. The game itself is a little more complicated than that, but that is the story the game is based on.
We used to play Escape From Colditz when we were younger, and we never had our own copy of the game. So recently my brother decided that it was a game we definitely needed, and he bought a copy. Since it arrived in the post we’ve played it several times with different numbers of players and different time limits.

Escape from Colditz box

Rules and Interesting Things:

This game was created by Pat Reid, a British Army Officer, and one of the few to successfully escape from Colditz Castle in World War II. The game is for 2-6 players, and the board is the floor plan of Colditz. The rule book tells us that the board is based on a true plan of the castle, but that was adapted to have all necessary features on one floor. This accuracy to Colditz is one of its most interesting features.

At the beginning of the game each player decides who they are going to play as, there are five escape teams to choose from, British (red), French (brown), American (blue), Dutch (orange) and Polish (green) and one player must play as the Security Officer (black). A different number of POW’s and Guards are allocated depending on how many players there are, as follows:
2 players: 8 POW’s and 6 Guards
3 players: 7 POW’s per player: 12 Guards
4 players: 6 POW’s per player: 14 Guards
5 players: 5 POW’s per player: 15 Guards
6 players: 4 POW’s per player: 16 Guards

The fact that the Guards are always outnumbered by the POW’s is historically accurate, as, during the war, the prisoners always vastly outnumbered the Guards. It was only by the harsh way of living, random public executions, and other similar means, that the Guards were able to keep authority over the prisoners.

Pieces are moved by the throw of two dice. A player may use all their moves on one piece or otherwise split the roll between as many of their pieces as they like. They have to move the whole number thrown and they cannot allocate any of their number of moves it to another player’s pieces. A double entitles the player to another roll.

There are five packs of cards involved in the game, Personal Civilian Escape kit, Escape Equipment, Escaper’s Opportunity, German Security and Do or Die cards. The Opportunity cards, Escape Kits, Escape Equipment and Do or Die cards are all only useful for the escapee’s, the only cards the Security Officer can use are the German Security cards.

To attempt escape, each prisoner must collect an “escape kit”, this consists of food, a compass, forged papers, and a disguise. Once collected this cannot be taken from you or lost in any way. The items collected as part of the escape kit do not exist as escape equipment. To obtain the escape kit the player must get four of their POW’s into the rooms in the castle that have the relevant symbols for each necessary item, they can then claim an escape kit.

To make a successful escape attempt each player must also collect other escape equipment, this can be rope, which comes in 30ft lengths, wire cutters, keys and forged passes. Ideally each player would have some of everything. To collect equipment a player must get their POW’s into a room with the symbol of the piece of equipment they want, they must have either two POW’s in the same room, or one in each of the rooms with that symbol, before they can collect the relevant equipment.

Start positions if playing with two people. EO is playing as Britain.

Opportunity and Security Cards:

Opportunity cards are specifically for the use of the POW’s. Likewise with Security Cards, which are specifically for the Security Officer. To collect a Security or Opportunity card a POW or the Security Officer must roll either a 3, 7 or 11. They are then allowed to take a card from the top of the deck before they continue with their turn. Opportunity Cards can be used as soon as they’ve been collected, or they can be held for later. However, each POW or Security Officer can only hold three at any one time. POW’s have an advantage over the Security Officer here, as, if playing with more than two players, they can choose to either discard one of their Opportunity Cards or they can pass it over to another POW. The Security Officer must discard a card if he/she has collected more than three. Opportunity Cards and Security Cards are incredibly useful, an Opportunity Card might provide a POW with a piece of equipment, or allow them to hide from the Security Officer at some point, it may even allow them access to a tunnel, which will aid their escape attempt. For the Security Officer, Security Cards are a little different, they may allow you to search a room (the SO cannot enter any of the rooms in the castle without the relevant card giving them permission to search it, meaning that POW’s are generally safe whilst in the rooms), or call Appel, which recalls every players pieces to their starting position, and other similar things.

Do or Die:

A Do or Die card is dealt to every Escape Officer at the beginning of the game, these are not read and are kept face down until they are used. Once an EO has decided to use their Do or Die card, they then turn it over and read it. It will tell them how many rolls of the dice they have to try and get one of their prisoners out of Colditz. The prisoner starts from anywhere inside the grey area of the board (the inner courtyard) and must reach one of the safe targets outside of the castle walls within the number of throws specified. The prisoner must leave through the main gate and pass and key points no longer effect them. If the prisoner does not manage to escape, they are “dead” and their whole team is removed from the board and from play.

There are even more rules to this game than i’ve mentioned in my brief (haha) overview here, however, you can gather the general outline of the game. It’s quite strategic, and definitely a challenging game for anyone! We thoroughly recommend it for hours of fun, we played the other evening and had a very silly argument, that anyone who has either of us on facebook may well have seen, about whether or not I, playing as the SO could continue to shoot one of his escaping prisoners if he was playing  a diversion card (one of the Opportunity Cards). I said no, therefore I won. He said yes, which would mean he had won.

Our unresolved ending.

This argument has no resolution so far.

All the information presented to you here came either from our experiences of playing the game, or from the rule book itself, if you’re interested, go find a copy!