Mysterium


Number of Players: 2-7

Year of Publication: 2015

Creators: Oleksandr Nevskiy, Oleg Sidorenko (designers and artists), Igor Burlakov and Xavier Collette (artists)

I hope you’ve been exercising your psychic abilities!

Having been absent from the blog for so long I think I’ve found a great game to mark our comeback!

Mysterium is a relatively new game and bears a few similarities (and many differences) to Clue or Cluedo (depending on where you’re from or which edition of the game you have). The similarities are that you have to determine a murderer, a location and a weapon from a group of options and guess correctly to win the game. Differences are pretty much everything else.

You play as a group of psychics called to the house by its new owner, Mr MacDowell, who has sensed the presence of a ghost and wishes to set it free. The game is cooperative, meaning that all players win, or lose, together.

“In the 1920s, Mr. MacDowell, a gifted astrologist, immediately detected a supernatural being upon entering his new house in Scotland. He gathered eminent mediums of his time for an extraordinary séance, and they have seven hours to contact the ghost and investigate any clues that it can provide to unlock an old mystery.” –excerpt from the introduction in the rulebook

What’s In The Box:

Special apologies made for the complete randomness and, in fact, quite terrible arrangement of this photo. It will be replaced by a better one as soon as time allows.

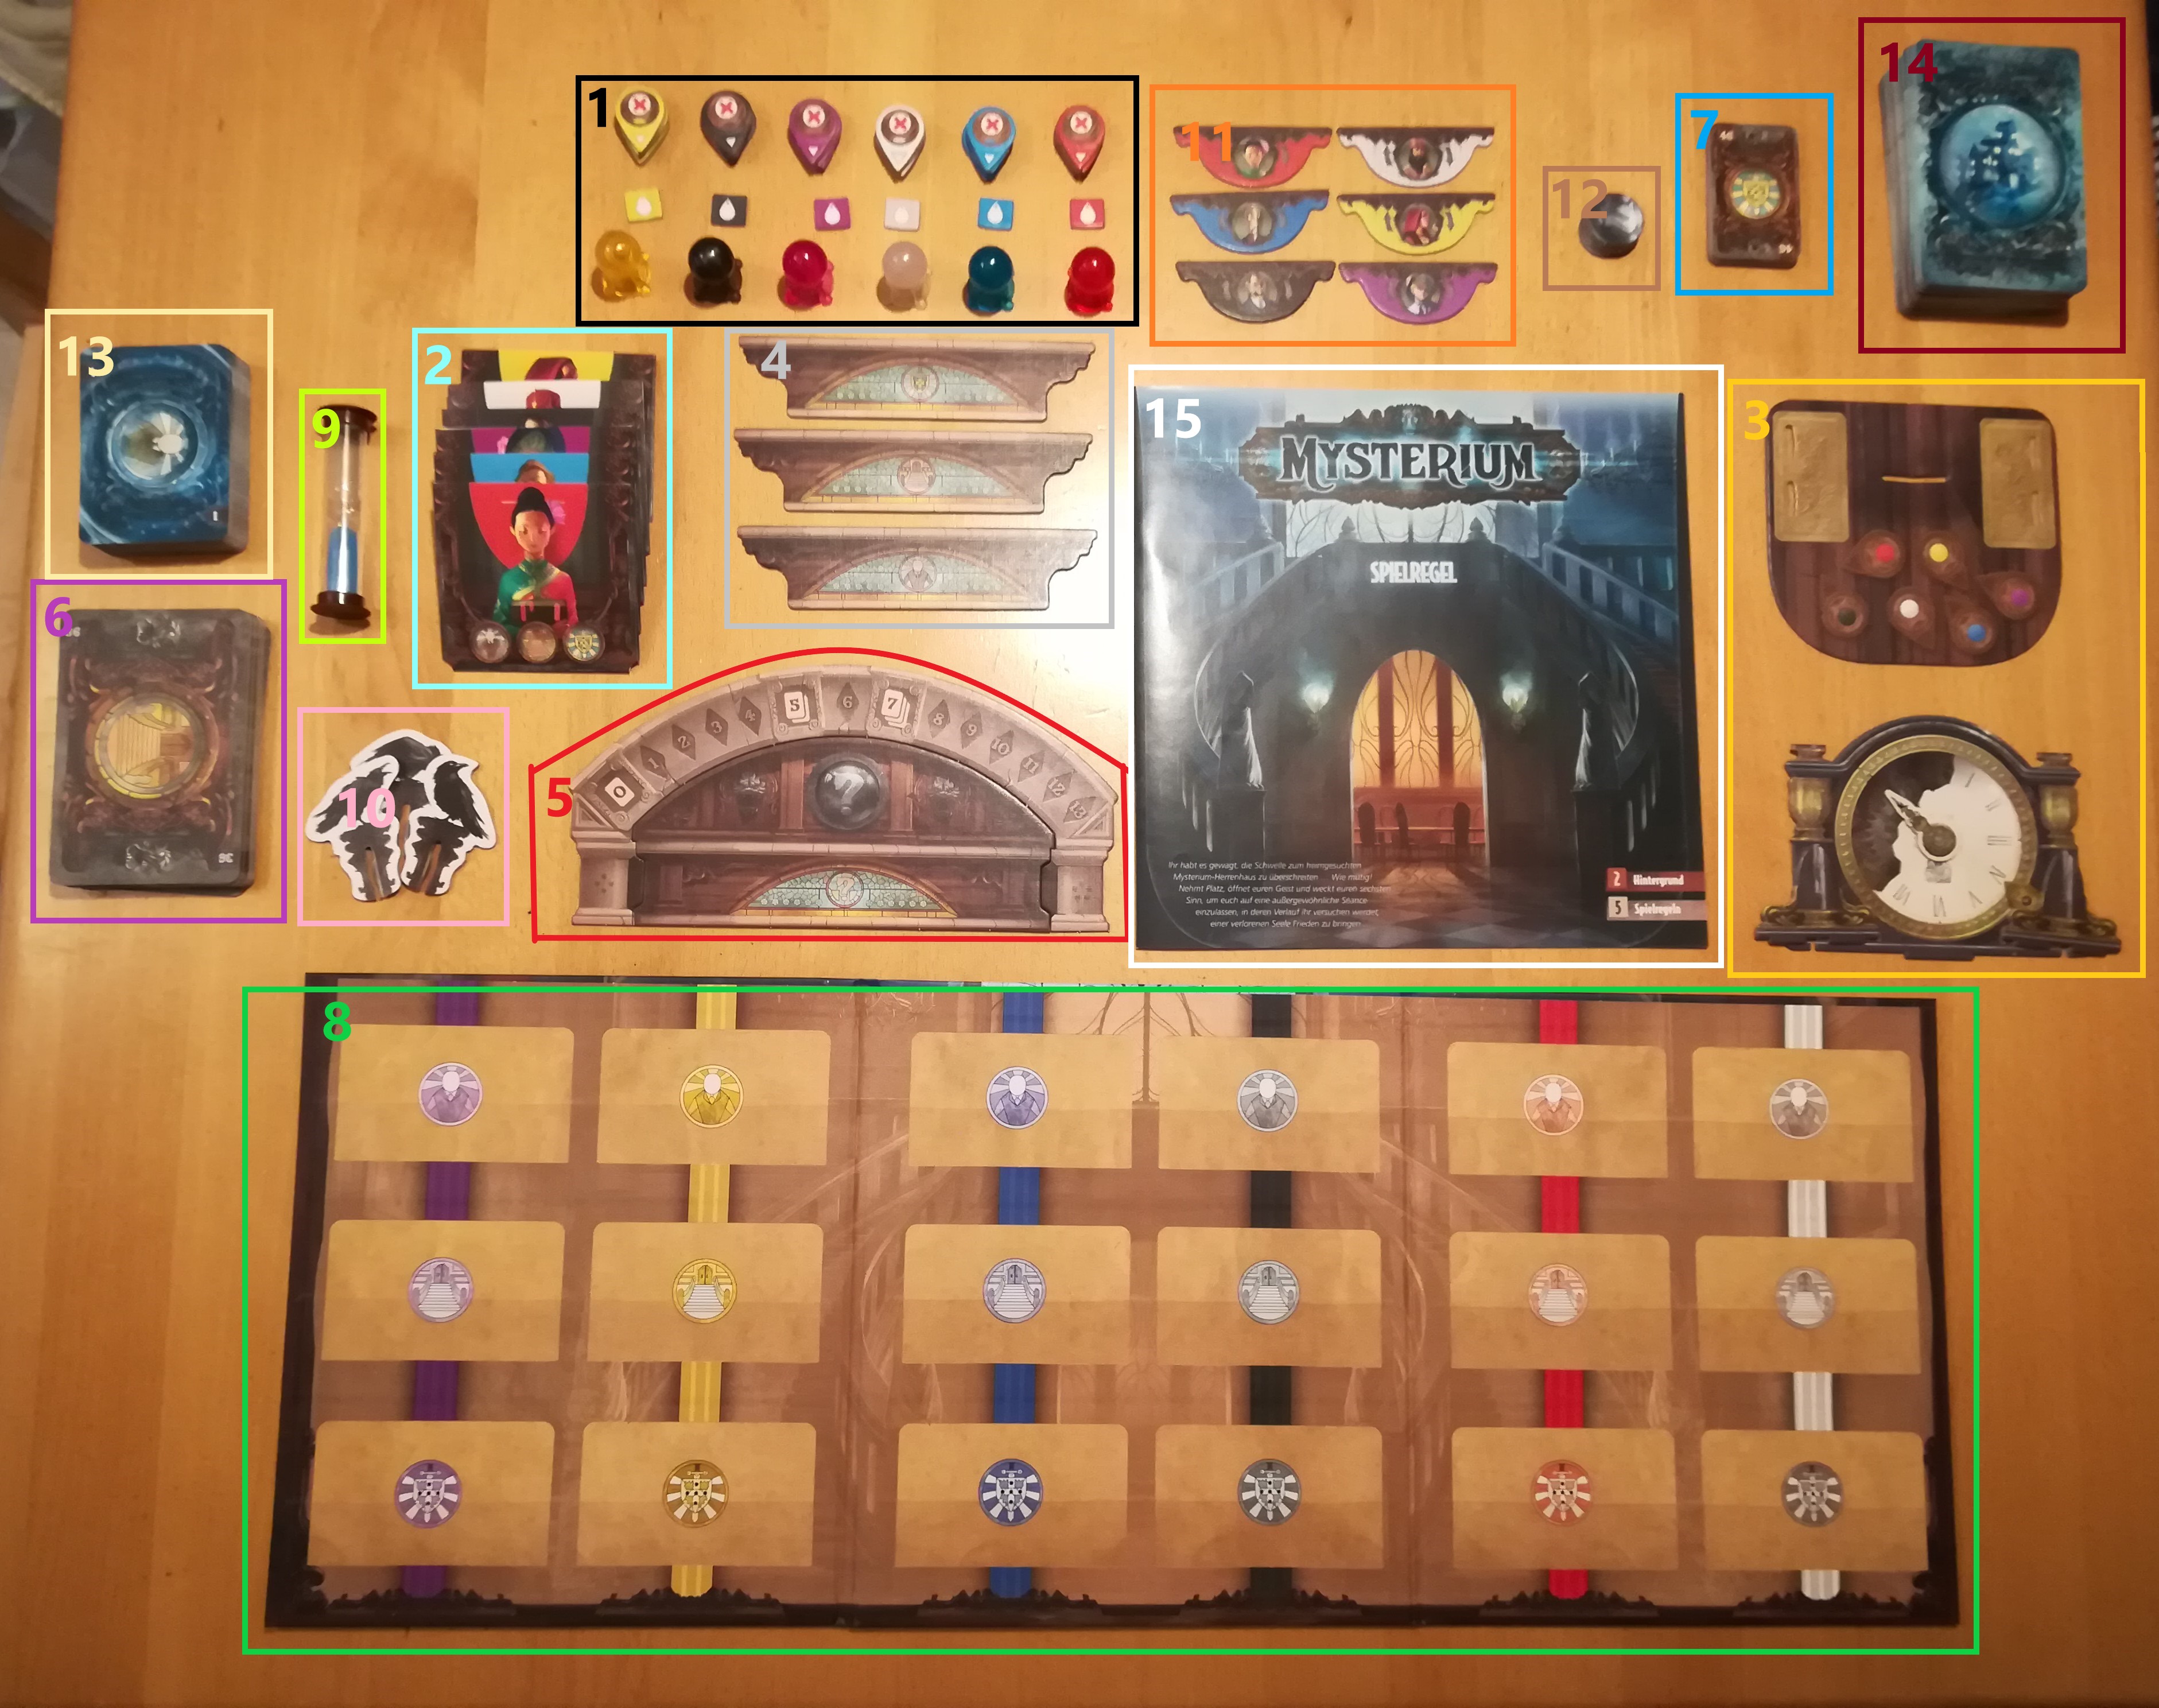
  1. 6 Intuition Tokens and 6 Clairvoyancy Markers (1 of each colour), 36 Clairvoyancy Tokens (6 of each colour)
  2. 6 Sleeves (1 of each colour)
  3. 1 Clock and Base Board
  4. 1 Character, 1 Location and 1 Object Progress Board
  5. 1 Epilogue Progress Board
  6. 18 Character and 18 Location Psychic Cards
  7. 18 Object Psychic Cards
  8. 1 Game Screen
  9. 1 2-minute Sand Times
  10. 3 Crow Markers
  11. 6 Ghost Tokens
  12. 6 Culprit Tokens
  13. 18 Ghost Character, 18 Ghost Location and 18 Ghost Object Cards
  14. 84 Vision Cards
  15. 1 Rule Book

Setting Up The Game:

Before the game begins there is a certain amount of setting up that needs to be done. Firstly, players should decide who’s going to play as the ghost. That individual then sits behind the Game Screen at one end of the table and the other players, now playing as the psychics, should gather around the other end. It’s important that none of the psychics can see behind the Game Screen. Each psychic must choose an identity to play as for the game; the characters each have a brief bio on page 4 of the rule book which will help you choose (or, as I do it, you can just pick your favourite colour), this will also help you to get into character. They then take the Intuition Token, Clairvoyancy Level Marker, 6 Clairvoyancy Tokens and the Sleeve that correlate to the character they’ve chosen. The Ghost Tokens that correspond to the identities chosen by the psychics should also be passed to the ghost and placed behind the Game Screen.

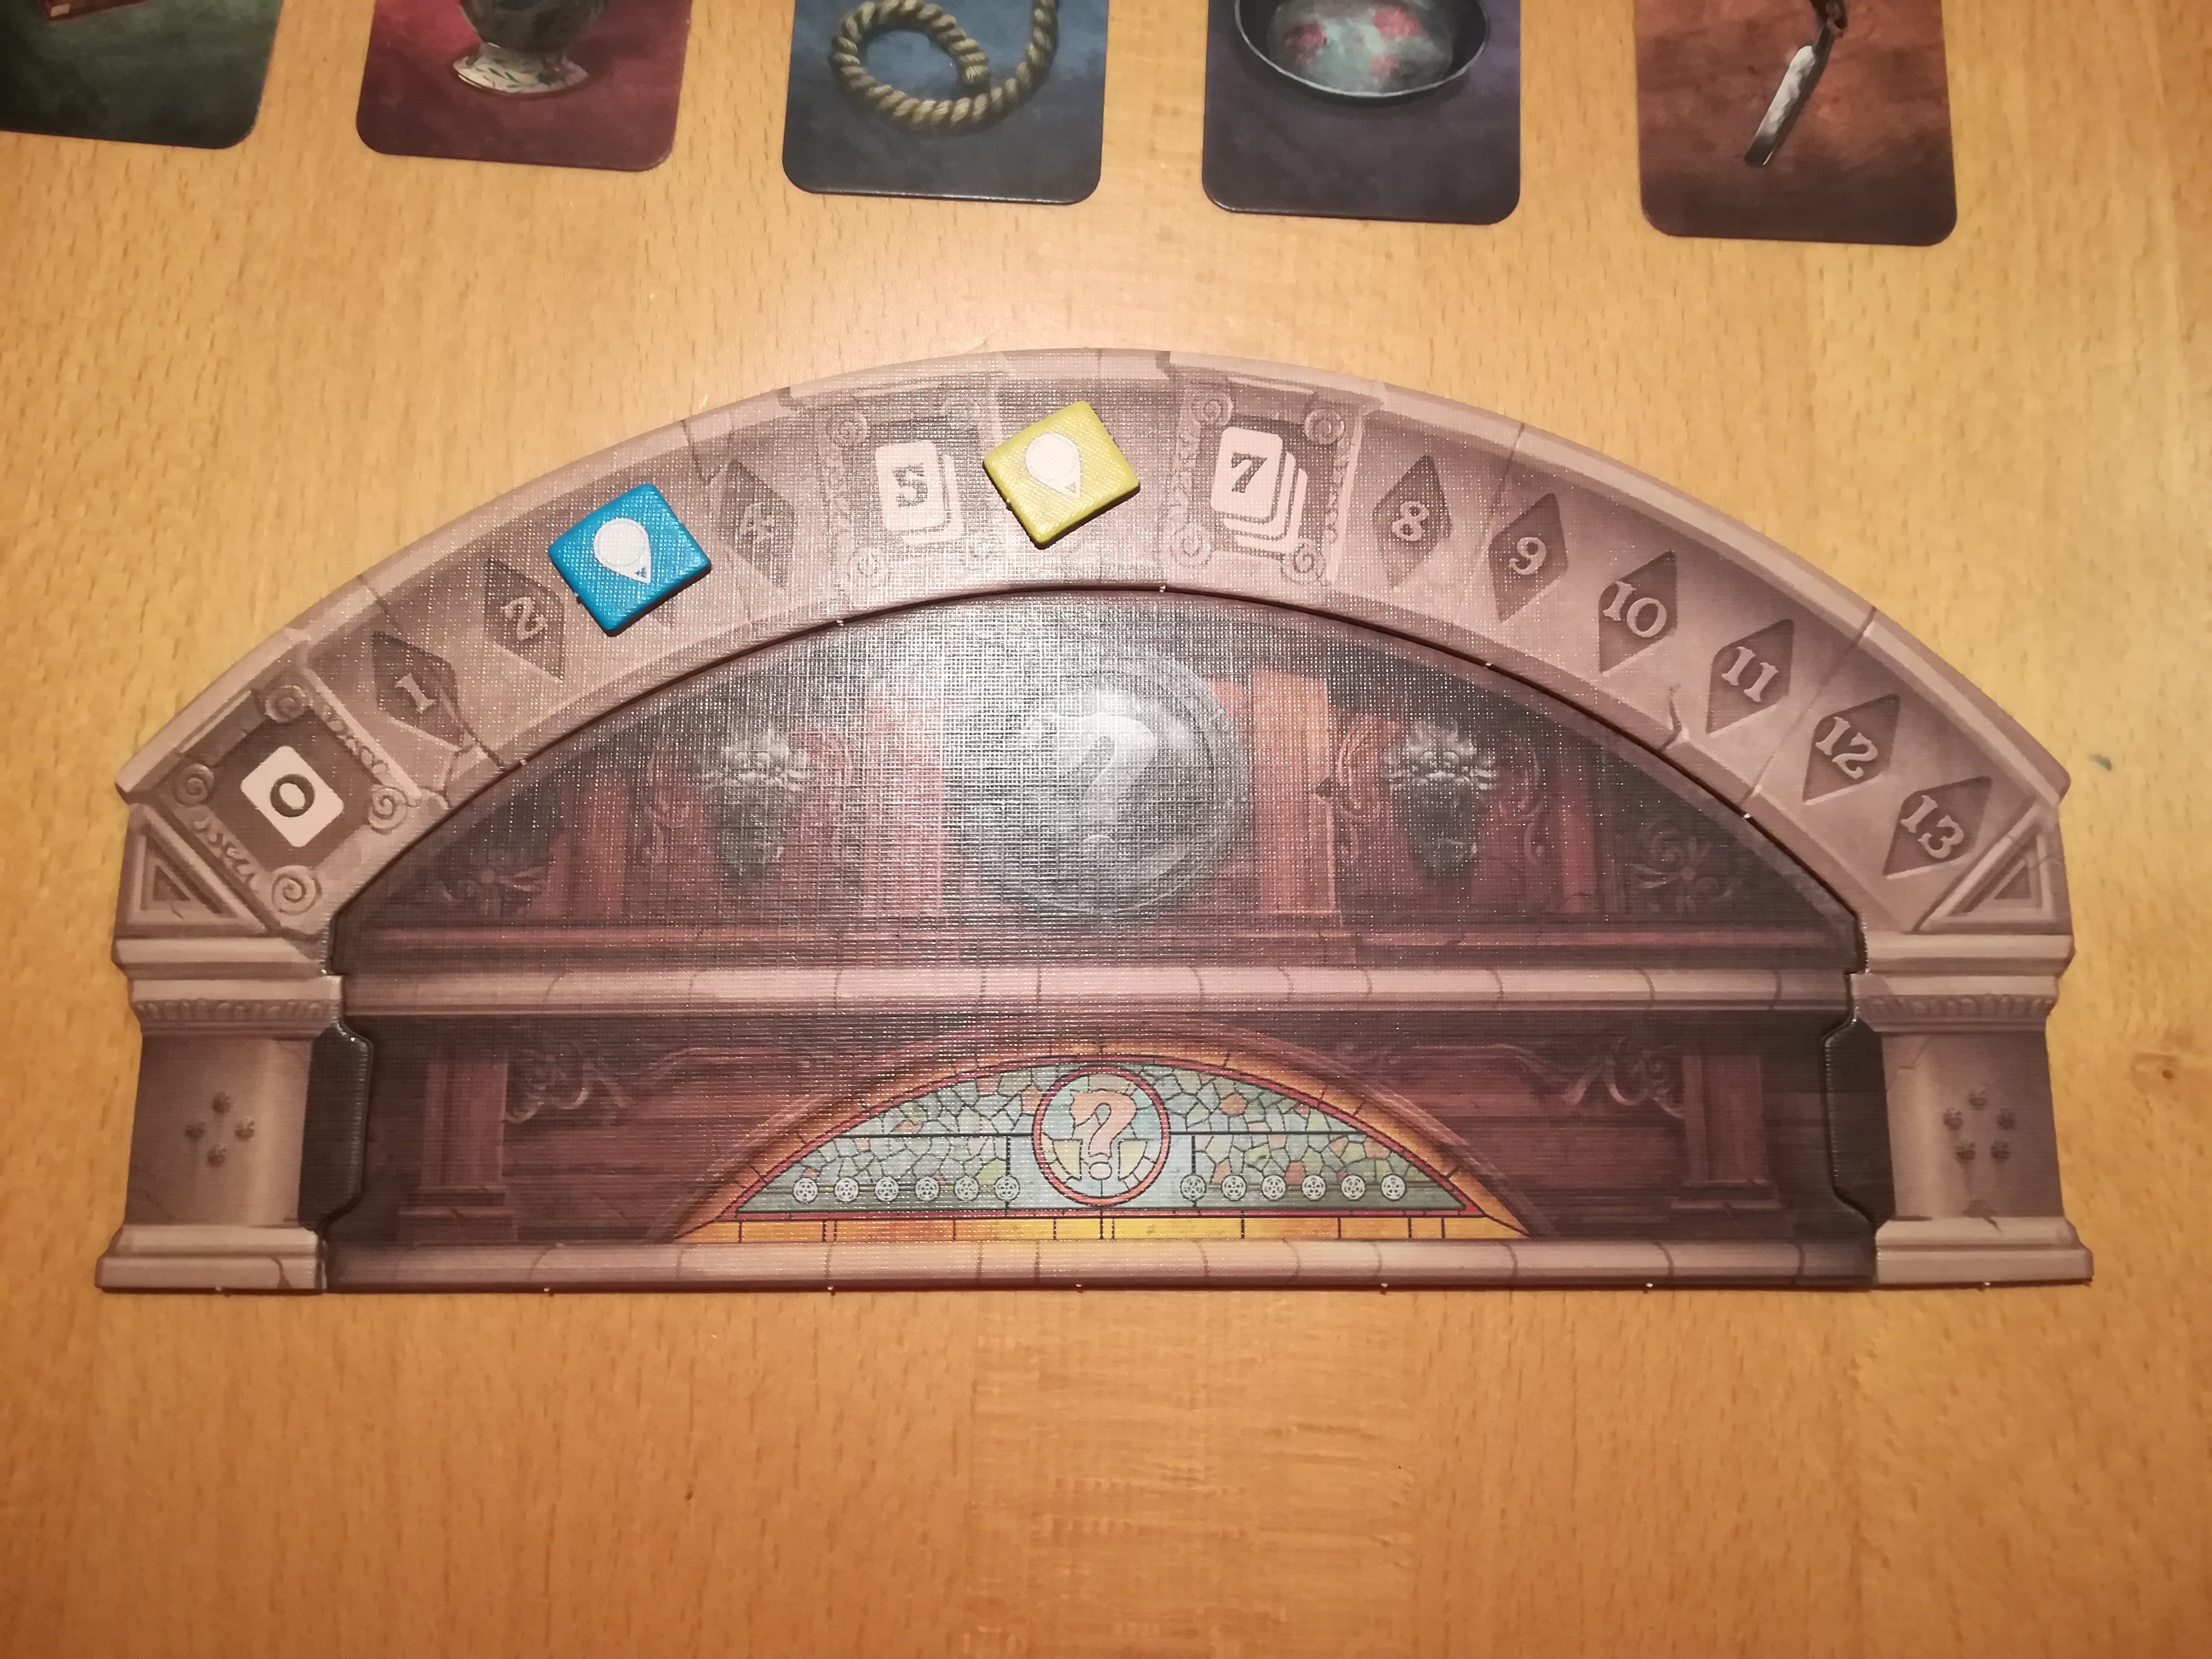
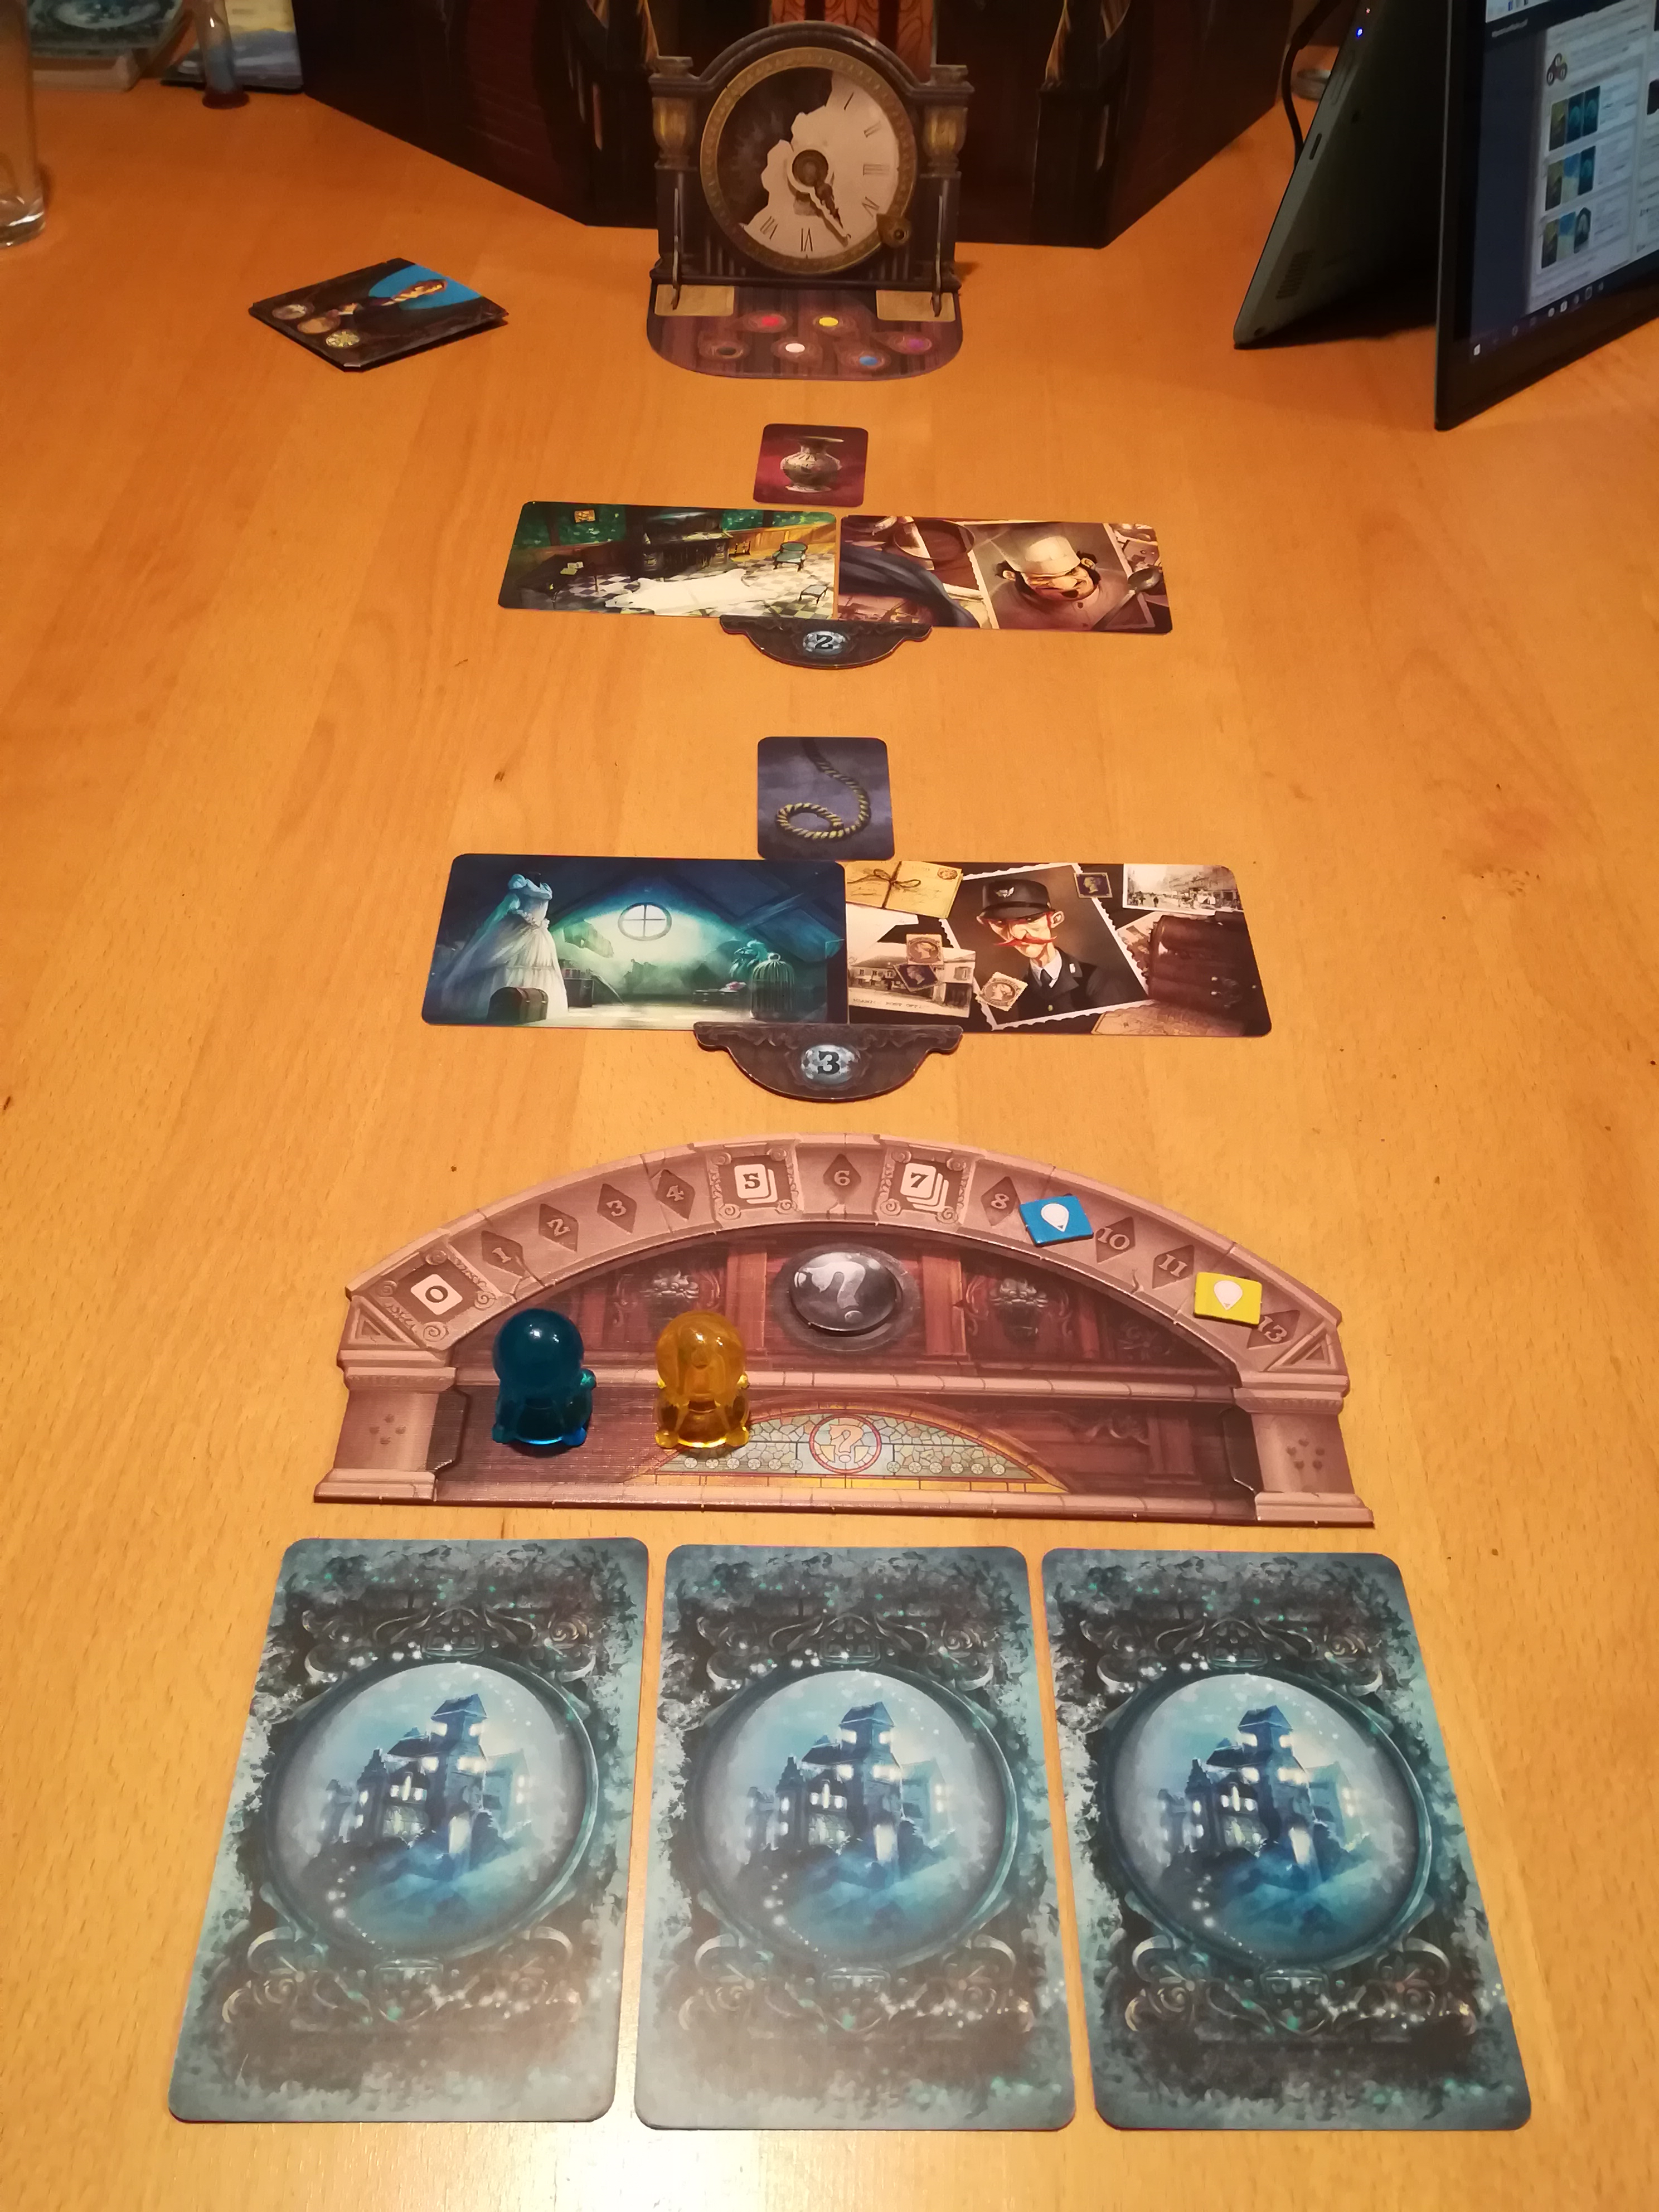
The Clock should be assembled so that it stands upright on its base board; this should then be placed, with the hand on 1, in front of the side of the Game Screen that the psychics can see. The base board of the Clock also serves as the discard area for Clairvoyancy Tokens used throughout the game.

After the Clock the Character, Location and Object Progress Boards should be spaced (in that order) down the table away from the ghost, and the Epilogue Progress Board should be placed at the very bottom of the game space. Once this is done we’re ready to draw cards, and then begin the game!

Ghost Setup:

Whilst the psychics set up the Clock and Progress Boards it’s good if the ghost organizes him or herself a little behind the Game Screen. Depending on the difficulty level chosen the ghost can take one, two or all three of the Crow Markers. These stay behind the screen simply lying on the table until such time as the ghost chooses to use them. The ghost should also take the Ghost Tokens and place them at the bottom of the columns on the inside of the Game Screen that correspond to the colour of the characters that are in play. Lastly, the ghost should take all of the Vision Cards, shuffle them thoroughly, and place the pile face down on the table inside of the screen. The ghost should then draw a hand of seven from the top of the pile.

General Setup:

Next, Suspect, Location and Weapon cards must be chosen for the game. The number drawn of each of these depends on the difficulty level and number of players. In the game shown in the photos in this post, we had only three players, so one ghost and two psychics, and were playing EASY. This means that 5 of each card were drawn during the set-up stage.

To set up, separate the psychic and ghost cards into the three categories: Character, Location and Object. Shuffle each pile thoroughly face down. Then draw 5 (or the number indicated if playing with a different number of players, or on a different difficulty setting) Character cards from the psychic pile.

NOTE: all the cards are numbered on the back for convenience in this stage

Once you have these five, retrieve the correspondingly numbered five from the ghost cards. Place all unused cards from both decks back into the game box. Repeat this step with Location and Object cards. All cards should remain face down until you have finished drawing. The ghost cards should either be drawn by the ghost, or should be immediately passed to the ghost once drawn. The ghost should then shuffle each pile separately, and randomly draw the number of cards that corresponds to the number of psychics playing. The ghost will see that on the inside of the Game Screen there are six columns, which correspond in colour to the six possible psychic characters. Once the ghost has drawn the correct number of cards from each category, he or she should place them into the plastic wallets in each column, with Character at the top, Location in the middle and Object at the bottom. This layout helps the ghost to see clearly what they need each player to achieve. The inside of the Game Screen should look something like this:

Inside of the Game Screen when playing with two psychics.

Meanwhile, the cards chosen by the psychics can then be turned over and organised underneath the correct Progress Board so that every player (including the ghost) can clearly see them. Players should also place their Intuition Tokens (the little crystal balls) onto the Character Progress Board to begin the game. Once this is done, the game space should look something like this:

Complete starting set up

As you can see here, the psychics have also already placed their Clairvoyancy Markers onto the Clairvoyancy Track that sits above the Epilogue Progress Board. This is important to not forget, as the number of points gained by each psychic on this track throughout the game will make a big difference at the end.

Lastly! Place the Sand Timer somewhere it can be seen by all psychics, but also reached by the ghost. Once this is done, we’re ready to play!

Playing The Game:

Objective: conduct a successful séance; work together with the other psychics to successfully interpret the visions sent to you by the ghost in order to identify his/her murderer.

We are a group of powerful psychics, and as such, possess the ability to communicate with the ghost haunting the house of Mr MacDowell. However, although we can all clearly sense the presence of the ghost, the ghost is unable to communicate with us clearly, and seems to have difficulty remembering the events of his death. The best the ghost can do is send us visions that will help point us to the correct suspect, location and weapon of the murder. We have seven hours in which to discover what happened, or else the ghost is destined to wander the netherworld for another year before we may have another chance to help.

It’s important to realise that whilst this is a cooperative game, the ghost has a different suspect, location and weapon for each psychic to find. This means that the visions being sent to the psychics will differ, and the psychics will need to help each other, whilst trying to work out their own clues.

The psychics must identify their suspect before the ghost is able to give them visions corresponding to their location, and location must be determined before object. Also important to know is that the ghost is not allowed to communicate with the psychics in any way apart from through the Vision Cards that he or she will distribute throughout the game.

At the beginning of each “hour” of the game, the ghost will send visions to each of the psychics. Choosing from the seven Vision Cards he or she has in his or her hand the ghost will try to choose cards that in some way indicate to the player which Suspect, Location or Object they should choose. The Vision Cards can be very obscure, so some creative thinking is required from the psychics. The ghost must give at least one Vision Card to each psychic every round. Even if they think that none of the Vision Cards they have available to them will help. Once the ghost has given Vision Cards to one psychic, they are allowed to draw new ones (to fill their hand to seven) before passing some to the next psychic.

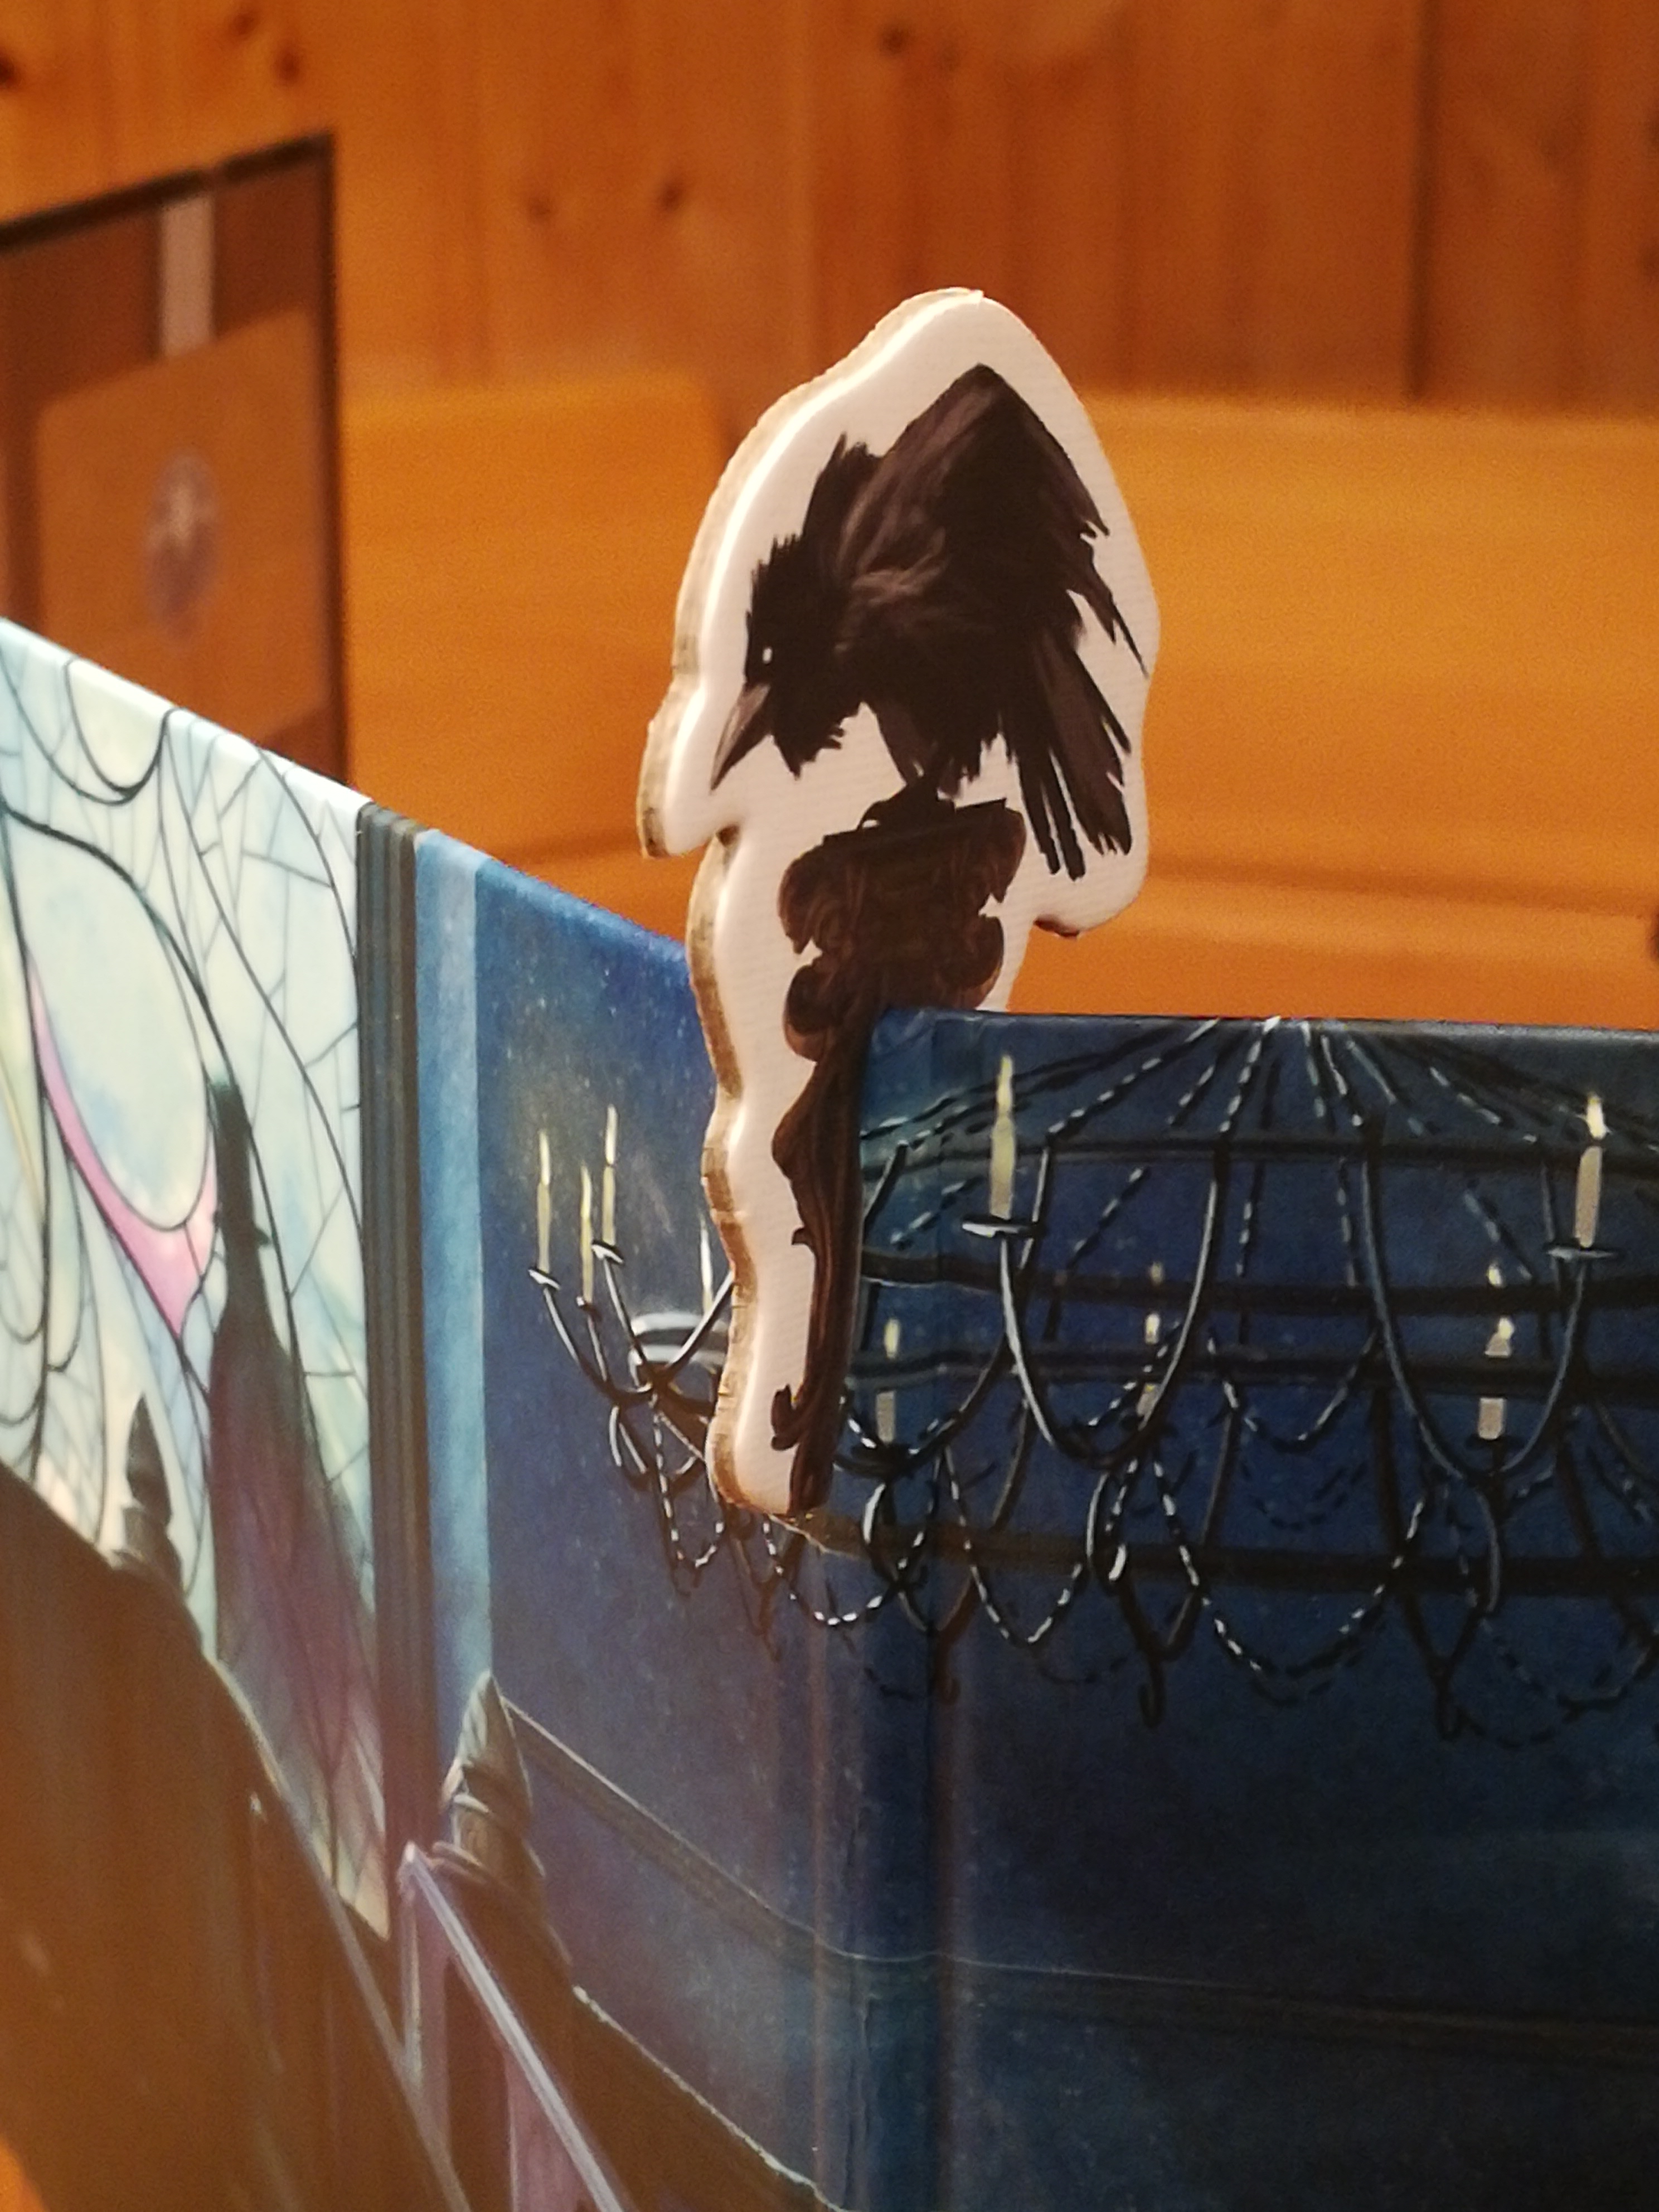
The Crow. At this point I should tell you what the Crow Markers are for. In our game, played on EASY, the ghost is allowed to use the Crow once per hour. The Crow allows the ghost to discard as many of their Vision Cards as they wish, and draw new ones, to fill their hand once again to seven. To make sure that the ghost does not use the Crow more often than the rules state the ghost is required to stand the Crow Marker onto the Game Screen, like this:

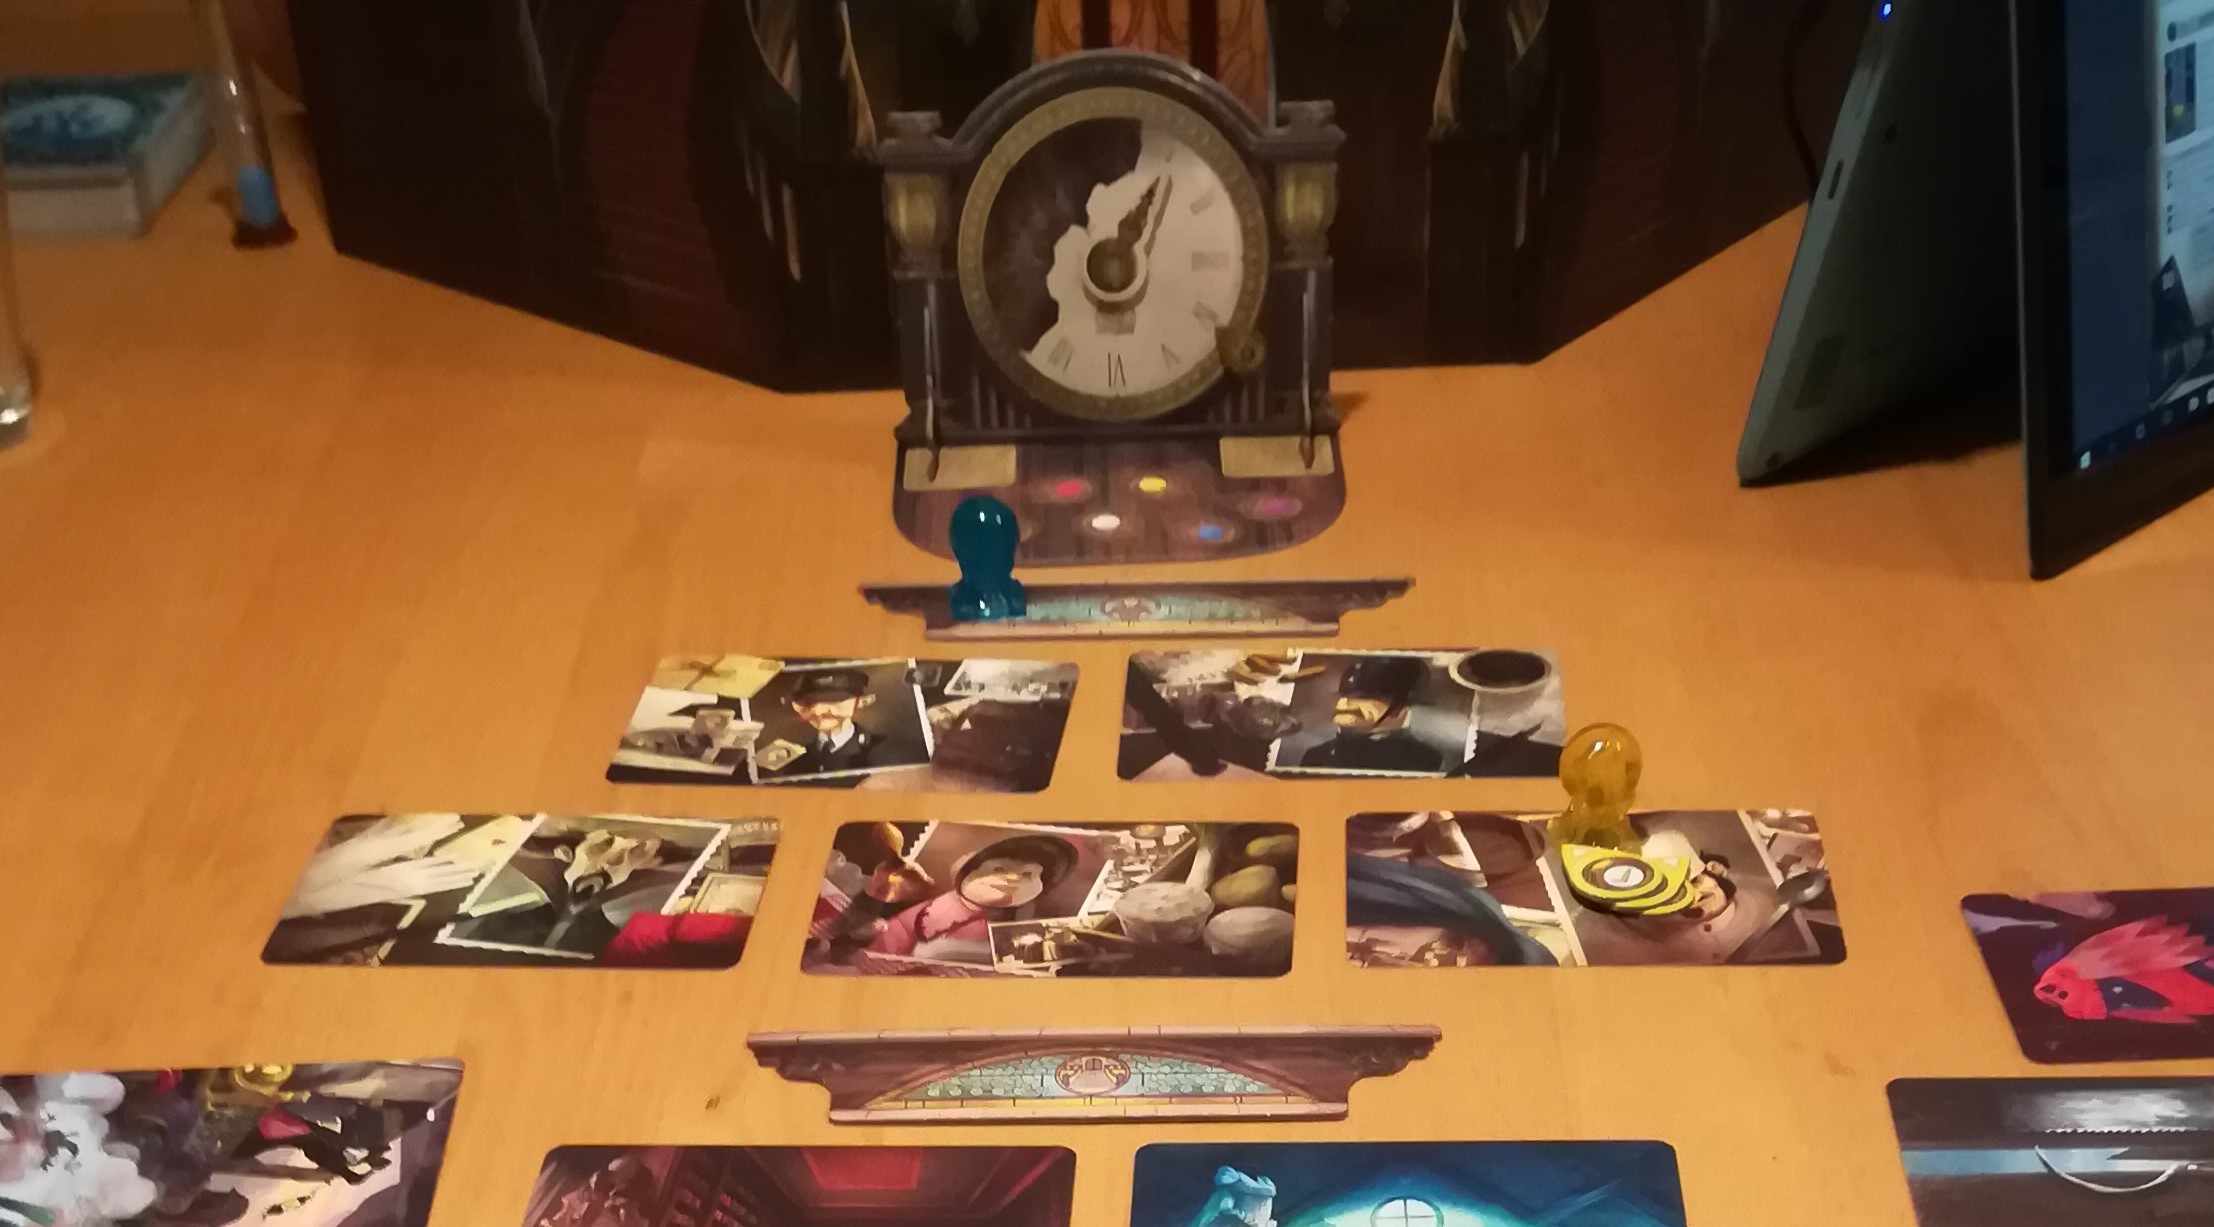
Once the ghost has given at least one Vision Card to each of the psychics they should flip over the Sand Timer, giving the psychics two minutes in which to decipher their clues and make a guess. The psychics do not receive Vision Cards in any particular order – the ghost is allowed to choose who to give to first, based on the Vision Cards that they have in front of them. This does mean that the psychic who receives first has a little extra time, as they are allowed to consider their clues as soon as they are received, and do not have to wait for their companions to get theirs. However, as the game is cooperative this can be an advantage to the other player. If the first psychic receives a very clear clue and is sure of the their guess, they are then free the help the others, who may have more challenging visions to work with.

Once the sand has run out, each psychic must have placed their Intuition Token onto one of the cards (Character, Location or Object, depending on where you are in the game) in front of them. In this photo you can see that only one psychic has chosen and the Sand Timer has clearly run out. The blue psychic must now immediately make his choice.

ghi

The ghost will then reveal whether or not each psychic has guessed correctly. However, before that happens, (and actually, this should happen before the Sand Timer runs out) the psychics have a chance to place a bet on their companions. To do this the psychic will take one of their 6 Clairvoyancy Tokens and place it next to an Intuition Token, with either the tick or the cross side facing up. This indicates whether or not their believe the guess is correct. If the ghost reveals the guess to be correct, or incorrect, as indicated by the Clairvoyancy Token, the psychic that placed the Token is allowed to move their Clairvoyancy Marker up the track at the bottom of the board. Clairvoyancy Tokens can only be used once, and must then be discarded to the base board area of the Clock.

Photo shows the progression along the Clairvancy Track of the two psychics playing

At this point, if a psychic has successfully deciphered their clues they are allowed to do two things: firstly, they take the Character, Location or Object card that they have discovered, and place it in their Character Sleeve. This is kept for later. Secondly, they move their Intuition Token to the next Progress Board in the game space.

NOTE: players move through the game at different speeds. It is completely possible for one psychic to have discerned all three pieces of information given to them by the ghost, whilst other psychics are stuck on the first or second.

Once the ghost has revealed whether or not the psychics are correct any psychic who has succeeded discards all Vision Cards given to them by the ghost so far. The other psychics keep their Vision Cards to see if they can find more of a pattern in the next cards that they receive.

The Clock is moved forward one hour, and play continues in the same way until one of two things happens:

  1. All psychics successfully discover their Character, Location and Weapon before the Clock runs out, OR
  2. The Clock strikes eight, meaning that the seven hours of the Séance are up, and the ghost is damned to wander the netherworld for another year. Meaning that the game ends and everyone loses.

If a psychic discovers all three of their clues before the Clock strikes eight, he or she should take their Intuition Token and place it on the Epilogue Progress Board. They are then also allowed to move their Clairvoyancy Marker forward on the Clairvoyancy Track the number of hours remaining on the Clock. This psychic is no longer given visions by the ghost, but instead can be more involved in helping the other psychics to catch up.

Once all psychics have reached the Epilogue Progress Board any remaining Characters, Locations and Objects not in a Sleeve are returned to the game box, and all Vision Cards are returned to the ghost. Likewise the Character, Location and Object Progress Boards are also removed at this point.

Winning The Game:

By the time the Clock strikes eight all psychics need to have successfully discerned their Character, Location and Objects assigned to them by the ghost. If everyone has achieved this then all players progress to the final stage.

Revealing The Culprit:

This final stage of the game is divided into three parts and we start with a suspect line-up. Simply, all the psychics remove their three cards: Character, Location and Object from their Sleeve and organize them into groups on the table. The ghost then gives each psychic his or her Ghost Token back, with the numbered side facing up. The psychics then place these next to their group of cards to make it easy to identify which is which. Like so:

Once this is done the psychics reclaim all of their Clairvoyancy Tokens from the Clock Base Board where they have been discarded over the course of the game. We are then ready to move onto our Shared Vision!!

At this point a lot hangs on the ghost getting good Vision Cards to pass to the psychics. The ghost is allowed to choose three Vision Cards from his or her hand of seven. If they have a Crow Marker available at this point they are, of course, allowed to use it if they think they have weak cards. The ghost must choose three Vision Cards to present to the psychics in a Shared Vision. One card should indicate the Character, one the Location and one the Object, all from the same group of those laid out on the table by the psychics.

The ghost shuffles the Vision Cards once they are chosen before placing them face down in front of the psychics. He or she should also secretly take the Culprit Token with the correct number for the group he/she has indicated on it, and place it, also face down, on the indicated space on the Epilogue Progress Board. As shown here:

We are now ready for the final step in the game. The Straw Poll!

It is now more important than ever that the ghost does not communicate in any way with the psychics as they try to interpret the final vision they have been given. Psychics should also not communicate with each other during this stage, as whether or not the game is won or lost is decided by a vote and each psychic must vote alone and secretly. Psychics will also vote at different times depending on the level of clairvoyancy that they have gained throughout the game, as shown on the Clairvoyancy Track. Any psychic with a Clairvoyancy Level of 1-4 will only see the first card of the Shared Vision before s/he has to vote. A psychic with 5-6 will see the first two cards, and a psychic with seven or higher will view all three cards before having to place their vote.

Once a psychic has viewed the amount of the Vision Cards that s/he is entitled to they must cast their vote. They do this by taking their Clairvoyancy Tokens, which are numbered on one side, and sliding the one with the number that corresponds to the group that they wish to vote for, into their Sleeve. This is done secretly. Once each psychic has voted it’s time for the truth to be revealed. The Sleeves containing the votes are passed to the psychic with the highest score on the Clairvoyancy Track and that psychic then reveals each vote in turn, placing it onto the group it corresponds with. If there is a clear majority, this group is immediately chosen as the suspect group. If for some reason there’s a tie, it’s broken in favour of the group the psychic with the furthest progress on the Clairvoyancy Track has chosen.

Now it’s time to flip the Culprit Token.

If the number on the Culprit Token matches the group selected to be the suspect group then the psychics have won and the ghost can rest in peace knowing that his/her murder has been solved. If, however, the psychics are wrong, everyone loses and the ghost is damned to haunt the house for at least another year before a fresh attempt can be made to help them.

Strategy:

This is an odd game, in that I don’t think there’s very much that can be said by way of strategy. It’s mostly guess work and trying to think like the ghost. I believe the best piece of advice that can be given regarding strategy is that if one psychic seems to get the ghost, i.e. interpret all the Vision Cards they’re given easily and correctly, then trust that psychic to help you with your own visions as you’ll most likely progress through the game quicker in this way. Other than that I don’t know how much strategy really comes into this game. It’s more about observation and communication than anything else.

NOTE: as we often say in these posts, we played the game wrong at least twice before really getting it. Initially we thought that the Clairvoyancy Tokens could be used as much as possible, and a few other things, and since then, more thorough re-readings of the rules have shown us how wrong we were.

History and Interesting Things:

  1. The game itself is a reworking of the game system present in Tajemnicze Domostwo
  2. It has won 3 awards
  3. Was a finalist for 1 award
  4. Was nominated for 7 awards

I realize I’m stretching this list a little thin, but there’s not much history to be found for this. Sorry!

To Conclude:

I think Mysterium is a really good, co-operative, family friendly game that all ages (from the recommended 8+) can enjoy together. Once played through once or twice you’ll find you have a good grasp of it. On top of that the game itself has been well manufactured. The cards have interesting and detailed graphics and the Vision Cards that the ghost has have many different ways that they can be interpreted due to the complexity of some of the images. I’ve only rated it 3.5 at the beginning of the post because I feel that although the game is highly enjoyable i believe it’s lacking in something not really identifiable that pulls you in.
I found that whilst playing other, different, co-op games I was much more engrossed in the actual game. Take Pandemic as an example, I realize that the games are very different, but when playing Pandemic I feel completely absorbed in the game. Unfortunately I didn’t quite get the same feeling with Mysterium which is what accounts for a slightly lower rating than I would otherwise have given it. Also, although the box itself is not badly designed, it does have a few spaces where there could be obvious improvement in the way the game components are stored.

In spite of that, I would still highly recommend this game to anyone who enjoys co-operative games, or who really liked Clue.

I hope you enjoyed our comeback post and will look out for our next game!

Advertisement

Let’s Try Again!

Hi everyone!

It’s been five days shy of two years since a new post went up on here, and it’s definitely time to refresh this space. A lot has happened in the two years since we’ve posted anything. The most key of these things being that Dave and I no longer live in the same country, making writing a blog together somewhat more challenging.

However! Given that I currently have a decent amount of free time I’m going to try and start posting again. Dave will still be helping, but in a purely administrative kind of way, so if you liked his posts more than mine, unfortunately you’re out of luck.

I have the good intention of posting my first new post next Monday evening. Fingers crossed I can keep to that. We used to post regularly on a Monday evening, but although I would like to be able to post once a week again, realistically I don’t know yet whether or not I can organize enough people here in Austria to make this possible.

But in the interests of keeping update posts short and sweet watch this space next Monday evening for a post about a pretty good game called Village.

Over and out – Mim

Cambio

4 - 5

Number of Players: 2 – 3

Year of Publication: 1996

Creator(s): Maureen Hiron

IMAG3069


Video:

Cambio, similarly to Quarto!, is a complicated or ‘thinking mans version’ of Tic-Tac-Toe (Naughts and Crosses).  For this review we’ve done another video. The video covers all our normal sections except ‘History and Interesting Things’ so check it out below:

History and Interesting Things:

There are only a couple of notable things about this game and they are:

  1. The game was invented by Maureen Hiron in 1996. She is a very successful game inventor and know for inventing several other games including: 7 Ate 9, Continuo and Qwitch.
  2. The word Cambio means exchange.

To Conclude:

Like we say in the video we like this game, the design of our specific issue of it could be better but apart from that its a fun and fairly simple strategy game thats not too long to play but not so fast you miss what just happened.

Quarto!

4.5 - 5

Number of Players: 2

Year of Publication: 1991

Creator(s): Blaise Muller

 Video:

Quarto! is complicated Connect Four and for this review we’ve done a video, our first real video review! The video covers all our normal sections except ‘History and Interesting Things’ so check it out below:

History and Interesting Things:

There are only a couple of notable things about this game and they are:

  1. The game was invented in 1991 by Swiss mathematician Blaise Müller.
  2. It has won the following awards:

To Conclude:

Like we say in the video, we like this game a lot! My only issue with it is retaining enough concentration to keep in check all of the eight different piece attributes that could create a line. However I would highly recommend this game and if you like games that range from Connect Four to Chess then you will most probably love this game.

Mastermind

3 - 5

Number of Players: 2

Year of Publication: 1971

Creator(s): Mordecai Meirowitz (designer)

I’m The Real Mastermind:

It’s completely possible, and quite likely, that the first thing that comes to mind upon hearing the word Mastermind is the TV Quiz Show, and although there is a board game of this, this is not it. This game of Mastermind pre-dates the TV show (by 1 year) and is a very simple, quick and fun game that anyone can pick up. But I want it noted here that the version featuring in our photos is in fact the Junior Mastermind, version of the game produced for children, featuring small, brightly coloured jungle animals as the pieces and having only three holes across for the code, rather than 4.

What’s In The Box:

You can probably tell that we're missing some of the pieces...
You can probably tell that we’re missing some of the pieces…
  1. Green jungle playing board
  2. Rocky mountain section (used to hide the code)
  3. An assortment of 6 coloured animals
  4. 15 red creatures and 15 white creatures (supposedly)

Playing The Game:

Objective: to crack your opponents code before you run out of pieces, or to create a code that your opponent cannot crack.

To start the game you choose one player to be the code-maker, and one to be the code-breaker; then you position the board accordingly. The code-maker then takes a minute or two to secretly decide what the code’s going to be and put the pegs (or in our case little animals) in the shielded section of the board. After this, play starts.

It’s now the job of the code-breaker to pick out pegs (or animals), and position them on their side of the board in the order that they think the code is. The code-maker then uses their red or white creatures to signal which, if any, of these guess are right. To be right a piece must have both the correct position in the code (i.e. central, left or right hand end, from the point of view of the code-maker) and be the right colour.

So the first turn of the game might look something like this:

And they're all wrong
And they’re all wrong

Play continues in this manner until the either the code is cracked, or you’ve played to the end of the board. Like this:

And Dave wins
And Dave wins

Winning The Game:

Traditionally this game is played in rounds; the players decide before starting how many rounds are going to be played (always and even number) with the roles of code-maker and code-breaker alternating every round. The winner is the player with the most points at the end of this. Points are scored by the code-maker. S/he gets one point for each guess the code-breaker makes, and is given an extra point if the code-breaker doesn’t manage to accurately guess the entire code in their last move. Points are kept track of across the rounds and added up at the end.

Strategy:

For the Junior version of this game there isn’t a great deal of strategy required, but for the adult version (which has a four-peg code, rather than three, and one more option for indicating yes or no to part of a code) you can be a little more logical about it. Unless you’re a mathematician (which I’m definitely not, but the internet’s a wonderful place to learn things) you probably won’t be able to work out in your head the maths that accompanies this game, but the most important thing to remember is that duplicates are allowed in the code.

History and Interesting Things:

  1. The modern game, played with pegs, closely resembles a pen and paper game called Bulls and Cows that may be over a century old.
  2. The rights to the game have been held by Invicta Plastics since 1971, initially they manufactured it themselves, but have since licensed it to Hasbro, Pressman Toys and Orda Industries for production across the world.
  3. The 1973 edition of the game features a well-dressed white man sitting in the foreground with an attractive Asian woman standing behind him. Bill Woodward and Cecilia Fung reunited in 2003 after 30 years to pose for another publicity photo.
  4. In a standard set of the game, allowing a four-peg code, with six colour options, there are 1,296 different possible code patterns (including, and allowing for duplicates).
  5. In 1977 Donald Knuth showed that the code-breaker can solve in a maximum of five moves, using this algorithm.
  6. There have been computer versions of the game produced, as well as multiple different editions released.
  7. The difficulty level of the game is altered simply by changing the number of pegs allowed for the code, or the way in which the code-maker indicates a correct or incorrect guess.

To Conclude:

I like Mastermind a lot, it’s a simple game that’s good for burning time or just chilling out, it doesn’t require a lot of concentration, and it doesn’t take long to play. I’d strongly recommend teaching it to kids too, the length of time it takes to play is well-suited to the generally shorter attention span of kids. But don’t let the really little ones get their hands on it – swallowing one of those pieces could end really badly!

Spartacus: A Game of Blood and Treachery

NOW SELLING THIS GAME HERE: https://www.ebay.co.uk/itm/Spartacus-A-Game-of-Blood-and-Treachery-Gale-Force-9-Board-Game-Good-Condition/283678724813

4 - 5

Number of Players: 3 – 4

Year of Publication: 2012

Creator: Aaron DillJohn KovaleskiSean Sweigart (Designers) and Charles Woods (Artist)

NO! I’m Spartacus:

Spartacus: A Game of Blood and Treachery is a board game based on the TV series Spartacus: Blood and Sand ( which has a mini series prequel and is followed by Spartacus: Vengeance and Spartacus: War of the Damned and proceeded by a not so good Spartacus: Gods of the Arena). To reflect the style of the TV series this is the only game I’ve come across, to date, that has an age rating on it:

The age rating at the top corner of the box lid.

And because of this you get cards with things like this written on them:

This did make us laugh...a lot.
This did make us laugh… A lot.

Now unfortunately, being a big fan of the TV series this review is unlikely to be completely non- biased, I will however do my best to stay objective.

What’s In The Box:

The Stuff!
The Stuff!
  1. Game board
  2. Rules Book
  3. 4 x House cards
  4. 62 x Market Cards
  5. 104 x Intrigue Cards
  6. 10 x Favor/Injured tokens
  7. 4 x Champion tokens
  8. 3 x House betting tokens (per house) and 1 x House marker (per house)
  9. 1 x Host marker
  10. 117 x Gold
  11. 4 x Gladiator figures
  12. 4 x Turn summary cards
  13. A lot of Dice (9 x Red, 9 x Black and 8 x Blue)

Playing The Game:

Objective: Be the first to raise your house influence to 12!

Depending on whether you want to play a Quick, Standard or Advanced game you set the starting amount of influence each house has to a different number:

  • Quick = 7
  • Standard = 4
  • Advanced = 1
Starting favor set to 7 for a quick game and the starting amount of things dealt out.
Starting influence is set to 7 for a quick game and the starting amount of things dealt out.

You then get dealt the starting number of items as dictated by your house card (circled green). So for Solonius that’s 2 Gladiators, 2 Slaves, 1 Guard and 12 Gold. Additionally each player gets one gladiator figure, their 3 house betting tokens and a turn summary card.

Now, every turn of play is made up of four sections:

  1. Up Keep
  2. Intrigue Phase
  3. Market Phase
  4. Arena Phase
Up Keep:

Up keep consists of three parts:

  1. Refreshing Cards – Any cards that have been exhausted in the previous round (so are face down) get turn back up so their abilities can be used again.
  2. Healing Injuries – Attempt to heal any injured gladiators or slaves by performing a healing role – on a role of 4 – 6 they are healed anything less and they stay inured.
  3. Balancing the Ledgers – You gain one gold for every ready slave you have and you must pay one gold to the bank for every ready gladiator you have – if you cannot pay (or don’t want to) you must discard the card that’s making you pay.
Intrigue Phase:

Intrigue consists of two parts:

  1. Drawing Cards – At the start of each intrigue phase each player draws three intrigue cards (players all receive three cards simultaneously).

    All Intrigue cards dealt.
    All Intrigue cards dealt.
  2. Playing Schemes/ Foiling Schemes/ Cashing in Cards – Some of the intrigue cards are schemes you can play against another Dominus (Latin word for master), cards that allow you to foil other schemes or get rid of an opponents guards. To play a Scheme you must have the right amount of influence  to play it (as listed on the card), if you don’t you can pair with another Dominus to play it by adding your influence together but beware; deals that are made can be easily broken. If someone plays a scheme against you you can foil it by using your guards and performing a dice role or you can play a scheme foiling card that are reactions to schemes and also require that you have the right amount of influence to play it. Finally if you don’t want some of you cards or can’t keep them (as your had size is dictated by the amount of influence you have) you can cash in cards for the amount written on them from the bank.
Market Phase:

This phase is made up of three parts:

  1. Open Market – At this point anything can be traded for anything for anything else. Except Intrigue cards, which cannot be sold.
  2. Auction – After open market is over each player conceals their gold in their hand and cards equal to the amount of players playing are drawn face down on to the board. The first card is flipped up; each player decides how much they want to bid for that card and hide it in their hand and hold it out over the board, then together they revel how much they have bid, highest bidder wins. Someone who bids nothing is ignored, but if everyone bids nothing the card is discarded. If there is a tie the two players who are tied place the amount they have already bid on the board and repeat the procedure until one player is victorious. This is then repeated with each card until all cards are sold or discarded.
  3. Bid for Hosting – This is done in the same way as the bidding for the cards. The person who wins the host bidding gets the Host token and it marks that they control the next phase of the game and choose who will fight who.
Arena Phase:

This phase is made up of six parts:

  1. Honour to the Host – The player that won the hosting rights in the auction gets +1 influence.
  2. Hosting the Event – The host then invites two players to take part in the games (they can invite themselves).  If a player declines they lose one influence. If they accept they place their gladiator figure in the arena in the starting position then place the card of the gladiator they are fighting, along with any Weapons or Armour they are also using.

    IMG_0564
    A starting gladiator ready to battle.
  3. Tribute – The owners of the gladiators are then paid tribute if their gladiators have favour or are champions – +2 gold for each favour token and +6 gold if they are a champion. If they don’t have any favour and are not champions they get nothing.
  4. Place Wagers – It’s then time to place wagers, you can wager on who will win (competing players can’t wager against themselves) and how they will win (injury or decapitation). Three is the maximum wager on any one wager and the wagers you place are marked by putting you house wager tokens on top of your pile of gold on the wager you have made.
    So a bet on players combatant one to win returns 1:1 odds so you can double your money.
    So a bet on combatant one to win returns 1:1 odds so you can double your money.

    A bet on the fight ending in injury returns 2:1 odd so you triple your money.
    A bet on the fight ending in injury returns 2:1 odds so you triple your money.
  5. Combat! – Now the fight begins. Each fighting gladiator has statistics for Attack, Defence and Speed. They are given as many red dice as their attack statistic, as many black dice as their defence statistic and as many blue dice as their speed statistic:
    IMG_0564
    3 Attack = 3 red dice, 2 Defence = 2 black dice and 2 Speed = 2 blue dice.

    Each player then roles their total amount of speed dice to determine who moves first, the player with the highest total wins and decides who moves first. Your total number of speed dice dictates how many spaces you can move; so if you have two dice you can move two spaces. You can chose to move and then attack or if you’re already adjacent to your enemy you can attack and then move away. Once adjacent you attack by rolling your attack dice while the defender roles their defence dice. You then line the dice up from highest to lowest, opposite each other. Any place where one attack dice is a higher number than the defence dice is a hit and any place where a defence dice is higher than the attack dice is successfully defended. If they’re equal it’s also a successful defence. Where attack die outnumber defence dice any additional roles that have no matching dice count as a hit so long as they are three or above.

    Two warriors ready for combat.
    Two warriors ready for combat.

    The dice are your health; so for each hit that is obtained the taker of the hit decides which dice to get rid of, lowering their attack, defence or speed for the next move. All attributes must be reduced to 1 before any can be completely removed. If one is completely removed then the player has yielded, if two are reduced to zero in one attack the player is wounded and if all three are reduced to zero in one attack the player is decapitated.

  6. Victory and Defeat – The winning Dominus gains one influence. The winning gladiator revives one favour token, if it’s his third favour token he becomes a Champion. Wagers are then settled with the bank. If the loser was not decapitated the host of the games decides if he lives or dies with the thumbs up or down signal. To kill a loser who has favour will cost the hosting Dominus 1 influence per favour token and champions cannot be killed.

After all this the turn phases are repeated unless one player has a full 12 influence at this point, then they’re the winner! If they have reached 12 influence before this point they are not yet the winner as they can still lose influence before the turn of play is over.

Strategy:

  1. MONEY IS POWER! Like in real life. If you are a broke Lanista (trainer of Gladiators) then you are a rather useless Lanista.
  2. UNDERSTAND WORTH! Linked to the first point, knowing what/how much to bid for something in this game is everything. Knowing what you need and what’s not worth buying (at that time) will be the key to winning and losing.
  3. HOST THE MOST! Bidding to be the host is always worth it, not only does it automatically give you influence you then have control too.
  4. KNOW YOUR FRIENDS! While this is a rather back stab-y game it’s important to know the people you’re playing with and understand when they’re likely to stick with you and at what point they will abandon you and leave you to be eaten by dogs.
  5. KEEP THINGS IN PERSPECTIVE! With such a large turn phase to the game it’s very easy to get caught up in just one round or one arena match and forget about the bigger picture and larger aim. Everything you do should be in aid of the bigger picture not just to get back at another player or just because you want to see a fight between two cool Gladiators.

History and Interesting Things:

While the board game itself does not have much notable history (at least nothing I can find) the historical events it’s based (very loosely around) do so that’s more what this section is going to contain.

  1. The board game was published in 2012, before the airing of the final season of the TV show, by A1 GamesBattlefront Miniatures LtdGale Force Nine, LLCHeidelberger SpieleverlagMarabunta and Zvezda.
  2. The board game is only based on the first season of the TV show Spartacus: Blood and Sand, it being the only season in which Spartacus is a Gladiator rather than a rebel.
  3. The TV series is a re-imagining of the 1960 film Spartacus directed by Stanley Kubrick and starring Kirk Douglas.
  4. However both the TV show and the film are based (loosely) around the historical Third Servile War of the Roman Republic.
  5. While historical facts on the war are highly debated it is often interpreted as a rebellion of oppressed people rising up against a slave owning oligarchy.
  6. Historically Spartacus (the man) is supposed to have lived from 109 BC – 71 BC. The characters Crixus,OenomausCastus and Gannicus, are also historically verified people who assisted in the uprising.
  7. He was born a Thracian and supposedly died on the Battlefield near to Petelia (modern-day StrongoliCalabria, Italy) as depicted in the TV show and film (probably without the “I’m Spartacus” fiasco).
  8. This being Appian also that his body was never found.
  9. 6000 survivors of the battle where crucified alongside the Appian Way from Rome to Capua as depicted in the final episode of the TV show with the crucifixion of Gannicus.
  10. Andy Whitfield who played Spartacus in the first season Spartacus: Blood and Sand (who’s face should be on the front of the game box rather than his replacements Liam McIntyre) sadly died on September the 11 2011 of on-Hodgkin lymphoma and the series was literally less than half as good without him.
picture lovingly borrowed from http://www.funnyjunk.com/funny_pictures/2600925/RIP.
Picture lovingly borrowed from: http://www.funnyjunk.com/funny_pictures/2600925/RIP.

To Conclude:

While my obvious like for the TV show has made this review at least slightly biased I would still maintain this game is a good game by anyone’s standards. It is, however perhaps a touch complex and drawn out. For example; cancelled down version of just the gladiator battles would have made quite a good game just in itself. So this game is primarily for the patient and those who are naturally enthusiastic about games not for those who think monopoly is the epitome of (board) gaming.

Further more it’s always nice to see a box that’s well designed unlike the Pirate of the Caribbean edition of Buccaneer! and Conquest of the Empire:

I rate this box design 4.5/5! The only thing that would have made it better is a slot for the host marker to sit in.

Yes I do think rate the box is going to have to become a permanent part of our posts.

Conquest of the Empire – Classic Rules

3.5 - 5

Number of Players: 2 – 6

Year of Publication: 2005

Creator: Glenn DroverLarry Harris, Jr.Martin Wallace (Designers) and Paul Niemeyer (Artists)

Julius Caesar, The Roman Geezer, Squashed his Wife with a Lemon Squeezer:

So as far I can figure Conquest of the Empire is just a table top version of Rome: Total War and being a huge fan of that game I’m also a huge fan of this game. In many respects it’s cooler; because you’re playing real people you actually feel some sense of victory when you crush them! But on the other hand, it’s obviously far more limited than Rome: Total War. To illustrate my point this is a picture of the Rome: Total War map:

Lovingly borrowed from http://ru.wikipedia.org/wiki/%D0%A4%D0%B0%D0%B9%D0%BB:Rome_total_war_map.jpg

And this is a picture of the Conquest of the Empire board:

IMG_0515
Can you see the similarities?

Now, there are two sets of rules to this game, as I explain in the History and Interesting Facts part of the post but this post is only covering the Classic rules, as we haven’t had the time to play the other rules. Hopefully there will be another post covering the other set of rules before the month is over, so keep an eye out for that.

What’s In The Box:

IMG_0505

IMG_0509

  1. 1  Game board (see picture in introduction of it laid out)
  2. Province tokens
  3. Some of the Chaos tokens (the ‘X’s at the bottom of the other sheet are also Chaos tokens)
  4. Influence/control tokens for each colour (except the bottom row)
  5. 2 Instructions Booklets:
    1. 1 for the Classic rules
    2. 1 for the new Conquest of the Empire 2 rules
  6. Black game pieces consisting of:
    1. 1 Caesar
    2. 4 Generals
    3. 20 Infantry
    4. 10 Cavalry
    5. 6 Catapults
    6. 8 Galleys
  7. Yellow game pieces, the same as black
  8. Blue game pieces, the same as black
  9. Purple game pieces, the same as black
  10. 25 five-talent coins (Silver) 50 ten-talent coins (Gold)
  11. Red game pieces, the same as black
  12. Green game pieces, the same as black
  13. 8 Dice (for some reason ours has 12 but it did come from a charity shop)
  14. 16 Fortifications
  15. 16 Cities
  16. 1 deck of cards
  17. Cards
  18. 20 Roads

Playing The Game:

Objective: To capture the other player(s) Caesar

The aim of the game is ultimately just to capture the other player(s) Caesar, which can lead to a fairly short game if you get lucky and the other person is careless; or if the other person is careful it can be a long complex game of strategy and well thought-out battling.

The board right at the beginning.

You start in one of the six starting provinces, these are shown on the board and the instruction book denotes which are available relative to how many players there are. The tribute scale at the bottom of the board is used to mark your income per-turn and increases if you capture provinces and decreases if you lose them depending on the worth of the province (marked on the board). you start on 15, as you home province is worth 10 but it also has a city in it which adds an additional 5.

The tokens for each player show the amount of money they get each turn.

Each turn is broken up into 6 sections:

  1. Movement
  2. Combat
  3. Collect Tribute
  4. Destroy Cities
  5. Purchase New Pieces
  6. Place New Pieces

So first up is movement, normal pieces can only move when attached to a General/Caesar. When they’re attached they form a legion; a legion may be up to 5 pieces (of any type) and then the General/Caesar to make a legion of six pieces overall. Without roads normal pieces may only move one space (being from one province to another) in a turn, however General/Caesar may move two, so they may move with a legion and then one further turn on their own. However they cannot fight by themselves – but are useful for conquering unoccupied provinces. The exception to this is roads; once on a road a player may move as far along that road as he/she likes. Galleys are the only units that can move without a General/Caesar, they can move up to two sea provinces even with no units in them.

The first move of the game.

The second part of a players turn is combat. Combat occurs when you move your pieces into a province occupied by an enemy and once you have finished all of your moving.

Just before combat.
Just before combat.

Combat is somewhat similar to Battle Cry! (as reviewed here) in that it uses dice with symbols that show which piece have to be removed. You role as many dice as there are piece in your legion (up to 6) and the defender does the same. the relevant pieces are then removed according to the symbols on the dice, and either you fight again or one player retreats. Generals/Caesar are the last pieces to be removed from any legion and can only be captured when the rest of the legion has been destroyed. Captured Generals are kept by the winner and can be bartered with later in the move, if Caesar is captured the person who loses their Caesar has lost the game and is out.

A captured Cesar.
A captured Caesar.

The next phase of a move is to collect tribute, that’s as simple as it sounds, you look at the tribute scale at the bottom of the board and collect the amount of tribute you are due.

A pile of gold!
A pile of gold!

The next phase is to destroy cites, you can do this in provinces you own if they are about to be captured to stop the other player gaining any benefits from them. This phase doesn’t have to be done as you may not be in a situation where its required.

The next phase is to buy pieces. You use your tribute to to buy pieces to build a bigger army. Pieces initially cost:

  1. Infantry – 10
  2. Cavalry – 20
  3. Galleys – 20
  4. Catapult – 30
  5. Fortified City – 50
  6. City – 30
  7. Fortification – 20
  8. Road – 10

However when inflation is trigger the first time (marked by the change in the tribute scale at the bottom of the board) cost doubles, when its triggered again (by the second change in the scale) the cost triples from the original prices.

A newly bought army.

The very last phase of a players move is to places his newly brought pieces. All new combat units must be placed in the home province of the player buying them, ships are placed on the coast of that province, or on the closest coast if you are landlocked. Cities are placed in the relevant province that you want a city in, only one city per-province and only one fortification per-city. Roads can only be built between two cities in adjacent provinces but multiple road sections between multiple cities can be used to make one long road.

Roads!
Roads!

This process is then repeated until there is only one players Caesar remaining.

Strategy:

Now, like most games on this blog I don’t claim to be a master ,but here are a few things I picked up that are important:

  1. DON’T FOR GET ABOUT YOUR CAESAR! That’s how I won the game we played, he was left in a province by himself. Always know where he is and always have him protected away from the action (unless you have no choice but t0 have him in the action.)
  2. MONEY IS POWER!  Conquering provinces is important to generate more tribute so you can buy more units so you can have more power.
  3. DON’T FORGET ABOUT SHIPS! Ships look like they can be a very useful tool to attack your enemy where he/she is not expecting.
  4. DON’T FORGET YOU CAN DESTROY YOUR OWN CITIES! Also destroying a city will destroy a road that runs between it and another city as roads can only exist between two cities. This could help slow a fast enemy advance.
  5. BRUTE FORCE IS KING! Due to the luck/probability of the dice actually being 100% tactical is difficult, so just out manning the other player in all conflicts is advised.

History and Interesting Things:

      1. While I have stated the publication date of the game as 2005, and hyper linked the 2005 game on BoardGameGeek, the original version of the game was released in 1984 by Milton Bradley and it’s sole designer was Larry Harris, Jr.
      2. However the original version of the game’s catapult rules were considered to be “broken” so the 2005 version of the game was issued with two sets of rules, one that was similar to the original rules but with fixed catapult rules (the classic rules, the ones played in this article) and another completely new set that were based on Martin Wallace’s Struggle of Empires (these are Conquest of the Empire II rules).
      3. The original version of the game also had different combat rules and the rules in the 2005 version were changed along with the dice that have images that correspond to the different units.
      4. The game is thought to be very similar to the game Axis & Alliesthis may be because it’s also designed by Larry Harris, Jr. (and because of this Axis & Allies is obviously going on our Games We Want page).
      5. It was a 2006 Golden Geek Best Wargame Nominee
      6. The original version of the game is now completely out of print and therefore a prized collectors piece.
      7. However, that’s what Wikipedia says but you can buy a 1984 original copy from America for around £55 on Ebay here (eBay listing was active at time of publication).
      8. The game is set in the Roman Empire after the death of Marcus Aurelius. So just after this happened:

(This may be from the film Gladiator and therefore may not be historically accurate).

      1. Like I said in my introduction, the game really is a physical version of Rome: Total War, just less complex and in some ways more fun.
      2. It is also the largest game we have played to date, which makes it just a little bit more awesome.


To Conclude:

I like this game, I like it a lot, but I was always going to – as I said in my introduction, it’s just table top RTW. However this version of the rules has quite a lot of ambiguity but with careful reading and a  bit of logic you can think your way through this. There are a few thing I think should be done differently, for example you should be able to build units in places other than your home provinces, other cities would have had barracks and been able to train men etc. Also it just feels wrong to collect your money half way through your turn, everyone knows turns begin with collecting money, it’s true of so many games, both table top and computerized. However I understand the building units one turn and not being able to move the till the next because it represents a training time.

The biggest issue with this game though is this:

Everything thrown in the box!

POOR BOX DESIGN! Now you may say that this is irrelevant to the game in the sense that it doesn’t affect game play. But it does, if you’ve had to spend 20 minutes sorting out pieces because there in a mixed mess you’re not going to have the same amount of fun playing the game as if they were all sorted already in a vacuum-formed tray in the box like 90% of games I’ve played (like Battle Cry!.) The only other game I’ve come across to rival this is the Pirate of the Caribbean edition of Buccaneer! Which you can read my rant about at the end of the post on it here.

But all in all Conquest of the Empire is a good and fun game (perhaps not quite as good/well thought out as Battle Cry! and definitely not as versatile). It’s also very large which for some unknown reason makes it more exciting…

We’ll have to wait and see if the other way of playing it is as good or perhaps better.

P.S. I (Miriam) wouldn’t usually add on to a post like this, but it was more like 2 hours sorting time than 20 minutes which makes this, in my opinion, an epic design flaw… Especially when trying to determine if all the pieces were still there.

They weren’t.

Escape From Atlantis

4.5 - 5

Number of Players: 2 – 4

Year of Publication: 1986

Creator(s): Julian Courtland-Smith

Escape This:

You have to imagine the Jaws music

So I thought I’d open with that just to get your attention. Escape from Atlantis is a game that’s really up there for me, it’s just really good fun. I remember if from when I was a child; I can’t remember exactly where we used to play it, either my Grandma or my Godmother had a copy, but I used to love it. Now, my sister being the wonderful person she is, bought me an original copy of the 1986 publication, complete and in very good condition, off the internet for my birthday. Naturally since then we’ve played it more times than any other game we’ve played recently.

What’s In The Box:

The Stuff.
The Stuff.
  1. A playing board.
  2. A instruction booklet
  3. An Atlantean Swirler
  4. 7 Grey (rock) land tiles
  5. 12 Green (hills) land tiles
  6. 18 Yellow (sand) land tiles
  7. 6 Sea Monster Pieces
  8. 6 Shark Pieces
  9. 6 Octopus Pieces
  10. 6 Dolphin Pieces
  11. 12 Boats
  12. 48 wooded play pieces divided in two twelve set of four colours (Blue, Yellow, Green and Red)

Playing The Game:

Objective: To save more of your Atlanteans than any of the other players by the time one player saves their last surviving piece.

The board at the start of the game.

You start the game by setting up the island in the middle and then taking turns placing your pieces on it. You can only have one piece occupying each yellow space at the beginning of the game. You then each place a boat on a space adjacent to the island.

IMG_0555
The board after all pieces are placed.

Then you start movement, each player can move three spaces per turn. These three spaces can be used on one man, or split across any combination. They can also be used to move un-manned boats or boats you have control of. You have control of a boat if there are more of your men in the boat than any other players, you share control if you both have one piece in it; meaning you both can move it. If you only have one piece to another players two you cannot then move the boat. Men who’re in the water (not in a boat) can only move one space per turn but three moves still apply so you can use the other two to move something else.

Yellow has control as there's only one red piece in the boat.
Yellow has control as there’s only one red piece in the boat.

The next phase of your go after movement is to take a piece of the island away. Each piece of island has a symbol on the underside representing one of the following; A whirlpool which sucks everything on adjacent spaces (that aren’t land pieces or on land pieces) in and destroys them, a sea monster, a shark, an octopus, a dolphin or a boat; these are all created on the uncovered sea space. Any men that were on the removed land tile are moved to the closest available space on the island – unless it’s the last piece, then they’re cast into the sea. The yellow land tiles are removed first followed by the green then the grey.

The symbol is a triangle which means shark, so a shark has been placed in the space the land tile was on.

The last phase of a players move is to spin the Atlantean swirler. This shows either a; sea monster, octopus, shark or dolphin and the numbers 1 -3 and the letter D. This indicates that you can move the relevant sea creature the relevant number of spaces or if it says D (meaning dive) you can move the creature to any unoccupied space on the board. The sea creatures are the fun part of the game, if you move a sea monster onto a space with a boat or swimmers in it will eat the lot, if you move a shark onto a space with swimmers it will eat them but it will not eat boats, octopuses will only destroy boats and make everyone in them swimmers but will let them live and dolphins are friendly and will carry a swimmer to safety at the cost of the player next three moves.

Dolphins save lives!

As the island disintegrates and more monsters appear, more pieces end up in the water and so the game becomes much more fun! The winner is the person with the  MOST pieces on the coral islands in the corners when the first player runs out of pieces either by saving them or having them eaten. Now, while the rules don’t specifically state this, we decided this meant no suicides as it could be beneficial to kill your own men off (by swimming them into sea monster/sharks or the other way around) when you have the most men on the islands. We decided this was not in the spirit of survival and should not be allowed.

The end of the game.

Strategy:

The primary strategy to this game is… DON’T GET EATEN! But there are a few other things to consider; like it’s always useful to make someone else save your pieces by putting it is as a tag along/third man in a boat controlled by someone else. Also dolphins are your friends. The best tactic I think is to remember to move not just to aid your escape but to move to hinder the other persons; move empty boats away from the island, block the escape island entrances with sea creatures (preferably sea monsters) and destroy land pieces that hinder the other players as much as possible.

History and Interesting Things:

  1. The game was originally released under the title Survive! in the USA.

    Original Survive! Picture lovingly borrowed from Wikipedia.
    Original Survive! Picture lovingly borrowed from Wikipedia.
  2. It was released like this in 1982 but was remade with 3D pieces to the addition we own and released in the UK with revised rules in 1986.
  3. In the original game the island was built at random in the middle and pieces where removed at random (as you might be able to see from the picture) which resulted in the island sinking in an less-uniform manor.
  4. From 1987 the game sold in many countries, in many languages including Finnish, Dutch, Spanish, Italian, French and German.
  5. In 2010 Stronghold Games announced they where going to reprint Escape from Atlantis and title it Survive! Escape from Atlantis. Which they did in February 2011.
  6. In June 2012 they then released Survive! Escape from Atlantis – 30th anniversary Edition with revised rules and a slightly altered theme involving the explorers actually finding Atlantis and then having to escape from it.
  7. French publisher Asmodee released the game under the title The Island in 2012.
  8. Stronghold Games released three expansions for the Survive: Escape from Atlantis! – 30th Anniversary Edition in 2013 called: 5-6 Player Mini Expansion Kit plus Dolphins & Dive Dice Expansion Kit and The Giant Squid Expansion Kit and because of these this version of the game and the expansions must be added to our Game we Want page.
  9. The game has won boardgame.ru best family game of the year 2012 as well as “2012 Juego del Ano Finalist” (what ever that means exactly… Some sort of finalist for something)
  10. World sales of Escape from Atlantis now exceed 1.25 million units.

To Conclude:

This game is up there with my favourites, it’s a classic that’s just really, really good fun. I will have to get the new one to compare it, so expect a post on that when I do. However never forget the fallen:

To quote a terrible Star Wars film: "the death toll is catastrophic".
To quote a terrible Star Wars film: “the death toll is catastrophic”.

The Witches

3 - 5

Number of Players: 1-4

Year of Publication: 2013

Creator(s): Martin Wallace (designer) and Peter Dennis (artist)  – Based on the books of Terry Pratchett

“Progress just means bad things happen faster”
Terry Pratchett’s The Witches

Lancre could probably be considered a bit of a backwards country, and, complete with all its quirks and oddities, is the setting for The WitchesWhich is a fantastic board game based on part of Sir Terry Pratchett’s Discworld series. As this month is Pratchett month we decided to post the games up in the order that they were published, so The Witches, having only been published last year, is the most recent, and therefore the last post. Guards! Guards! and Ankh-Morpork were published in the same year, and so were tied for second place after Thud.
The Witches is currently the only one of the four Discworld board games that have been published that’s suitable for one player. You can travel around the mountains of Lancre solving problems and fighting monsters all on your lonesome – or you can play with up to three other witches and meet up for tea and a chat!

What’s in the Box:

The Stuff.
The Stuff.
  1. One Playing Board.
  2. One Rule Book.
  3. One Player Aid Card.
  4. Four Trainee Witch Displays.
  5. Three Advantage tiles – one Invisibility tile (blue), one Cure Sick Pig tile (green) and one Magic tile (red).
  6. Four Witch pieces.
  7. Four 6-sided Witch dice (notice here that two of the dice are showing a witches face, this is because these dice do not have the value for 1 on them. The witch face represents a Cackle, which is equal to a score of 0).
  8. Twelve Crisis counters.
  9. Fifty-five Game cards.
  10. Sixteen Cackle counters.
  11. Twelve Black Aliss tiles.
  12. Thirty Easy Problem tiles (green).
  13. Seventeen Hard Problem tiles (purple).

Playing the Game:

Objective: To solve more problems than the other players, and therefore score the most points at the end of the game!
Setting up the Board:

The initial set up for the board is very simple in this game, you simply shuffle all your Hard Problem tiles, and place one face down on each square on the board with a purple square in the top left corner of it, and do the same with the Easy Problem tiles. You then refer to the rules to see how many of remaining tiles from both Hard and Easy are set face down on the spaces in the bottom right of the board. If you look closely at the picture you can see that, if you don’t want to go back to the rules, the board actually tells you how many of each type of problem to put in each square, depending on the number of players.

So in the first stage of setting up the board, it should look like this. We had three players this time that we played, and so the number of tiles in the bottom right of the board are set accordingly.

Once all the tiles are laid out like this, all the Easy Problem tiles can be turned face-up. All the Hard Problem tiles remain face-down on the board until a player moves to deal with one, then it’s flipped for everyone to see. Next you need to shuffle the deck of Game cards, and deal three to each player, the rest are placed face-down next to the board.

Lastly you should assign characters. To do this each player rolls all four Witch dice and the player with the highest total roll is allowed to choose their preferred Trainee Witch display. Note: rolling a Cackle counts as zero here, and in the event of a tie, both players re-roll all the dice. Once the highest rolling player has chosen their Trainee Witch Display, then player who had the next highest total chooses… And so on.

You then take the Witch piece of the correct colour for your persona for the game, and, if your Trainee Witch has one, also your Advantage Tile. Tiffany, Petulia and Annagramma all have these, Tiffany’s is blue and is an Invisibility tile, Petulia’s is green and is a Cure Sick Pig tile, and Annagramma’s is red and is a Magic tile. I’ll explain the benefits of these tiles later on. Annagramma also starts with one Cackle counter, if she’s in play. The last Trainee Witch that can be chosen is Dimity Hubbub, her special ability is that whichever player chooses to play as her, gets to play first. If she’s not in play, the player who chose last goes first, and play then proceeds clockwise around the board. Finally, each player (starting with she/he that chose last) should place their Witch piece on any empty space on the board.

The board should look like this just before the first player takes their turn:

Complete starting set up for three players - as you can see, Dimity Hubbub is not in play in this game.
Complete starting set up for three players (although the Easy Problems in the bottom right section are supposed to be face-up too, whoops!) – as you can see, Dimity Hubbub is not in play in this game.

The Rules:

Playing the game is very simple. A turn consists of three phases, placing the next Problem tile, moving you Witch, and drawing cards. The first thing you do during your turn is draw the top card from the deck and place it face up beside the board. Each card in the deck has a location written on it, if there’s no Problem tile or Witch in the location on the card you draw, the top Problem tile is taken from the leftmost stack, and placed face-up in this location. If there’s already a problem here however, a Crisis counter is placed on top of it. These add two points to the difficulty of the problem and look like this:

A Crisis counter on top of an Easy Problem tile, this adds two to the difficulty of the problem.

If there’s a Witch in the location you draw then a problem cannot be placed there, and if they’re in either Lancre Castle or Lancre Town, where there are multiple spaces available, you do not place Crisis counters on problems existing there. If a Witch is present, Crisis cannot happen and problems do not occur. If you place a Crisis counter on a problem, you must continue drawing cards until you find an empty location in which to place the next problem. You may then continue with your turn.

Next you move; a Witch can move up to two connections per turn, unless they have in their hand a card with a broomstick symbol on it. If they choose to play this, they can fly to anywhere on the board and it counts as one of their movements.

Lastly, you tackle problems! To beat a problem you have to roll either equal to or higher than the number shown in the white circle on the problem tile, you must also factor in the Crisis counters, if there’s one on the tile. To beat a problem you roll all four dice, but not together. You roll two first and can then decide if you want to play any of the cards in your hand. The text is often useful for solving problems. Once you’ve decided, you roll the next two dice. Note: if you roll enough on your first roll to beat the problem, you must still roll the second set of dice to see if you get any Cackles. If you roll any Cackles, you take one Cackle counter for each Cackle rolled.

Rolling to solve a problem, this player must take one Cackle counter for their roll.

If you fail to beat a problem, you must run away, and if it was a Hard problem, you must face the consequences! There’s a lot of variance in consequences however, so I won’t go through them.

At the end of your turn you discard any cards you played and refill your hand to the maximum number of cards you can hold. If the deck of cards runs out, the discard pile is shuffled and flipped, and play continues, the game comes to a natural end at the end of the turn of the person who places the last problem tile on the board.

Lastly I’ll explain the Advantage tiles I mentioned earlier. Tiffany has a blue Advantage tile, which is invisibility, this allows her to go onto the same space as a Hard problem tile, look at it, and then choose either to solve it, or go somewhere else. Everyone else has no choice but to try and solve the problem, no matter how hard it may be, if they enter the same space as it.
Annagramma has a red Magic tile; there are three different symbols that appear on the top of each Game card; either a broomstick, a star, or a pair of glasses and a mustache (also known as Headology). Of these three symbols, Magic and Headology can be used to your advantage when solving a problem. Magic gives you a plus two bonus (but you must take a Cackle counter for every Magic card played) and Headology gives you a plus one bonus. Annagramma’s Magic tile can be played for the plus two bonus when solving one problem at some point in the game.
Petulia has a green Cure Sick Pig tile. This is fairly self-explanatory; when Petulia enters the same space as a Sick Pig problem tile, this Advantage tile can be used to automatically solve the problem.

Petulia's Cure Sick Pig tile in action!
Petulia’s Cure Sick Pig tile in action!

All three Advantage tiles can only be used once in the game. They must then be discarded by the player that used them.

Strategy:

There’s not a lot to be said for strategy for this game, as it mostly comes down to the roll of the dice. But it’s good to have tried to solve a variety of Easy and Hard problems throughout the game, not only do Hard problems usually score more points than Easy ones, they also give you a different benefit the more of them you collect.

History and Interesting (or just other) Things:

There isn’t much history to this game (and even less that’s interesting enough to write about) so have some things about the fictional Discworld country of Lancre instead:

  1. Lancre is good Witch country, there’s a high level of background magic, and the country has always been renowned for producing some of the best Witches and Wizards in the history of the Discworld.
  2. It’s shown to be about 40 miles by 10 miles in size, but this isn’t the truth. Because of the background magic some areas of Lancre have been known to take on other geographical properties.
  3. It has Gnarly Ground. This is a place, on the Lancre Moores, where reality has become folded, and so two places may appear to be right next to each other, but are actually miles apart. Crossing it (or flying over it) is not for the faint-hearted.
  4. It is the physical location of, certainly one, but possibly two, gateways to Parasite Universes, inhabited by Elves.
  5. The current King of Lancre is Verence II. He is believed to be the illegitimate son of Verence I; he was the castle Fool until his half-brother, Tomjon’s immediate abdication after being offered the crown.
  6. Lancre is technically as constitutional monarchy, in that Verence II has set up a parliament, but mostly the people aren’t interested.
  7. Regicide is an accepted method of becoming King in the history of the country.
  8. The population is only 500.
  9. The Lancrastians generally aren’t particularly religious, but they do believe in services for births, marriages and deaths and know exactly what they believe religion should sound like, which is more or less a Latin Roman Catholic service.
  10. The climate there goes to extremes, with burning summers, unbelievable storms and masses of snow, respective to the time of year.

More information on the country can be acquired by reading A Tourists Guide to Lancre.

Different publications of the game:

There is a collectors edition of this game, which is the same in rules and gameplay to the edition we’ve got, but with the addition of sculpted pewter figurines, instead of small wooden witches hats as your playing pieces and a different shaped box and artwork, and a bonus A1 poster.

Further Reading and Conclusion:

Although Dave recommended (amongst other things) all Pratchett books in the Update post for this month, there are actually only a few that you need to read to really understand all the goings on in this game, and they are: Equal Rites, Wyrd Sisters, Witches Abroad, Lords and Ladies, Maskerade, Carpe Jugulum, The Wee Free Men, A Hat Full of Sky, Wintersmith and I Shall Wear Midnight.
I realize that I said “only a few”, but 10, when looked at in context of all the available books by Terry Pratchett, is actually not that many.

I’m personally of the opinion that Ankh Morpork is the best Discworld board game so far, and I believe Dave agrees with me. However, this game is also brilliantly conceived. It’s more laid back than Ankh Morpork, in that, you’re not really trying to one up any of the other players, or double-bluff them into not knowing your objective, or anything like that, because you’re all sharing the same objective and there are plenty of problems on the board, so you don’t usually ever have to go for the same one as another player!

It’s also great because you can play it as a 1-player game, just to fill a rainy afternoon. I highly recommend this game, to everyone, but also specifically to people who prefer games that aren’t super-competitive!

Guards! Guards!

NOW SELLING THIS GAME HERE: https://www.ebay.co.uk/itm/283678712760

3.5 - 5

Number of Players: 2 – 6

Year of Publication: 2011

Creator(s): Leonard Boyd & David Brashaw – Inspired by the books of Terry Pratchett

“Noble dragons don’t have friends. The nearest they can get to the idea is an enemy who is still alive.” – Guards! Guards!

Guards! Guards! is a board game based on the book of the same name from the genius mind of Terry Pratchett (if you are unaware of Terry Pratchett read our update post for this month here).

Whats In The Box:

jgfuhbjk
The Stuff.
  1. Playing Board
  2. Rule book
  3. 8 Guild Cards
  4. Player’s Guide
  5. 4 Dragon Cards
  6. 30 Shades & Shadows Volunteer Cards
  7. 30 Man & Beast Volunteer Cards
  8. 30 Lords & Ladies Volunteer Cards
  9. 36 Fate Cards
  10. 1 Luggage Piece
  11. 20 Odds & Sods Item cards
  12. 20 Curses & Cures Scroll Cards
  13. 6 Saboteur Tokens – Fools Quadrant
    6 Saboteur Tokens – Thieves Quadrant
    6 Saboteur Tokens – Assassins Quadrant
    6 Saboteur Tokens – Alchemists Quadrant
  14. 6 Alchemists Fire Water markers
  15. 6 Pox Markers
  16. 6 Spell Run Tokens
  17. 36 Spell Returned Tokens
  18. 1 8 sided die
    6 Coloured Playing Pieces
  19. 39 Gold 5 Ankh-Morpork $ coins
  20. 56 Silver 1 Ankh-Morpork $ coins
  21. 18 Attribute Markers (red cubes)
  22. 25 Great Spell Markers (gold cylinders)

This is by far the game with the most individual pieces we’ve played so far.

Playing The Game:

Objective: To return five of the eight Great Spells marked on your Guild card to the Unseen University before anyone else.

Now, this game is very complicated and also not very all at the same time. It has a LOT of rules, and took us a good hour to read through them all, but once you get the hang of it it’s actually all quite simple and is effectively just a slightly complicated race. So because of the complexity of the rules I will only outline in rough what happens.

You set up the board like this:

Board set up
Board set up

Each player starts at their start marker in the relevant guild quadrant, the board is divided into for quadrants, Assassins, Thieves, Fools and Alchemists quadrants. You start the game by picking a guild, for which you get a guild card for which has stats on it for Charm, Magic and Guild. You can increase these stats throughout the game by various methods and you blocks go up as shown bellow.

Not that all of my stats (marked by the red blocks) have increased by one.

Your stats are mostly increased by the recruitment of volunteers which is done by charming or bribing. To bribe a volunteer you simply pay the amount marked in the bribe section on the card, to charm it you must roll the dice and achieve a number higher than its charm value, for this you also add you charm value from your stats to that number.

A selection of volunteer cards.

These cards also determine the movement of the coolest function of the game…THE LUGGAGE! At the top of each card it says “Luggage Moves” and then a number or instruction. The player who drew the card then has to move the luggage around the set track marked on the board, at splits in the track they get to chose which way it goes. If it collides with a player, even if it’s the piece of the person moving it, the player is sent straight to the nearest hospital, as shown bellow:

Nom, Nom, Nom!
Nom, Nom, Nom!

All of this is with the aim of returning spells to the Unseen University; you do this by getting to a spell you require and starting a spell run. This is where the volunteers you have collected are needed; you send them with the spell back to the University where you have to complete different levels of the wizards challenge to get the spells back in. I won’t go into the full mechanics of this as that would make this post very long. But as you return more and more spells the wizards challenges get harder and harder and you add more gold cylinders to you section of the Unseen University to mark the spells you have returned:

At this point we had both completed three levels of the wizards challenge and therefore returned 3 spells each.

These spell runs can be sabotaged and you can use your volunteers to fight with each other, there are also items and scrolls that can be very helpful but I won’t go into these as, again, we would be here forever.

The other cool thing is that dragons can be summoned onto the board if three members of the Brotherhood, when called, are in play:

The symbols in the bottom left mark them as members of the brotherhood.
The symbols in the bottom left mark them as members of the Brotherhood.

When this happens a dragon is summoned like this:

A summoned dragon in play.

The dragon mechanics are complicated and in many respects kind of irrelevant, as once the dragon is summon and the threat initially met it’s very easy to just ignore it and carry on with the game regardless. However, one fun aspect is that if all four dragons come into play the game ends and nobody wins, this is a bit of a reoccurring theme in Terry Pratchett’s game as there is a similar mechanic in the Ankh-Morpork (read our post on it here) game as well as The Witches. Although this can have the downside of  being rather anti-climactic and making you feel like you just wasted a few hours.

The game is won by the first person to return all the spells:

The game finished...and won by me!
The game finished… And won by me!

There are plenty of other rules about playing the game and other things and if you want you can read the revised rules here. We were following the unrevised rules, having an original edition of the game, so there was some ambiguity at points as to whether you actually could sabotage like that, amongst other things, but we worked through it.

Strategy:

Having only played this game twice I have a limited idea of the best strategy. But one thing I did notice was that the person who collects as many volunteers as possible rather than going straight for the spells seems to have an advantage. Also NEVER forget about the scrolls and items as they can get you out of some tight binds, the first time we played I basically ignored them, to my own peril. Also PLACE SABOTEURS! It is the difference between winning and losing, if you can sabotage the other persons spell run you have the edge!

A saboteur ready to pounce.

History and Interesting Facts:

  1. Although the board game was published in 2011 it was originally conceived in 1991.
  2. Leonard Boyd Originally conceived the idea and played it with friends until in 1995 he showed it to Terry Pratchett.
  3. Terry Pratchett liked the game but said they needed the backing of a major games company to make it all happen.
  4. In 1999 Colin Smythe (currently Terry Pratchett’s agent) suggest that the game never be published…I’m quite happy that he was wrong and they didn’t give up on it.
  5. In 2006 Gary Wyatt (of the Green Games Company) advised that they tried again with the publication of it as the board games market had picked up significantly since 1995.
  6. So in Junes 2008 it was taken to the Speil Toy fair in Essen, Germany where it was shown to many companies, a couple of companies requested copies for play testing.
  7. In 2008 Wolfgang Ludtke of TM-Spiele/Kosmos Games in Germany asked about developing a game based on the books of Terry Pratchett so they go sent a prototype too.
  8. All three companies that had play tested the game felt that it needed a redesign to be aimed more at the hobby market.
  9. So after FIVE redesigns it was sent for testing by the same three companies, it was also test played by Terry Pratchett fans, it got the backing of Z-Man Games and a license from Terry Pratchett.
  10. The game was finally published in September of 2011! Showing that the road to getting a board game published can be long and very hard but if you end up with a great game its worth it in the end. Also while Thud is the oldest of the Terry Pratchett board games by publication date this one is probably the oldest in concept.

To read the full history of the game go to the official website here.

To Conclude:

Guards! Guards! is a good game however it has it’s flaws, for example it took us over an hour to read the rules…We’re patient but there’s a limit. Also for all its rules it manages still to be quite simple in the sense that it’s a race and the person with the best luck tends to win. However it is a fun way to spend a couple of hours with some friends and the artwork and layout of the game are well conceived. I would recommend it, especially if you are a fan of the Discworld universe as each volunteer card has a unique quote on it that is taken from one of the books and are mostly quite amusing, as well as passages in the rule book being quoted and funny. For another overview of the game watch this video review here: