Winner: David
History:
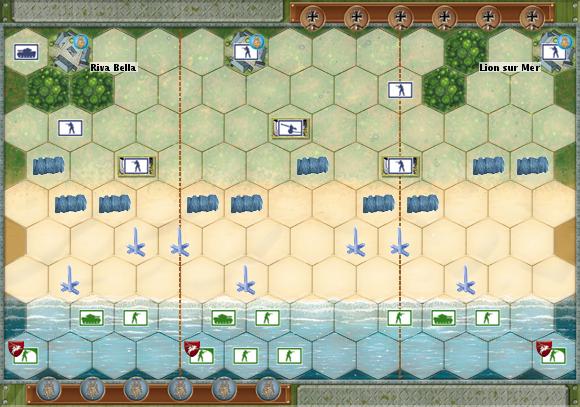
Morning. June 6th. 1944. The 8th Brigade Group of the 3rd British Division, supported by Commandos of the 1st Special Service Brigade and the Sherman tanks of the 13th and 18th Hussars make up the first wave of Allied forces to land on “Sword” beach, near the mouth of the Orne River.
The objective of the day was for the Allied forces to retake the city of Caen, and although the French troops captured the Casino at River Bella, the Allies failed in this objective. The sea was difficult that day, the tanks were supposed to land first and engage the enemy before the infantry landed, however, tanks and infantry ended up landing together. This coupled with the German resistance meant that the inland advance was seriously delayed. The failure to retake Caen was one of the biggest set-backs of D-Day and the consequences were still felt well into July of that year.
Strategy and Tactics:
Axis:
You have a defensive advantage in this scenario. Not only are the Allied forces advancing from the sea, which initially gives them a terrain disadvantage, but some of your forces are also already holed up in bunkers. Bunkers are useful as they give a -2 to tanks and a -1 to infantry when being attacked. You also possess the only artillery unit in this scenario. This is, if you manage to prevent its destruction, probably your most useful unit, as it has the longest attack range.
Despite these advantages you also have fewer troops than your opponent, and your only tank unit starts in a useless position, from which you have to order it twice to get it within attacking range of the Allied forces. You also have one less command card, and move second.
Okay, so that aside, tactically we found that arranging your troops towards the back of the board and then waiting for the Allied forces to come to you was a fairly sound way of playing the scenario. Though it’s definitely worth dragging your tank unit out of the corner early on. I would also generally say that it’s worth keeping the units that are already in the bunkers in them, unless for some dire reason you have to retreat or lose that unit.
Because wood hexes provide a -1 for attacking a unit in the woods it’s also worth trying to position your in Lion Sur Mer in the most forward of the two woods hexes next to it, this moves you closer to the fighting action whilst giving the unit a decent terrain advantage and enabling it to be close enough to try and prevent Allied forces taking the town and claiming the medal there, that contributes to their victory points.
Other than that, I would say, try not to let yourself get surrounded by the Allies, because they’ve got a lot more firepower than you, and also, if possible, knock out their tank units first, as these move further and have a fighting advantage over infantry units as well as needing less hits to destroy a unit.
Allied:
Although you start in the sea, you have an advantage in number units and number of command cards, as well as being the side that starts the scenario. Not only do you have three tank units to the one that your opponent possesses you also have three special forces units available to you, these are able to move up to two hexes and still battle, where regular infantry can either move one and battle, or two and do nothing.
Your first task is to get your units out of the sea, this is slow going because of the terrain restrictions that the sea imposes, but we found that it was tempting just to move either one block of your units out, maybe just from, say, the left flank, or to maybe move one unit from each section of the board, depending on your command cards. This is however, not a good idea. If you move one unit from each section too far from its comrades you make it an easy target, remember that you’re at a disadvantage with the bunkers, not to mention the hedgehogs and barbed wire that’s between you and the Axis forces. And if you only move one block and ignore the others you also make those units targets because if they’re in the sea and they get attacked a retreat roll on the battle dice counts as a hit because you cannot retreat and so must sacrifice one member of your unit for every retreat rolled.
If you start out with any command cards that enable you to annihilate your opponents artillery unit this is a big score early in the game, it levels the playing field a lot. Not only does it have only two pieces to a unit, making it the easiest to destroy in terms of dice rolls needed, but it also makes it much harder for the Axis player to just sit and wait for you, as they can no longer pick off your units from such a distance.
Surrounding bunkers is a good way of destroying a unit completely, if you attack a bunker with three units instead of just one, you’re less effected by the defensive advantage they give to the Axis player.
Lastly, don’t forget about the medals in the three towns at the back of the board. Each one of these counts for one of the five victory points you need to win the scenario if you capture, and hold, the town. They’re worth going after because they mean you need to physically destroy less enemy units.
To Conclude:
I really enjoyed this scenario from both sides. As you can see from the running score we’re keeping – I lost. But it was fairly close both ways round. It was more a lack of useful command cards than any tactical errors made. This scenario is also great because you get artillery and special forces units in play, as well as bunkers, hedgehogs and barbed wire, which adjust the way you have to think about moving around the board. This is great because by this point you’re familiar with the infantry and tank units, and then the game gives you something new to play with. It also starts to pick up the pace of play. Dave mentioned in his last post that he thought it felt a little slow, I agree with him, but I think that this scenario really cranks the game up a bit, making it much more interesting.
Running Score:
David: 8
Miriam: 4