Games You Can Make At Home – Nine Men’s Morris

Approx. Time Required: 30 minutes

Where Did The Game Come From?

No one really knows; Nine Men’s Morris is in the running with Chess and Go for one of the oldest games in the world. A board for it was found cut into a wall in the temple at Kurna, in Egypt which dates to 1440 BC. The dating of this is dubious as to its accuracy however, as Coptic Crosses were also found carved there which could not possibly have been put there by the Egyptians of the time. However, this game has achieved worldwide popularity across the ages, with three variations existing; Three Men’s Morris, Six Men’s Morris and Twelve Men’s Morris.

You Will Require:

dsc_0358
The Stuff.
  • A large A3 or similar sized pad of paper (in which you can store all the games you make)
  • A ruler, at least 30cm in length
  • A pencil (I recommend a mechanical one)
  • Coloured pens/pencils (optional)
  • Time – about half an hour
  • Plenty of space – either a clear table or big wooden floor

The Process:

You should start by measuring out a square on your paper. I went for one that was 9″ x 9″ as it filled the space quite nicely without being too big.

dsc_0342
Standard, boring large square.

Because Nine Men’s Morris has three squares in it and I’m a little OCD, my next step was to ensure the proper spacing of the squares. So I drew two diagonal lines, dividing the square into four triangles:

dsc_0344

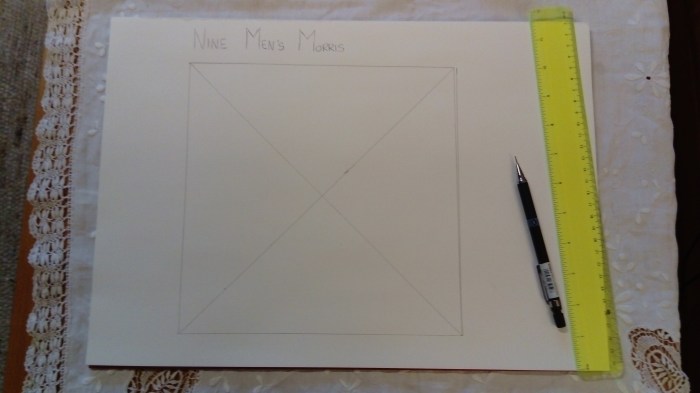
*NOTE: with a 9″ x 9″ square a regular 30cm ruler will not be long enough to draw these diagonal lines. I went hunting for something longer, and ended up using a box edge.*

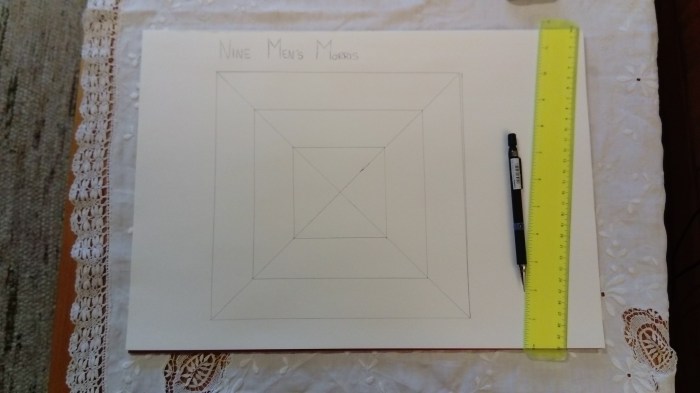
Once the diagonal lines are drawn in you need to measure up them and make two marks; one for the middle square, and one for the inner square. I measured 2 inches up each each line, from the outside corners for the middle square, and then another 2 inches for the inmost square.

As soon as you have all the marks, simply join them up nice and neatly and there you have all three squares – nearly finished!

dsc_0349

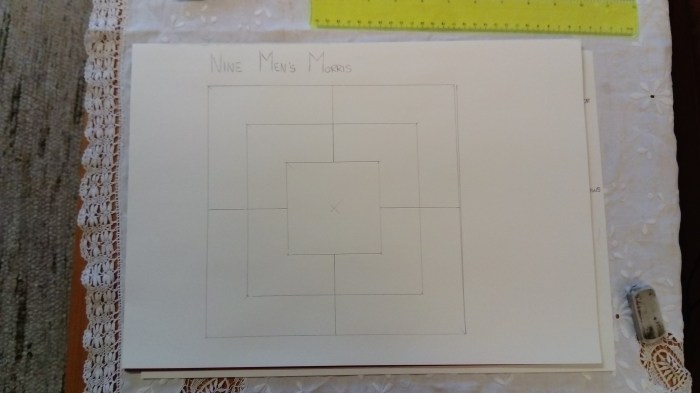
Okay, there’s only a few lines left to draw before you have a complete Nine Men’s Morris board, but before you draw them you should erase the diagonal lines, leaving only the small cross that marks the middle of the board, like this:

dsc_0350

The small cross in the middle is very useful for drawing the last lines. The board needs vertical and horizontal lines that go through the middle of each side of the board, essentially dividing it in half along the horizontal and vertical middle lines, but leaving the center of the smallest square completely blank. The small cross makes this easier by showing where the middle of the board is, so all you have to do is lay your ruler straight across it horizontally, and then vertically, and mark the lines.

It should look like this:

dsc_0352

If you’re rushing to finish this then at the point you could declare yourself finished, and set about playing the game, but if you have a few more minutes, you should take the time to make it a bit prettier.

Finishing Up:

First thing’s first! Go over all your lines with your ruler and a black pen. This is the most important part of finishing up. Next go over the name of the game in nice colourful pens so that it stands out, and so you don’t forget which game it is in the future.

dsc_0355

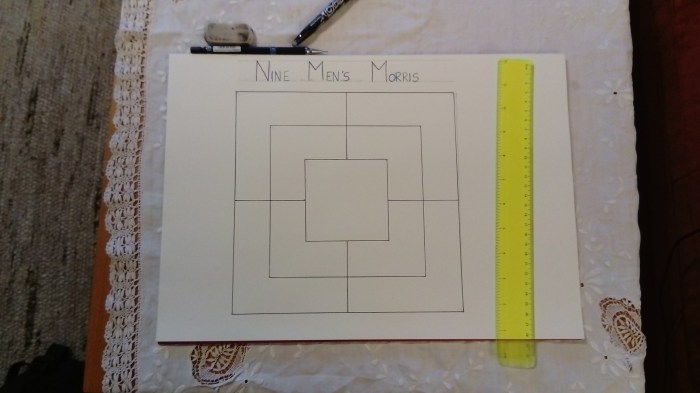
Lastly, erase any still-visible pencil lines that mar the beauty of your finished game!

The Final Product:

dsc_0356

Okay, it doesn’t look like much I admit, but this game is really good fun – and quite challenging if your opponent is any good at it. The last thing you need is to either make or find twenty four flat tokens, twelve in one colour, and twelve in another (typically black and white similar to Checkers). I suggest buttons as an excellent substitute for actual tokens from another game. If you have any, a few large buttons would make perfect pieces for this game!

As with Snakes and Ladders you can make the game as colourful, or plain, as you like, there’s plenty of space around the edges for doodling or sketching, and you could even colour in the board if you felt so inclined!

I do intend to make copies of the three other variations of this game and post them here, although I may do them all in one post, as the the system will be fundamentally the same as how I drew out this one.

If you’re interested in how to play Nine Men’s Morris check out the full review post we wrote about it here.

One Last Note…

These posts are entirely non-profit, the idea behind them being to suggest creative ways that bring assorted games into the house if you don’t have the money/space to buy beautiful wooden, or printed copies. The games I am writing about are all old and in public domain.

Games You Can Make At Home – Snakes and Ladders


Where Did The Game Come From?

Well, we’re going to make a version of Snakes and Ladders. For anyone who doesn’t know, Snakes and Ladders is originally an Ancient Indian game, played entirely by luck. Historically it had its roots in morality; your progress up the board represented a life journey with the complications of virtue (ladders) and vice (snakes). Nowadays it is most commonly played as a simple race and counting game for younger children.

What Will You Need?

  • A large A3 or similar sized pad of paper (in which you can store all the games you make)
  • A ruler, at least 30cm in length
  • A pencil (I recommend a mechanical one)
  • Coloured pens/pencils (optional)
  • Time – about half an hour
  • Plenty of space – either a clear table or big wooden floor

The Process:

  1. The very important first step is deciding what size you want your squares to be, and how many squares there will be on the board. I made two boards; one with 100 squares, and one with only 25, these were, respectively, 10×10 and 5×5 grids. For my 100 square board I settled on a size of 5x5cm squares.
  2. Once you’ve chose the number of squares you want, and the size they will be, you simply lay down your ruler and (in pencil) measure out the total length of all the squares; i.e. 5 x 10 = 50cm x 50cm for the 100 square grid. Once you’ve measured out the length, go back down the ruler and mark off each 5cm (or whatever your chosen size of square is) to get the intervals for where your squares will be. Repeat this on all four sides trying to keep your lines as square to each other as possible.
  3. When completed you should have a square with 5cm marks down all four sides. Next you just join them up, go along either horizontally or vertically joining the top and bottom, or left and right lines together. Then repeat the way you didn’t go first to end up with a nice grid.
  4. At this point you should have a nice, neat pencil grid in front of you. My next step would be to number the squares, in the top right hand corner, reasonably small, but big enough to be easily read.

We’re now almost finished with the first stage of the game! The last thing to do is to draw on your snakes and your ladders, you should aim to have these fairly evenly distributed across the board, their lengths are totally up to you, but I would advise making all of them different lengths, and including at least one pretty long ladder, as well as a nasty snake quite close to the end of the game, if you’re feeling mean.

*NOTE! Everything up to this point should be done in pencil, as mistakes are easy to make, but hard to correct if the work was done in pen.*

Making It Colourful!

Here’s where your coloured pens/pencils come in. When I did it I went over all the grid lines and numbers with my black pen and then proceeded to colour in the ladders and snakes giving them black outlines, but more colourful insides. You should also feel totally free to doodle on the blank paper outside of the grid, this is your project and you’re completely free to make it complicated or simple – as you choose!

If you’ve got little kids you could also draw and number the grids yourself, going over them in black pen, and then give it to your kid (or make multiple copies if you have more than one child) and let them draw on their own snakes and ladders.

Finishing Up:

My last action was to go over the grid with a rubber in the places where I could still see the pencil marks – this is totally optional, if it doesn’t bother you to see the pencil marks, then by all means, leave them there.

The Finished Product:

As you can see, my final products were pretty simple, but you can do whatever you want with yours! All you need now is a standard 6-sided die and a few generic coloured playing pieces and you’re ready to roll!

One Last Note…

These posts are entirely non-profit, the idea behind them being to suggest creative ways that bring assorted games into the house if you don’t have the money/space to buy beautiful wooden, or printed copies. The games I intend to write about are all old and in public domain.

Games You Can Make At Home…

… A Brief Overview

This is my first proper post since the end of the Twelve Games of Christmas and I’m going to keep it short. The purpose of this post is to properly introduce my idea for the Games You Can Make At Home series of mini-posts that will be going up this year.

My inspiration for this came from two different places; about two years ago I bought a book in the Oxfam shop I worked in called Play The Game, which is literally a book in which every page, or double page spread is a game that you can play. This, to me, was a fantastic idea, as it provides at least fifty games that take up all the storage space of one large, hardcover book – genius! The second place inspiration came from was my husband – a few months ago he asked me to make him a Snakes and Ladders game for some of the kids in the class he was working in at the time (he’s training to be a teacher), and whilst making those boards I suddenly thought, “hey, this is a great way to save space if you live in a tiny house/flat but love games!” (at the time we were looking at moving into a very tiny flat) and so this mini-series was born.

At the moment my aim is for one of these posts to go up every month. I think this is a good amount of posts considering that this year should also (fingers crossed) hold the Discworldathon posts in addition to the regular, once a week reviews, which will hopefully be going up again from this coming Sunday.

How Are These Posts Going To Work?

Good question! I’m still kinda working that out, so I think the format of the posts is likely to change over the first few until I find the structure I like most. But the plan is to keep it reasonably simple, the posts won’t be that long and they will quite simply include a list of things you need, a brief background on the game (for those who are interested) and then a step-by-step instructions list, with accompanying photos.

If They’re Short, Why Only One A Month?

It’s quite likely that none of you were actually considering that question, but nonetheless I’m going to answer it. There are two reasons, the first is previously stated – there should be plenty of other posts going up around these ones, meaning that I won’t necessarily have time for more than one a month. The second reason is that I have to research each game for copyright reasons. I have to make sure that the writing and publishing of a post about recreating that particular game will not infringe any copyright laws, and that takes a little time.

Lastly…

The first post for this series will be going up tomorrow, and the subject game is Snakes and Ladders. This post has only the final product pictures in it, as I had the idea for this mini-series of posts as I finished making those. So please forgive me and don’t forget that there will be more photos in all the next posts!