You’re going slower than the speed of a snail, could you hurry up!?
My parents and siblings all use this phrase when one of us is doing something stupidly slowly and they’re running out of patience. Fortunately for us the snails in this game are much speedier; like this racing snail:
The racing snail and his rider, Gluckukfrom The Neverending Story, a popular fantasy story written by Michael Ende. This image is a screenshot taken from the 1984 movie adaptation.
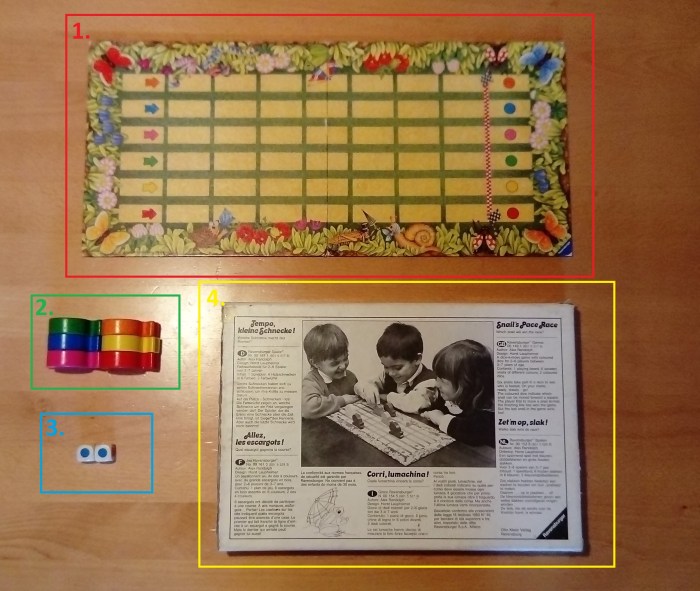
What’s In The Box:
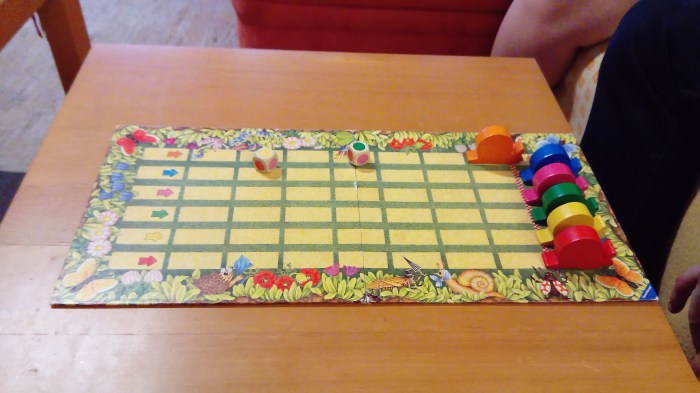
Game Board
6 Coloured Snails
2 6-Sided Dice
Rules printed on the back of the box (technically not in the box, but still important)
Playing The Game:
Objective: To guess correctly which two snails will win and lose the race!
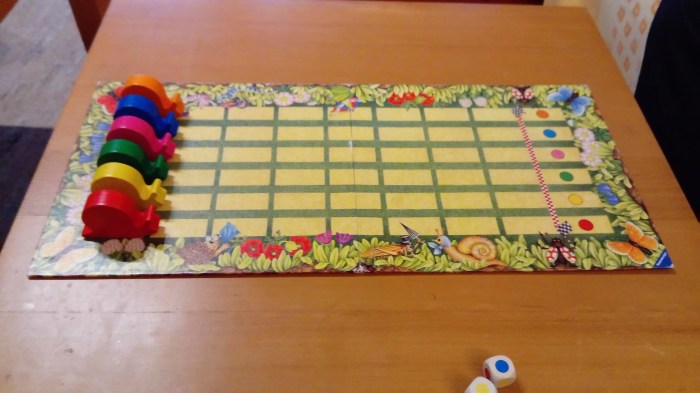
In this game it doesn’t matter how many people are playing, all six snails are still used. To begin the game line up the snails on their respective colours. Then each player has to place a bet on which snail they think will come first, and which will come last in the race. Players then take it in turns to roll the two dice, whichever colour is rolled, that snail is moved forward one space on the racetrack and if both dice show the same colour then that snail is moved forward two spaces. Every player does this until all the snails have crossed the finish line. The winner is then the person who guessed most accurately which snails would win and lose.
Starting Line-Up
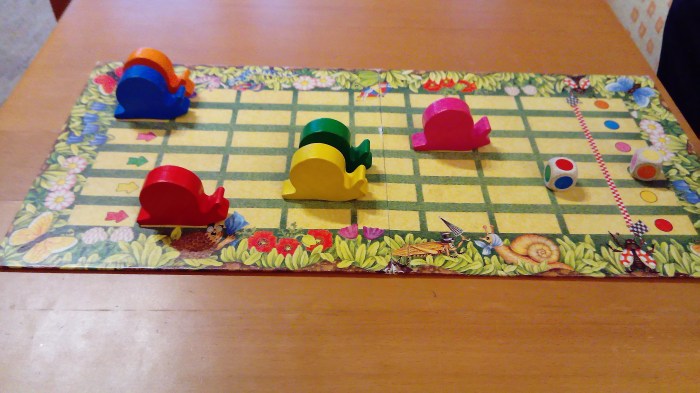
The game begins like this: say I bet that the Orange Snail will win, and the Blue Snail will lose and my opponent bets that the Blue Snail will win, and the Yellow Snail will lose, we then roll the dice and move the snails like this:
No Orange Snail, why are aren’t you moving!?!?
So far the Pink Snail is in the lead and both Blue and Orange Snails are having a nap or something. But due to the erratic and unpredictable way in which each snail is allowed to move the game can also change reasonably quickly, like this:
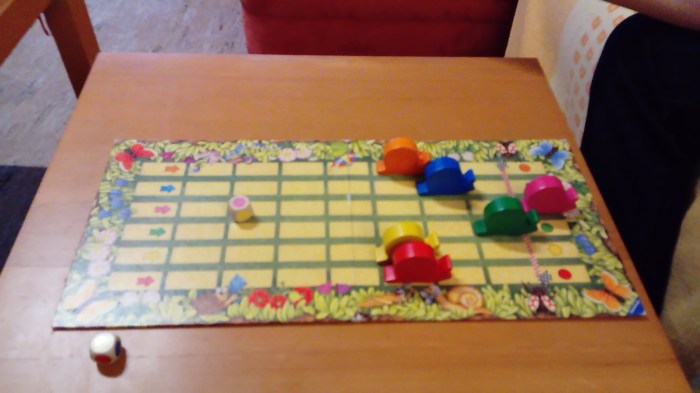
Please excuse the fuzzy quality of this photo…
Okay, so Orange Snail hasn’t won here, but he’s caught up pretty well after a slow start! At this point Pink Snail has won, and as no one bet on her we have to see which snail loses the race to know if anyone’s managed to win the game.
Orange Snail loses the race. 😦
Because Orange Snail is the last to cross the line you could argue one of two things:
That I lose because the Snail I bet on to be first actually lost the race, or,
That no one won the race because neither of us guess winner or loser correctly.
I’m going with option number 2 on this one.
Strategy:
This is a guessing game, so I really can’t write anything about strategy except that you’ve probably got as much chance of winning the game as any of the other players.
History and Interesting Things:
This game is excellent for teaching colour recognition in children, as they have to identify each snail by its colour to be able to play the game.
It promotes sharing and because technically the snail wins the race, and not the player, it’s a good game for children who have issues with not coming first.
The game was originally published in German – hence my dual-language title for the post (also as the version of the game I’m playing is German).
That’s about all I can get for this section, so we’ll proceed now to the conclusion!
Conclusion:
I like this game a lot, I think it’s great for children, particularly those that are very young and can’t grasp a game with lots of rules. I’ve rated it only at a three for a few reasons. The first of which is the box. All the pieces are just loose in the box. We’ve said this on a lot of posts, but it’s still true, there are very few things more satisfying than a board game with a well-designed box. For a game with this few pieces it wouldn’t have been difficult to make a plastic insert that could hold the snails and dice, would it? As it is, everything rattles around inside the box, and whilst the snails are wooden, and so quite durable, they also get scratched, and bash up the dice if the game is moved around a lot. My second reason for not rating it higher is that it’s a betting game, and although you don’t bet anything on the snails, there are some children that would insist that they get given something by the other players if their snail wins, and I could foresee this becoming an argument-starter.
That said, it’s a good, simple game that can be played in five-ten minutes. The time each player needs to take their turn is maybe 10 seconds, so the pace of the game is also good as it doesn’t allow time for the children to get bored. All in all, I would recommend it!
First thing’s first. It’s the start of December and I am now going to officially announce that the Twelve Games of Christmas are going to happen again this year. We didn’t really have a theme to the games last time we did this, but this year I found myself surrounded by games that were great for kids. So an obvious theme appeared almost immediately. If you aren’t even slightly into kids games then I apologize and hope that you’ll find what I’ve got planned for the New Year more interesting!
Those plans are going to remain secret for the time being though, as they shall all be revealed in the January update post. All I’ll say is that I’m hoping for a pretty interesting/exciting board game year!
In other news avid readers (if they exist) may have noticed that we’ve changed the day and time that we post at. Statistically we realized that Sunday was the most popular day for people to view this blog. So instead of posting on Monday evenings at 8pm we’ve decided to try out posting on Sunday mornings at 10am so see if it makes any kind of a difference. Aside from that not much else has changed.
Enjoy Christmas, and the posts that go up in the interim!
There’s No One More Mindful Than Me Here, You Could Even Say I’m The Mastermind!
Okay, I know that’s a bad line, but we actually already wrote a post about this game which you can read here, so I didn’t have much creativity flowing through me. So, if we’ve already reviewed this game, why are we reviewing it again, I hear you ask. Well it’s simple really, the first Mastermindpost that we wrote was actually about Mastermind Juniorwhich is the simple-for-kids version of the game. Hence my second Mastermind post.
However, as this is a follow-on post it’s going to be quite short, as the fundamental way of playing the game is exactly the same.
Playing The Game And The Differences Between The Two Versions:
Adult Mastermind is exactly the same as Mastermind Junior in that one player makes a pattern or code using the colours and hides it from their opponent. The opponent then uses the remaining colours to try and crack the code. The first player indicates whether or not their guess is correct using the (in this game) black and white pegs. A white peg means a colour is right but in the wrong place, and a black peg means a colour is right and in the right place. This the where the difference between the two games comes in; in Mastermind Junior the first player indicates which colour is right by the placement of the pegs, but in regular Mastermind the second player doesn’t know which of the colours they’ve chosen is correct, only that one of them is.
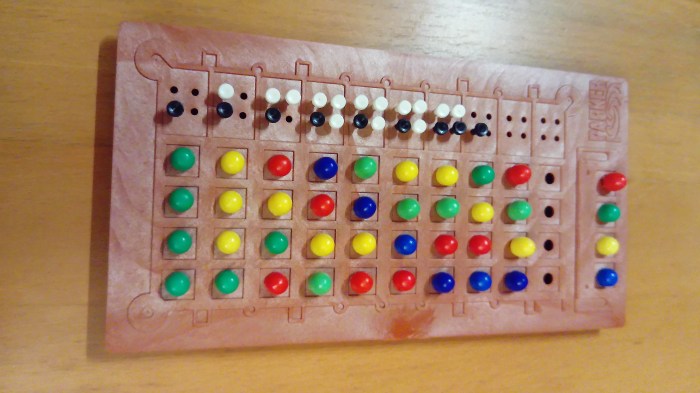
So here you can see how correct colours/placements are indicated in Mastermind Junior:
The white animals indicate correct colour and placement.
And here how they’re indicated in regular Mastermind:
I apologise for the weird angle of the photo, WordPress refuses to let make the photo vertical so that it looks less strange. But here black pegs indicate correct colour and place, and white correct colour but wrong place. You can see that there’s no way to tell which of your colours is correct with this layout.
There’s a slight difference. The first difference between the games is that in the adult version you play with one extra colour in the code, making it that little bit harder to crack. In addition to that your opponent doesn’t indicate to you which of your colours is correct, so you have more guessing to do.
Winning The Game:
Traditionally this game is played in rounds; the players decide before starting how many rounds are going to be played (always and even number) with the roles of code-maker and code-breaker alternating every round. The winner is the player with the most points at the end of this. Points are scored by the code-maker. S/he gets one point for each guess the code-breaker makes, and is given an extra point if the code-breaker doesn’t manage to accurately guess the entire code in their last move. Points are kept track of across the rounds and added up at the end.
Strategy:
In the Junior version of the game, not much strategy is required, as the code is only three pegs rather than four. In the adult version my preferred strategy is the one seen in the photo above. I like to start with four of one colour and see if any of them are right. This does seem pointless to some people but it’s a very quick and useful way of knowing, is this colour in the pattern. From that first one you simply continue in a similar pattern with other colours until you have the code. Though this strategy doesn’t crack the code in the optimal 5 moves most of the time I will say that I’ve never lost a game playing that way.
History and Interesting Things:
The modern game, played with pegs, closely resembles a pen and paper game called Bulls and Cows that may be over a century old.
The rights to the game have been held by Invicta Plastics since 1971, initially they manufactured it themselves, but have since licensed it to Hasbro, Pressman Toys and Orda Industries for production across the world.
The 1973 edition of the game features a well-dressed white man sitting in the foreground with an attractive Asian woman standing behind him. Bill Woodward and Cecilia Fung reunited in 2003 after 30 years to pose for another publicity photo.
In a standard set of the game, allowing a four-peg code, with six colour options, there are 1,296 different possible code patterns (including, and allowing for duplicates).
In 1977 Donald Knuthshowed that the code-breaker can solve in a maximum of five moves, using this algorithm.
There have been computer versions of the game produced, as well as multiple different editions released.
The difficulty level of the game is altered simply by changing the number of pegs allowed for the code, or the way in which the code-maker indicates a correct or incorrect guess.
Conclusion:
To conclude, I have to reaffirm how much I like this game. In both the child and adult forms. I think it’s a great game for kids because it’s quick, it’s easy to understand, and it promotes logic, problem-solving thinking. I think it’s a must-have if you have kids, or if you like quick games.
P.S. I know I borrowed the History section (and the winning section) from the previous Mastermind post, by they were still applicable, so please don’t be grumpy!
Is what my mum and grandma used to say to me when I was small and doing puzzles (I love puzzles, for the record, but I wasn’t a particularly patient child) and the piece I wanted to put in a certain place didn’t fit and I’d just stubbornly push it, trying to bend it to my will. Eventually one of them would intervene though, to stop me from destroying the puzzle.
Fortunately, Blokusisn’t a puzzle in that way. But it is a rather good, simple abstract strategy game.
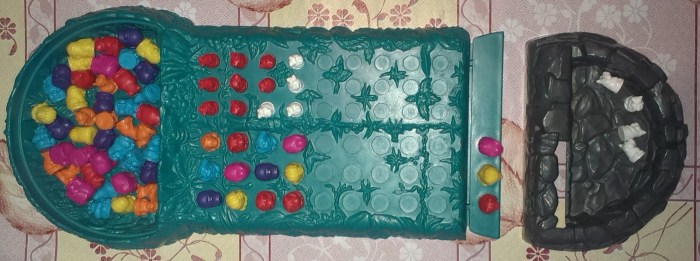
What’s In The Box:
Grid-Patterned Game Board
Game Rules
Four-Coloured Game Tiles
Playing The Game:
Objective: To play all your tiles onto the board.
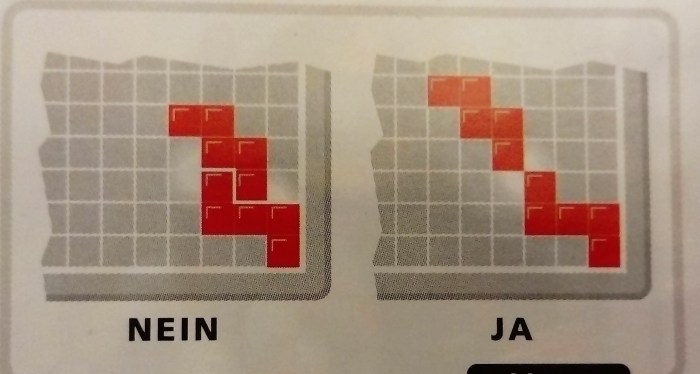
Blokus is a very straightforward game. Every player chooses a colour and takes all those pieces. Players then take it in turns to place one of their coloured pieces onto the board starting from the corner closest to them. However, pieces cannot be placed with the flat edges touching, but must be places point to point, as you can see in the picture below:
It may be noted that I’m using German rules for the game currently – that’s because I’m in Austria, so any photos of rules posted may not be in English.
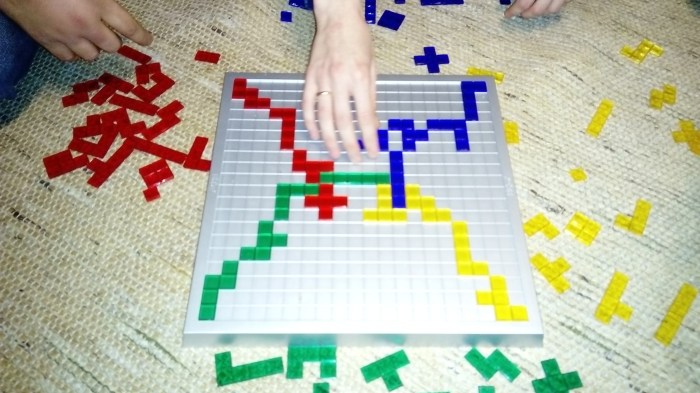
The idea is simply to manage to play all your pieces without getting blocked in by other players. With less than four players this game is very easy. Everyone usually manages to play all their tiles without any problems. However, with four people it does get more challenging, especially when you get closer to the end of the game.
I realize that the above is a pretty bad picture, but you can clearly see that the green and blue players have managed to create a kind of blockade in the middle of the board. I don’t have a picture, but this was quite problematic for the green player later in the game as they effectively sealed themselves off from one part of the board.
Strategy!
This game does require you to think a few steps ahead, as the further into the game you get, the harder to have to think about where you’re putting your pieces, and which way around is the best to place them. In my opinion the best strategy is to get rid of the biggest, most awkward-shaped pieces as quickly as possible, as these are the pieces that will really be difficult to get rid of when the board is fuller. On top of that if you can manage to get through to every section of the board then you’re doing very well. The more places you can reach, the more likely you are to be able to put down every tile. The best way to develop a tactic for this game is to just go for it. Play, watch your opponents, and give a reasonable amount of consideration to each of your moves.
Winning The Game!
It is possible for every player to win this game, so it may not be as appealing to some people, but to be honest I consider it more of a personal challenge to get all my pieces down. However, if no player is able to lay all their tiles then the player with the fewest squares (once counted up from their remaining pieces) left not on the board is declared the winner.
History and Interesting Things:
Blokus was first published in 2000, the inspiration for it was most likely the very popular retro game Tetris.
Between 2002 – 2005 it won five awards and was nominated for two others.
There is also a Solitaire version of the game where one player tries to get rid of all the pieces in one sitting.
To Conclude:
I rated the game 4.5 because although it’s very well thought-out and easy to understand and play, I think the 3/2- player variations are too easy. If I were developing the game I would add some kind of additional “2-3 Player Challenge!” to the game, so that it could be played in the original form, or with, for instance, white tiles randomly placed around the board in a few places that add an extra dimension of challenge to the game. Something like that. It seems to me that there’s room for improvement.
Having said that, I recommend this game. It’s quick, it’s easy, it’s good, old-fashioned fun!
In this classic variation of Pairs, the simple memory game Teddy Memoryis a cute and child-appealing version of the game, with adorable teddy cards.
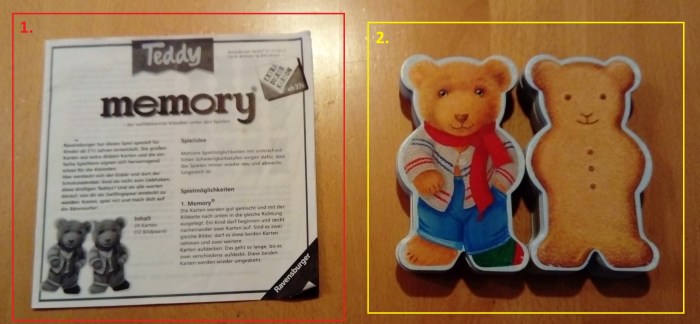
What’s In The Box?
Multi-lingual rulebook
24 Teddy cards (12 pairs)
Playing The Game:
Objective: To have the best memory and so collect the most pairs before the end of the game.
In normal Pairs there is only one way to play the game: you shuffle the cards and lay them all out face-down on the table. You then take it in turns to flip over two cards. If they match you can keep them and take another turn. If they don’t match you have to turn them over again and it is the next players turn. In Teddy Memory Ravensburger have suggested two additional ways to play this game, which are both interesting.
The first is this: Reaction Memory
I’m going to write here exactly what they wrote in the rulebook. “Shuffle all of the cards and place them face down in the same direction. The first player turns over one of the cards and leaves it face up. The next player then does the same, and the game continues in this manner until two matching cards are revealed. Then it’s up to the players to react – the first one to call out what the picture on these cards is takes them as his or her own. The game then carries on as before. The game is over when only two cards are left on the table. The player with the highest number of pairs is the winner.”
The second variation is: Describing Pictures “The Memory cards are shuffled well and placed face up on the table. One player chooses a card, describes it and then passes it on to the next player. The second player chooses the matching card from the table and keeps the pair. This player then chooses a new card and describes it before passing it on to the next player. The game is over when all the cards have been collected. There is no winner in this game.”
These are all simple and I don’t think they really need any extra explanation, so I’m going to go straight to the next part of the post.
Strategy!
Well, this is a game for children aged 2 and a half – 5 so there’s not much in the way of strategy. For the classic version of the game the best way to play is really to concentrate on what other people are turning over. I find that to collect a lot of pairs you should first turn over a card that you haven’t seen the other side of, and then try and remember if its pair has already been turned over somewhere. If it has, pick that one out, and if it hasn’t, turn over another random one to see if you can get lucky.
That’s basically it. Concentrate hard and you might be able to win. But also maybe not, that’s the beauty of simple games.
History and Other Interesting Things:
To be totally honest, this game is really old but it’s almost impossible to date it or to know anything interesting about it except that there’s hundreds of variations of it, with Bears, Disney Princesses, Barbie, Happy Families, Farm Animals… The list goes on.
Further Reading and Other Editions of the Game:
This is possibly the easiest game to find variations of ever. Online there are regular memory games, number memory games, letter memory games… Some more challenging and obviously educational than others, but fundamentally all the same.
Conclusion:
This game is great for kids, and for adults. It’s so simple that the rules have no ambiguity to them, and you can even make your own version of this game at home using paper and pens if you don’t have a properly published version. It’s also quick and straightforward, so although it’s always possible to get frustrated at a game I believe that this one generally remains fun and light-hearted. If you’ve got kids and you haven’t played this game with them you should get a copy, especially as it really helps them focus, therefore improving their concentration and memory skills from an early age.
So since my last update post I’ve successfully posted…. 1 game.
This is a little underwhelming I know. But I have been formulating a plan in the time since then, and I promise it doesn’t involve every second post being an update! The first part of the plan involves my sister, Bex, blogging about books over at anarmchairbythesea, and Terry Pratchett, well-known author of the Discworld series of books, among other things.
The second part of the plan involves Christmas!
A little explanation is in order? Perhaps.
I don’t want to say too much in case of two things;
I fail epically at making any of this happen, OR,
I fail at making you (the reader) excited about it, and therefore unlikely to return to read the fruit of these plans.
Part 1:
A basic sum-up of the plan can, however, be given. The part involving Bex goes like this: she’s organizing and partially hosting a Discworld Readathon or ‘Discworldathon’ (as she’s taken to calling it) on her blog, starting in January and continuing for one full year with each month having a Discworld-novel theme.
Since Terry Pratchett also authorized the creation of several board games based on the books, which we have already reviewed on this blog (the reviews can be read here) we thought it could be a nice idea to tie in the Discworldathon with some kind of replay or re-enjoyment of the related games. As of now we’re not 100% sure what the best way to work this out is, but we’re theorizing and planning and scheming and such, and we’ll undoubtedly come up with something.
Part 2:
This is the part of the plan involving Christmas. As some avid and dedicated readers may remember we did a series of posts entitled “Twelve Games of Christmas” in 2013. These, based on the statistics of the site, were quite popular. So I intend to bring them back this year. I’m hoping to be organized enough to make this possible, and I’ve already compiled a list of potential games to use for this.
That about sums up everything that’s in the works at the moment, and my hope is that even if posting is sporadic there should be a decent amount of posts going up around Christmas and some definite ones happening in the New Year in connection to Bex’s Discworldathon.
That’s everything for now, and I sincerely hope that my next post is not an update!
Ever wanted to go travelling, but just didn’t have the time? Ever wanted to become a friar but you were too female to join a monastery? Well inVillageyou can fulfill all of those unfulfilled life dreams that you may have had any time in your life. Take control of four generations of one family to make your all dreams come true! (Okay, maybe I’m lying about all your dreams coming true, but it’s still good fun, okay?)
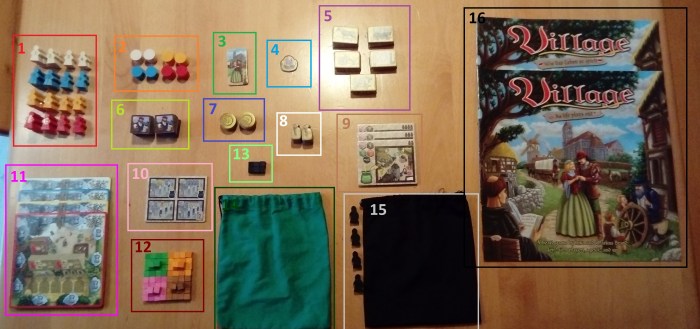
What’s In The Box:
44 Family Members in four colours
32 Markers in four colours
1 Starting Player Marker
1 Next Starting Player Marker
40 Goods Tiles
24 Customer Tiles
15 Coins
20 Bags of Grain
3 Setup Cards
1 Mass Overview Card
4 Farmyards
72 Influence Cubes (Brown, Pink, Orange, Green)
6 Plague Cubes (Black)
1 Green Bag
1 Black Bag and 4 Black Monks
2 Rule Books (German and English)
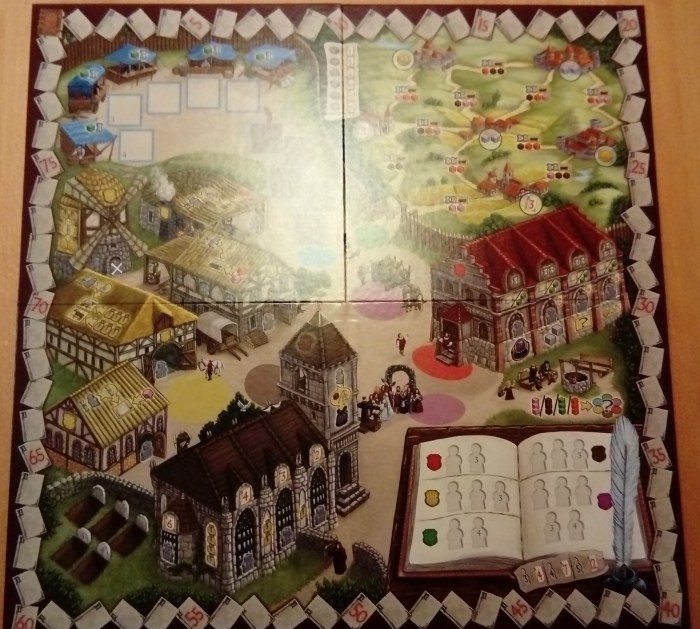
1 Game Board
Playing The Game:
Objective: To efficiently manage the lifespans of each of your family members so as to gain the maximum number of prestige points.
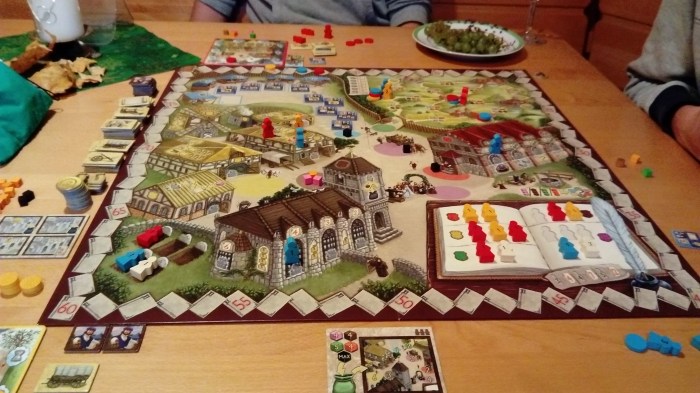
To start the game each player chooses a family, and is given a farmyard, one gold coin and all of their coloured markers. One marker is placed on the closed book symbol in the top left-hand corner of the board. Each family has four generations of people. To begin the game only the four people marked with a 1 are placed on the farmyard.
Setting Up The Board:
Once you’ve chosen your family and claimed all of the pieces you need to begin you then follow the instructions relevant to the number of players there are. As you can see there is a big book in the bottom right-hand corner of the board. This is call the Village Chronicle, it’s the dream of all the villagers to have their name written in this book when they die. When playing with less than four players there are spaces there, and in the unmarked graves (bottom left-hand corner) which are marked with a 3 or a 4. These spaces have to be filled with a member of an unclaimed family at the start of a two or three-player game. This helps to control how long the play time of the game is.
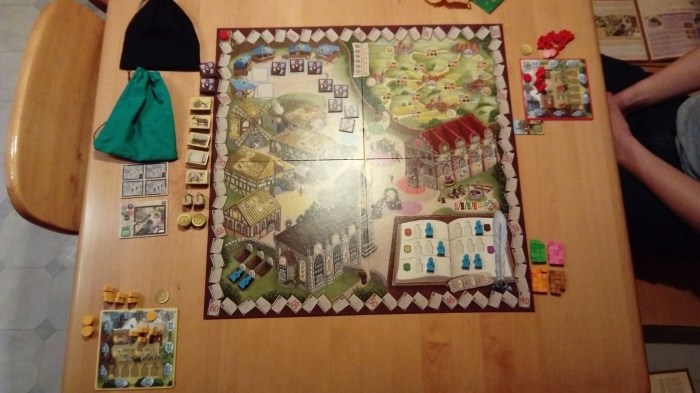
Basic starting setup for two players.
At the start of the game the oldest player immediately becomes first play (you can see the red player in this game has the strange marker with the couple on it next to his farm). This player then takes a pre-determined number of the coloured Influence Cubes from the pool at the side of board and puts them, and all the Plague Cubes into the green bag. These are then drawn at random and used to Seed the board. The Setup Card for the number of players indicates how many cubes should be placed on each coloured patch of the board. Each of these patches represents a potential action that you can take on your turn.
The only other thing left to do now is place customer tiles on the indicated number of marker squares on the board. Once this is done you’re ready to play!
As you can see, Influence Cubes and Plague Cubes have been randomly distributed to the different coloured patches on the board according to the Setup Card and Customer Tiles have been placed in the Market area.
The Rules:
We found that the rulebook for this game is very well written. It’s quite clear what is and isn’t allowed, and there’s very little ambiguity, this makes the game pretty straightforward to play as there’s little opportunity for argument about whether one action is or isn’t allowed.
Taking Your Turn:
This game is quite clever; because each round consists of a few turns for each player – but the actual turn itself is quite short – the game should keep going at a reasonable pace, making the impatient among us much happier as their turn comes round more often. To begin your turn you take an Influence or Plague Cub from the action spot of your choice, the choices are:
Grain Harvest – if you have one or more family members on your farmyard you can perform this action. Take an Influence or Plague Cube from the spot with the wagon on it and then immediately take 2 bags of grain from the supply. If you do not have any family members on your farmyard you cannot perform this action.
Family – when you perform this action a new family member is born! Take a cube from the patch with all the people standing next to it and then take a new family member from the next generation of your family (if you have all of the 1st generation on your farm or the board somewhere then take one from generation 2 and so on) and put them on your farm. Alternatively, instead of taking a new family member from the supply, you can also use this action to recall a family member from somewhere on the game board to your farm.
Crafts – Take a cube from the yellow patch by the workshops. You can now send a family member to one of the workshops to learn a skill. Each workshop will show on it how much time must be spent to train a family member, and then again how much time must be put in to create. Note: the train cost of time only has to be paid once per family member in a workshop.
Market – when a Cube is taken from the blue patch by the market place a market day is immediately triggered. Each player has a chance now to trade at the market. However, only the spaces directly in front of a market stall can be traded with. The player who triggers the market day performs the first trade action and can perform this for free. Every other player who wishes to trade at the market must pay both one time and one green Influence Cube before they can trade.
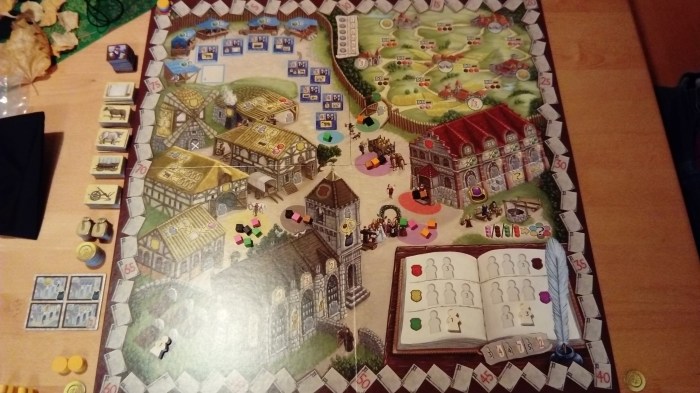
As you can see, we have only traded with the customers who were directly in front of the market stalls. No other customers have been served.
Travel – The green patch near the gate out of the village indicates travel. You can use this patch to send a family member to other villages. This gains you prestige points and other benefits depending on where you go.
Council Chamber – taking a Cube from the red patch by the council building allows you send a family member into the local council. As you train them they gain influence in the council and the benefits you receive from them increase.
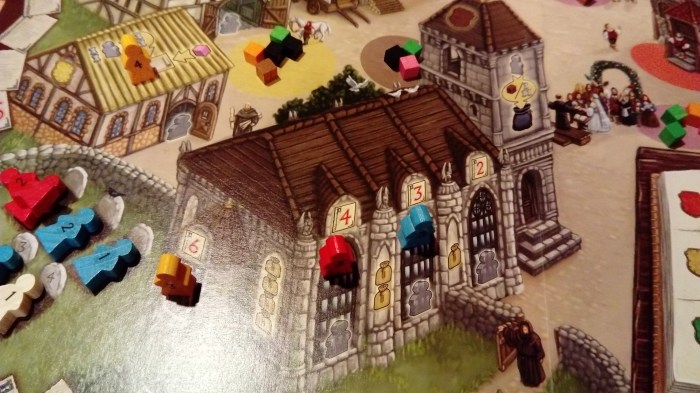
Church – the brown patch nearest the church allows you send a family member to orders. Once sent this family member goes into the Black Bag with the Monks and is not used again until Mass is said at the end of the round.
A Family Member Dies:
As each action costs you time eventually someone will have to pay. On your farm you will see clouds with sand-timers in them around the edge of the farmyard. Each time you perform an action that requires time you must move your marker the requisite number of spaces. Every time your marker passes the bride at the top of your farm, a family member from your oldest generation has to die. When this happens you may complete the action that you were performing fully before choosing which family member to kill.
Note: with the exception of Market Day. If Market Day is trigger by taking a Plague Cube you must immediately pay the 2 time and if someone dies they must be removed from the board before completing the Market action.
It is beneficial to plan which family members will die as there are a certain number of spaces in the Village Chronicle for each profession. Once these are full no other people who die whilst in this occupation can go there and must be buried in the unmarked graves. This is important because you gain Prestige Points at the end of the game for the number of family members in the Village Chronicle, but you do not gain points for any in the unmarked graves.
Here you can see family members in both the Village Chronicle and the Unmarked Graves. Orange and Red have here achieved the most strategic deaths so far.
Ending A Round And Saying Mass:
Once the last Influence or Plague Cube has been taken from the board the round ends once that player has completed their action. At this point Mass is said. Four monks are drawn from the Black Bag to say Mass. If any player has a family member in the bag they are allowed to pay one gold coin to have their family member definitely say Mass. If the players do not pay them those saying Mass are drawn randomly. Any coloured Monks drawn from the bag are placed on the first window of the church, and any black Monks are returned to the bag. Players may now move their Monks further up the church hierarchy by paying the indicated number of Bags of Grain back to the supply. Once this is done the player with the highest number of family members in the church is awarded two prestige points. If there’s a tie then the player with the highest ranking family member wins, if there is still a tie then the tied players all receive two Prestige Points.
Here, Orange has paid the most grain and been made Abbot in exchange. Red is a senior Monk of some sort, and Blue is sadly just a Novice still.
Once Mass is ended the board is re-Seeded and a new round begins.
Ending The Game:
The game ends once either all the spaces in the Village Chronicle or the unmarked graves have been filled.
Winning The Game!
At the end of the game Prestige Points from all the different aspects of your life in the village are added up. The player with the most Prestige Points wins!
Note: The board is clearly marked with which actions will give you more Prestige Points when continued with for longer periods of time.
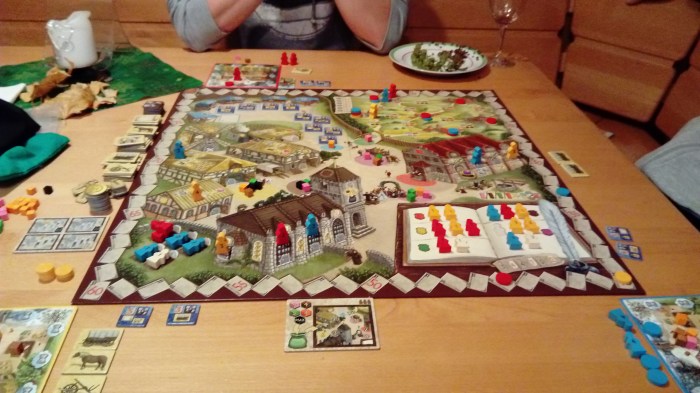
Red is victorious! Orange not far behind, and Blue seriously lacking in Prestige…
You can see that the score has been added up by moving each players coloured counter around the track on the edge of the board. Red has won, but not by much!
Strategy:
There are several different strategies that can be adopted for this game. The one I played (I was orange) was to try and have family members in as many different professions as possible, so as to be able to spend a lot of time and have them in the maximum number of available Village Chronicle spaces. I gained a lot of Prestige Points from this. The other aspect of my plan was to try and get reasonably high in the church, as you get points from this, and to have traveled a reasonable amount, for the same reason. I didn’t win the game though, the winning strategy was to build things using the Crafting action and to travel as much as possible. Although this strategy won, it only just won, so it would be worth playing again and seeing if I can alter my strategy a little to make it the winning one!
Both of us playing used the Market action. I had more Market points and I know from a previous time we played this game that if a player is focused enough it is also possible to win using only the Crafting and Market actions. But this requires serious dedication and single-mindedness.
Tactically it is also worth triggering a Market Day when you can trade but you know no-one else can. Even if you only have one thing to trade. You may only get a few points for this action, but no-one else gets any, which gives you a bit of an edge.
History and Interesting Things:
Between 2011 – 2014 this game won 7 awards, and was nominated for 14!
It’s set in a kind of 1700’s era Village.
To be honest, the game was only published in 2011 and doesn’t have much extra-curricular information about it, so I’m going to have to fail at giving any extra points here!
Further Reading and Other Editions of the Game:
This game is still relatively new – only five years old – but it has four expansions:
As you can see, I have actually had very little to write about the history or background info to this game, but having said that, I would recommend the game. It’s not particularly complicated and it’s good for a chilled-out afternoon with family or friends. It’s also great for playing with friends who like board games, but aren’t fanatic enough about them to spend more than about 2 hours playing one. I particularly enjoyed it because you can explore so many different ways to win. Having played the game twice in the last three days I can say that at the moment one of the strongest win-strategies seems to be trying to travel to all six of the other towns.
It’s been five days shy of two years since a new post went up on here, and it’s definitely time to refresh this space. A lot has happened in the two years since we’ve posted anything. The most key of these things being that Dave and I no longer live in the same country, making writing a blog together somewhat more challenging.
However! Given that I currently have a decent amount of free time I’m going to try and start posting again. Dave will still be helping, but in a purely administrative kind of way, so if you liked his posts more than mine, unfortunately you’re out of luck.
I have the good intention of posting my first new post next Monday evening. Fingers crossed I can keep to that. We used to post regularly on a Monday evening, but although I would like to be able to post once a week again, realistically I don’t know yet whether or not I can organize enough people here in Austria to make this possible.
But in the interests of keeping update posts short and sweet watch this space next Monday evening for a post about a pretty good game called Village.
The rules of the game tell us a brief history of this battle; June 6th, 1944.
It was felt by the Allies that the position the Germans held on top of the cliffs at Pointe-Du-Hoc was too strong. They had guns with them that could, from the top of the 100 foot cliff, accurately hit anything attempting to land on the beach.
The Second Rangers (an American unit formed specifically for this mission), under the command of Colonel James E. Rudder were assigned to stop them. After a difficult landing, under heavy fire from the Germans they managed to reach the top of cliffs. Here they found that the guns had been withdrawn from their stations several days beforehand and only dummies left in their casements. One Ranger patrol went south searching for the missing guns.
Two concentrations of Germans had remained; one in the south-west antiaircraft bunker, the other in the observation bunker. Despite repeated attacks these resisted and were the most dangerous of the German forces in the area.
The single Ranger unit finally found the guns sitting quietly, unguarded, in an apple orchard inland. They placed incendiary devices inside them and completed their mission.
Pointe-Du-Hoc
The Steup.
Strategy:
Allies:
Landing on the beach puts you at a fairly strong disadvantage to the Axis player; you’re in the sea, which gives you movement restrictions, and retreat penalties, but you get six command cards and you move first, so it’s not all bad.
You have to factor in that you cannot scale the cliffs in one move, the special rules for this scenario state that you must use two moves, to scale a cliff from the beach side.
However, your units are Rangers, so they can all move two hexes and still battle, which is a big advantage, and makes life much harder for the Germans.
The victory condition is four medals; we found that the most promising way to achieve this was to storm straight up the middle and try and take out the units in the sandbags, plus the left-hand one in the bunker. Then capture medals at the back to win. You should also try and do this as quickly as possible.
In this scenario I would say that keeping your units pretty close together was probably a better bet than spreading them thin, simply because the victory condition in not so high as in other scenarios, and it’s easier to outgun a unit if you’ve several of your units attacking them.
Axis:
You get the fun of defending in this one. Dave and I did have a bit of a debate about whether or not it was more advantageous to stay in the bunkers and let the Allied player come to you, or to go out and meet them. We played it both ways.
You’ve got a bit of an interesting set up, on the top of the cliff. You’re position is very good defensively, but a little annoying until the Allied player has moved a fair few of their units.
You’ll probably find that although you can attack maybe on or two of their units, you can probably only do so with one battle die, which is an incredibly tedious (although completely acceptable, and sometimes necessary) way of destroying a unit
My main comment for this one is to not (if possible) let your enemy destroy your artillery. Because of its range this unit is incredibly useful, but annoyingly, also fairly easy to obliterate if an enemy unit gets close enough. PROTECT IT. That’s what your unit in the bunker on the point is for – to stop anything getting to your artillery.
General strategy point: be aware of the spread of your units in relation to your command cards. It’s very unwise to bunch all your units in one section of the board, as there may come a time when you have no command cards relevant to that section, which renders your turn useless and gives your opponent the upper hand.
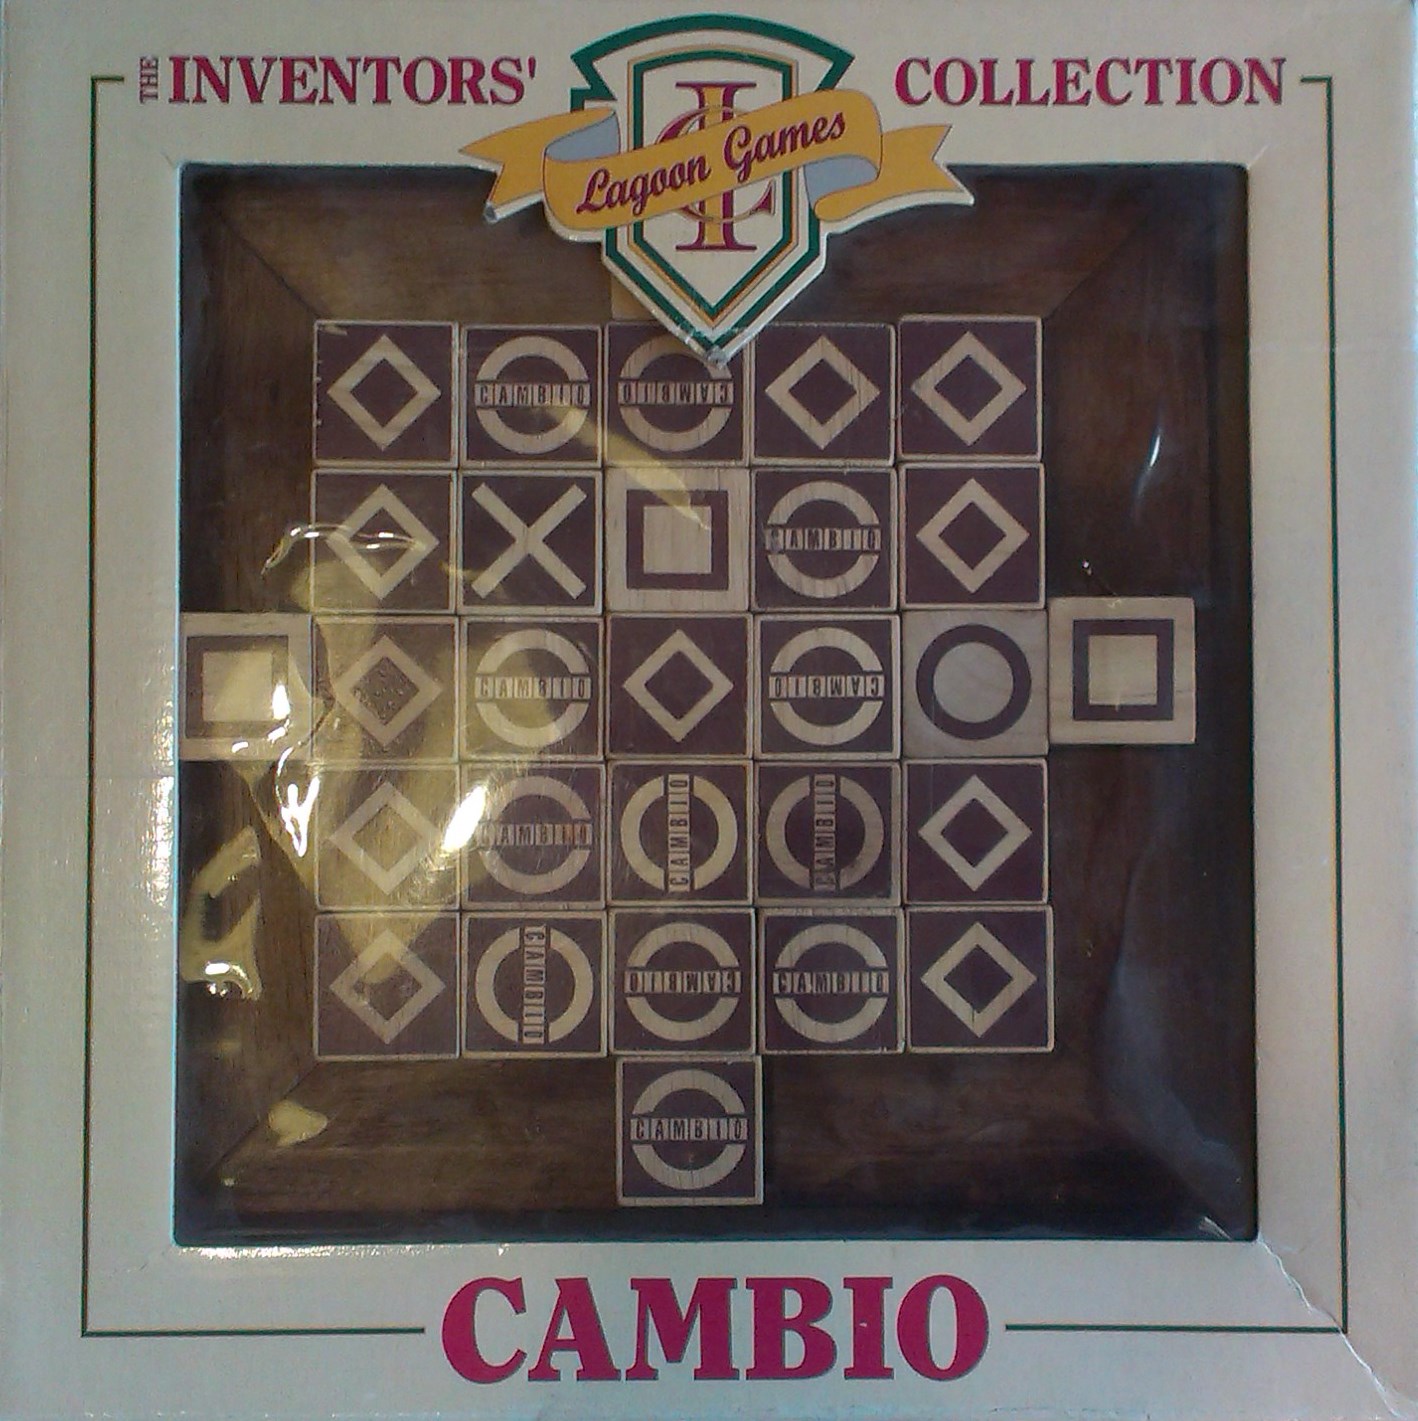
Cambio, similarly to Quarto!, is a complicated or ‘thinking mans version’ of Tic-Tac-Toe (Naughts and Crosses). For this review we’ve done another video. The video covers all our normal sections except ‘History and Interesting Things’ so check it out below:
History and Interesting Things:
There are only a couple of notable things about this game and they are:
The game was invented by Maureen Hiron in 1996. She is a very successful game inventor and know for inventing several other games including: 7 Ate 9, Continuo and Qwitch.
The word Cambio means exchange.
To Conclude:
Like we say in the video we like this game, the design of our specific issue of it could be better but apart from that its a fun and fairly simple strategy game thats not too long to play but not so fast you miss what just happened.